IIoT connector
Overview
The IIoT Connector is an MQTT client that can establish a connection to an MQTT broker. As soon as the connection is established, the IIoT Connector can publish or subscribe to messages.
Different systems can be connected:
MQTT JSON can connect to MQTT brokers that support JSON payloads in MQTT versions v5 or v3.1.1 (e.g., Mosquitto or HiveMQ)
ResMa® (Weidmüller Energy and Process Data Software)
Azure IoT Hub
MQTT (deprecated) can connect to MQTT brokers, but has a fixed payload and will be removed from the product in 2027.
Connector overview
Overview for managing existing connectors and entry point for adding new connectors.
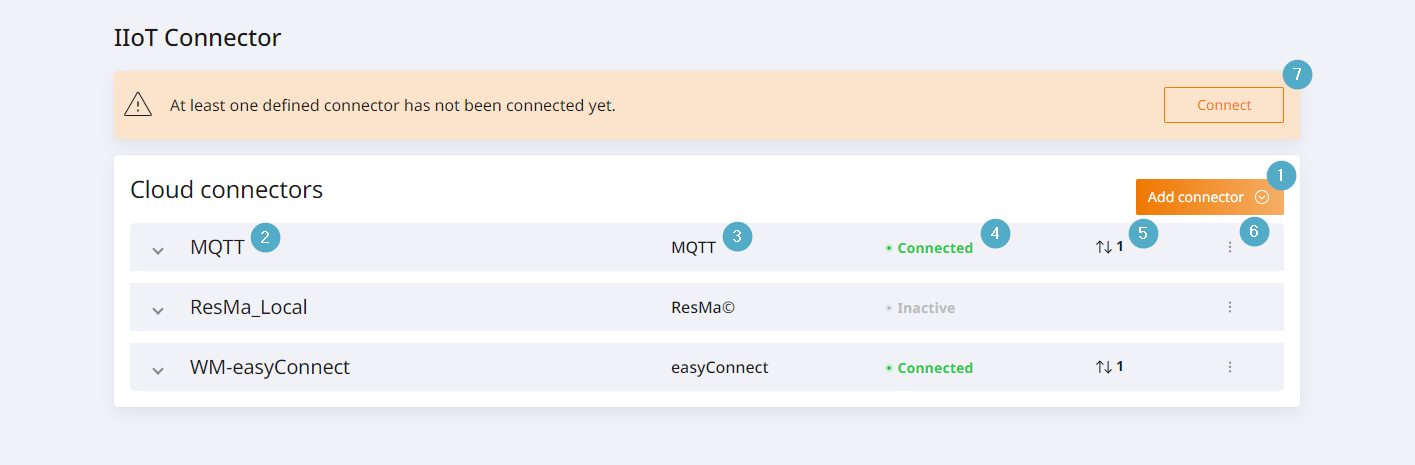
Add Connector: The starting point for adding a connector. Clicking this opens a dialog where you can select the destination to connect to. You can choose from Azure IoT Hub, ResMa®, or an MQTT broker.
Name: Name of the connector in the overview. The name is selected by the user when adding. Subsequent editing is not possible.
Target: Target type to which the connector is connected. For example, Azure IoT Hub or MQTT.
Connection status: Current status of the connection. Here you can see whether the connector is connected to the target or inactive. Licence information is also displayed here.
Message overview: Number of messages sent and received.
Options menu: Entry point for options of the respective connector such as Connect, Edit or Delete.
Global connection indicator: The global connection indicator appears if at least one existing connector was unable to establish a connection to its target.
MQTT JSON
MQTT client with configurable payload in JSON format.
Communication
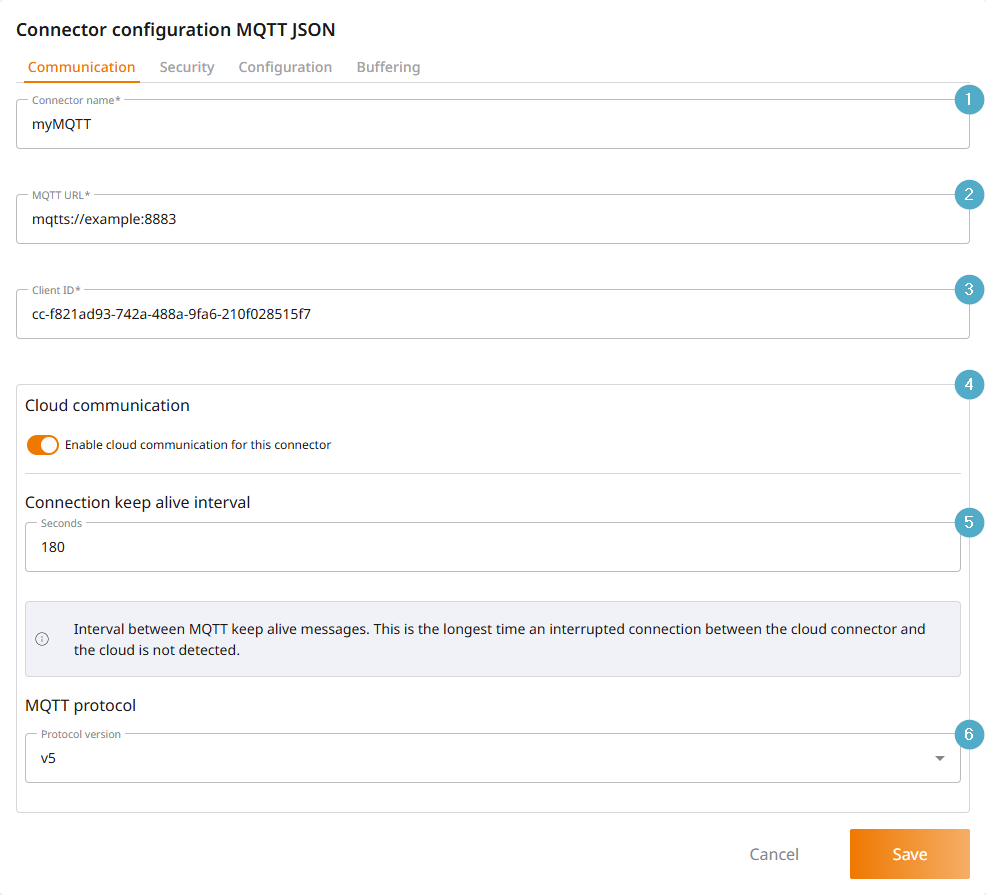
Connector Name: Unique name of the connector. Displayed in the overview. Can be changed later.
MQTT URL: The URL and port of the MQTT broker to which a connection should be established. Depending on the encryption method, the URL must be prefixed with either
mqtt://ormqtts://.Example:
mqtts://example:8883
Client ID:
Cloud communication: If deactivated, no values can be received or sent outside of your own network.
Keep-Alive Interval: This interval determines how often a ping signal is sent to maintain the connection to the broker (default: 180 seconds). A shorter interval increases connection stability, while a longer interval reduces network load.
MQTT Protocol: Protocol version. The version must be set to match the MQTT broker you are connecting to. The version determines the status codes used in communication between the MQTT client and the MQTT broker.
Security
This tab is used to configure the authentication mechanism. A production connection should always be encrypted.
The MQTT Connector supports both MQTT and MQTTS. To use MQTTS, the following settings must be taken into account:
The URL of the MQTT broker in the Communication tab begins with
mqtts://.The default port for MQTTS in the Communication tab is 8883:
mqtts://[Broker_URL_Goes_Here]:8883.Certificate files are stored in the Security tab.
The
Enable Client Certificatessetting in the Security tab is enabled.
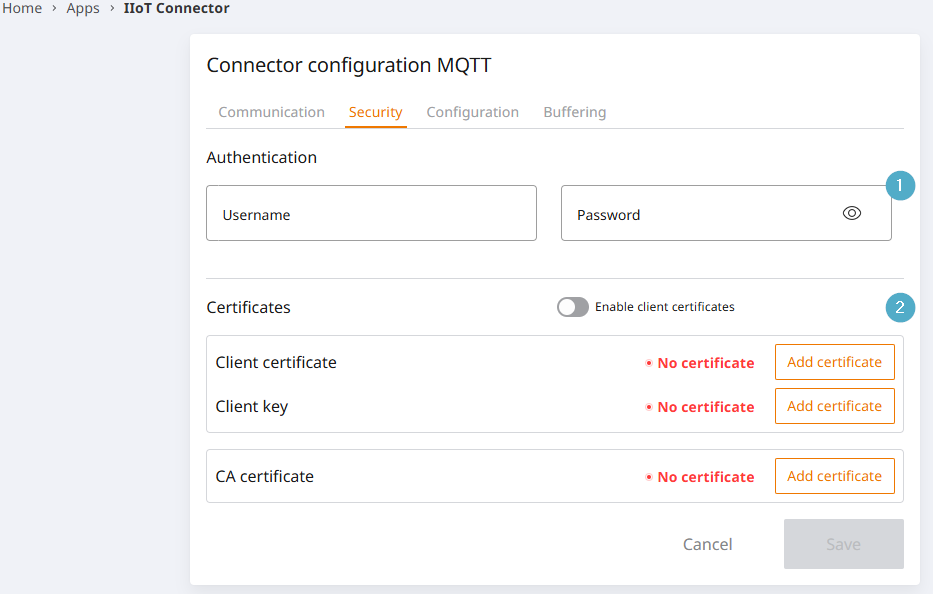
Authentication: Valid user and password for the connector.
Certificates: Activate client certificates and upload them using the button.
Configuration
In this tab, you can configure the Birth Message, Death Message, and Last Will.
Birth Message: The Birth Message is sent after a successful connection is established with the MQTT broker.
Death Message: The death message is sent before the connector logs out of the MQTT broker.
Last Will: The Last Will message is sent if the client unexpectedly loses its connection.
For more configuration details, see Quality of service (QoS) and Retain.
The following variables can be used in topics:
Device ID, notation
{device_id}Client ID, notation
{client_id}
Example
Configuration:
{device_id}/{client_id}Message:
AX9S14PC7600015/cc-f821ad96-742a-489a-9fa8-210f068507f1
Buffering
When using the IIoT connector, the buffer ensures that messages can be delivered correctly even under unstable network conditions or in the event of brief connection interruptions.
How the buffer works
The transmission of messages is continuously monitored by the IIoT connector.
If a message cannot be sent, a message buffer is set up.
The size and storage medium of the buffer are determined by the Buffering configuration.
The first message that could not be sent is placed in the buffer.
All further messages are added to the buffer queue in sequential order as long as there is no connection to the destination.
If the maximum number of messages is exceeded, the oldest message in the buffer is overwritten by the newest message.
As soon as a connection to the destination is reestablished, the buffer is processed.
Processing is carried out sequentially from old to new.
If new messages arise while the buffer is being processed, they are added to the buffer until it has been completely processed.
The buffer is closed after the queue has been completely processed, and messages are transmitted directly again.
Treatment of messages with Quality of Service 0
By definition, the delivery of a QoS 0 message is not guaranteed.
With a QoS of 0, the message is transmitted at most once.
With QoS 0, the MQTT broker does not send an acknowledgement to the sender confirming that the message has been received.
Messages transmitted with Quality of Service 0 (QoS 0) are never buffered.
For further details, see Quality of service (QoS).
Default values
New connectors are created with the following buffer configuration:
Number of buffered messages: 1000
Buffer type: RAM
Buffering configuration
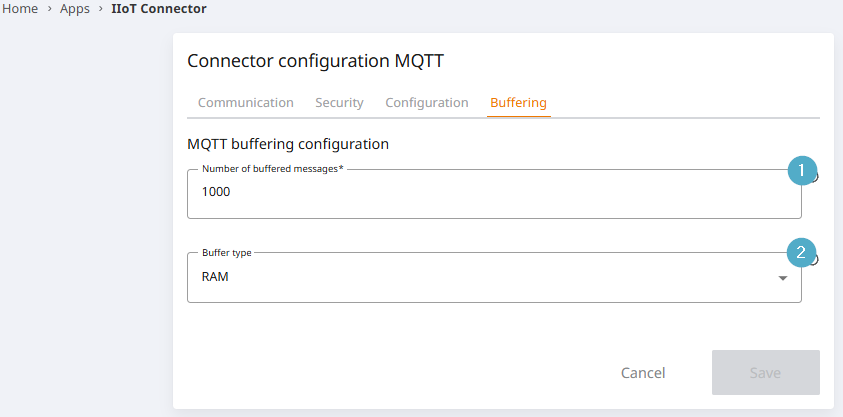
Number of buffered messages: This option determines the size of the ring buffer. If this size is exceeded, the oldest message is overwritten by the newest message. Select the number of buffered messages based on the requirements of your application and the available hardware. Depending on the type of buffer selected, ensure that the hardware has sufficient RAM or hard disk space.
Buffer type: Buffering can be stored temporarily in RAM (main memory) or persistently on the file system.
RAM: More powerful than persistent buffering. Suitable for use on controllers and gateways. When the service or device is restarted, the buffer is irretrievably discarded. The RAM usage of the device must be specifically taken into account during configuration.
Persistent: Buffered messages are retained when the service or device is restarted. The persistent memory must be sufficiently dimensioned. The buffer process results in a large number of write cycles on the file system, which may affect the service life of the hardware.
Quality of service (QoS)
Quality of Service (QoS) in an MQTT client determines how messages are transmitted between the client and the broker. There are three QoS levels: 0, 1 and 2. Each level offers a different balance between reliability and performance. QoS levels
QoS 0 - At most once
Mode of operation: The message is sent once without the sender receiving confirmation from the recipient. There is no guarantee that the message will be received.
Performance: Highest performance, as no confirmations are necessary and the transfer only takes place once.
Use case: Suitable for non-critical data where reliable delivery is not important, e.g. sensor data that is updated frequently.
QoS 1 - At least once
Mode of operation: The message is resent until a confirmation is received from the recipient. However, it can happen that the message is delivered several times.
Performance: Medium performance, as the transmission may be repeated.
Use case: Suitable for applications where the message should arrive in any case, but multiple delivery is tolerable, e.g. payment orders or status updates.
QoS 2 - Exactly once
Functionality: The message is guaranteed to be delivered exactly once. This is achieved by a multi-stage handshake process between sender and recipient.
Performance: Lowest performance, as several communication steps are necessary to prevent double delivery.
Use case: Ideal for critical messages where double delivery is not acceptable, e.g. when transmitting order data in an ordering system.
Note
The choice of QoS level should be made depending on the specific requirements of the application in order to achieve an optimum balance between reliability and performance.
QoS 0: Maximum once - High performance, no guarantee of delivery.
QoS 1: At least once - balance between reliability and performance.
QoS 2: Exactly once - Highest reliability, lower performance.
The choice of QoS level should be made depending on the specific requirements of the application in order to achieve an optimum balance between reliability and performance.
Retain
Configuration option: Retain option in the MQTT client
The retain option in an MQTT client determines whether a message is stored (‘retained’) on the broker so that it can be sent to future subscribers. This influences how the broker deals with new subscribers who log in after the message has been published.
Retain option activated
Behaviour: If the Retain option is enabled, the broker will save the last message sent for each topic that they relate to. This saved message is then automatically sent to all new subscribers as soon as they subscribe to this topic.
Use case: Useful if subscribers should always receive the latest information, even if they log in after the original publication. For example, if the current status of a system (such as temperature or online status) must always be available.
Retain option deactivated
Behaviour: Without the Retain option, the message will not be saved on the broker. New subscribers will only receive messages that are published after their registration. Earlier messages will not be delivered.
Use case: Suitable for data that is only relevant in real time, such as continuously updated sensor data where it is not important to know the last message.
Note
The choice of whether to enable or disable the retain option should be based on the needs of the application, in particular whether new subscribers need to access the last known state or not.
Retain option activated: Saves the last message on the broker and ensures that new subscribers receive it. Ideal for status information that must always be up-to-date.
Retain option deactivated: Messages are not saved; new subscribers only receive future messages. Ideal for real-time data where past information is not relevant.
The choice of whether to enable or disable the retain option should be based on the needs of the application, in particular whether new subscribers need to access the last known state or not.
Data definitions (Topics)
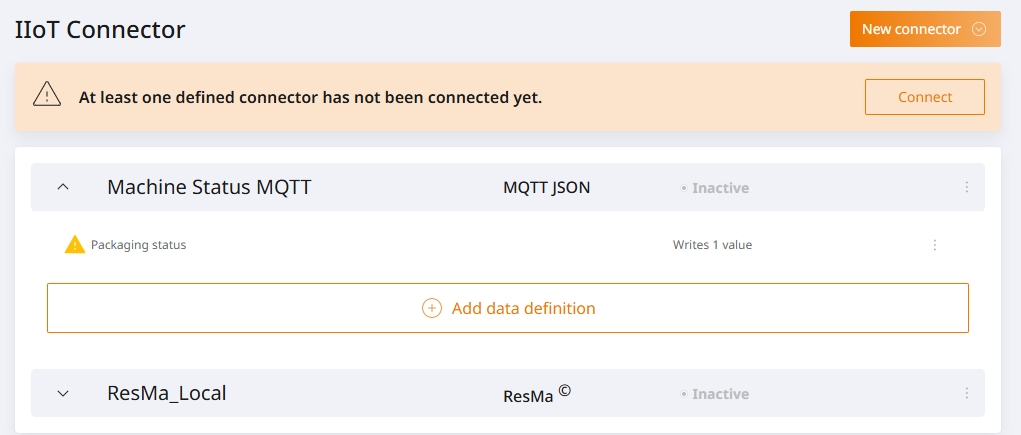
Expanding the connector in the overview displays an overview of the data definitions already created and the “Add data definition” button.
Topic Tab
The MQTT-specific configurations for the topic are carried out in the Topic tab.
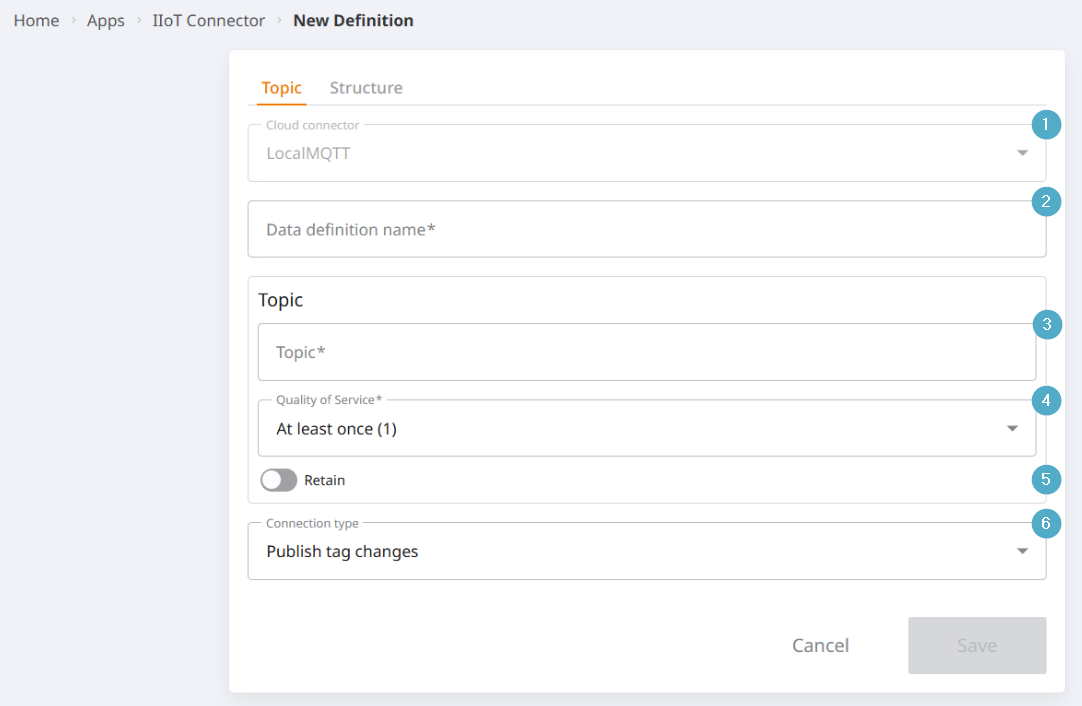
Cloudconnector: Name of the connector. For reference purposes.
Cloud data definition name: Unique name for the topic. Displayed in the connector overview.
Topic: MQTT address path for publishing and receiving messages. The placeholders
{device_id}and{client_id}can be used.Quality of Service: Quality of Service (QoS) for the specific topic. For further details, see Quality of service (QoS).
Retain: Retain configuration for the specific topic. For details, see Retain.
Connection type: Specifies whether the topic is a publish or a subscribe topic. The following options are available:
Send tags on values change (publish): When the connection is established, the entire payload is sent. When a value changes, only the changed content is sent.Send tags periodically (publish): The entire payload is sent when the connection is established. The entire payload is sent periodically.Read tags (subscribe)
Payload Tab
The Payload tab is where the payload is configured. Groups provide a level of structure, tags represent values, and the tags’ Options menu allows their payload to be customised in detail based on their properties.
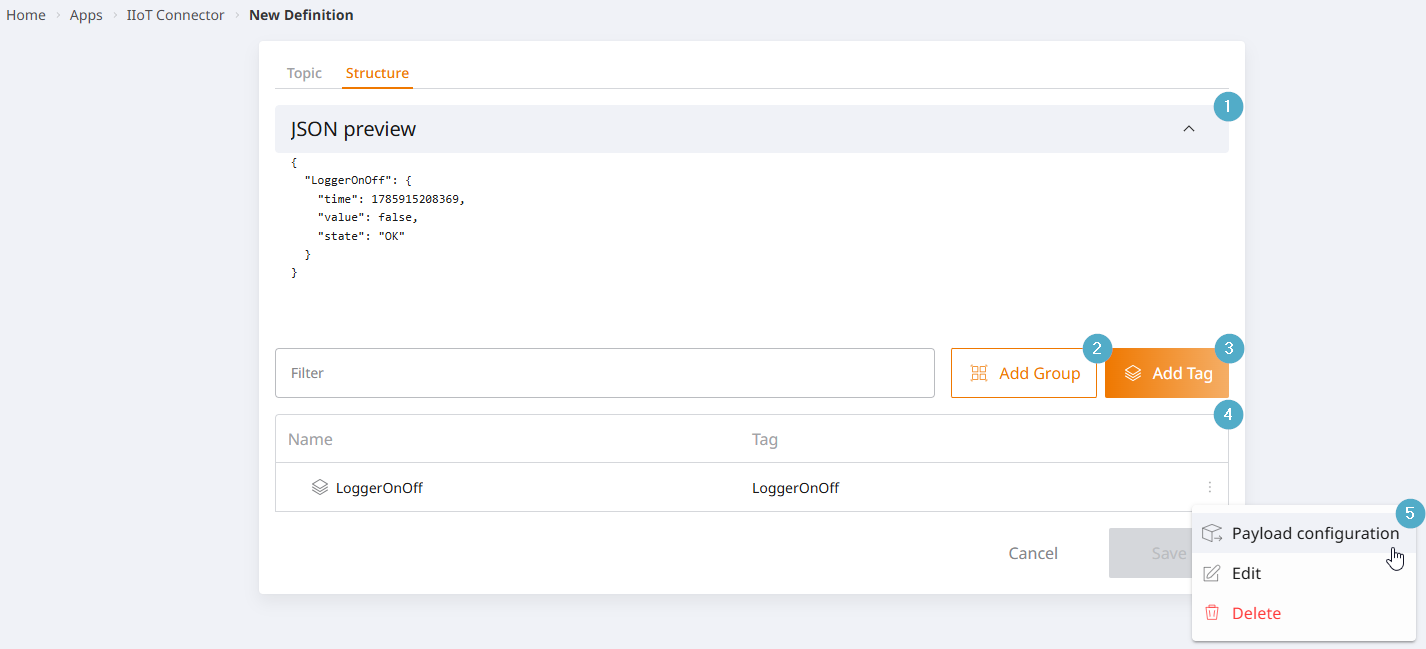
JSON preview: A preview of the payload in JSON format, based on the configuration, including groups, tags and their properties.
Add group: Add a group to organise or nest the payload.
Add tag: Add a tag to publish one or more of its properties or, in the case of a subscription, to describe the properties. For communication purposes, the tag may be given a
Namethat differs from theTag Name. TheNamemust be unique within a hierarchy level, but may appear multiple times in the payload as a whole.Structure Configurator: Groups and tags can be nested within one another using drag and drop. The maximum nesting depth is 10 levels.
Payload configuration: Opens the tag’s property selection. Not available for subscribe topics. The available properties depend on the tag’s data type. Selected properties are added to the payload and can be checked via the JSON preview. By default,
Name,Value,TimestampandStateare sent, as shown in the screenshot.
Configure Subscribe Topic
Subscribe topics allow individual values from the received payload to be written to tags. The timestamp of the write operation is generated in PROCON-Connect and represents the timestamp of the write operation in the tag cache. If the timestamp is to be captured from a received payload, it must be mapped to a separate tag as its value.
If the connection type is set to Read Tags (subscribe), some elements in the Payload tab behave differently:
The
Payload Configurationoption is disabled.The JSON Preview does not display tag properties, but rather
"Name": Value.
Here’s how values from the payload can be written to tags:
In the Topic Tab, set the connection type to
Read tags (subscribe).In the Payload tab, recreate the payload paths from the Subscribe message whose values are to be adopted.
You only need to recreate the subpaths from the root to the relevant information in the payload. The notation must be identical.
The ‘name’ property for the receiving tag must be set so that the name matches the JSON key in the payload. The spelling must be identical.
Payload example
{
   "timestamp": "2026-08-04T14:30:00Z",
   "source": "PLC-01",
   "values": {
      "activePowerKw": 523.7,
      "gridVoltageV": 400.8,
      "gridFrequencyHz": 50.01,
      "breakerClosed": true
   }
}
Configuration example
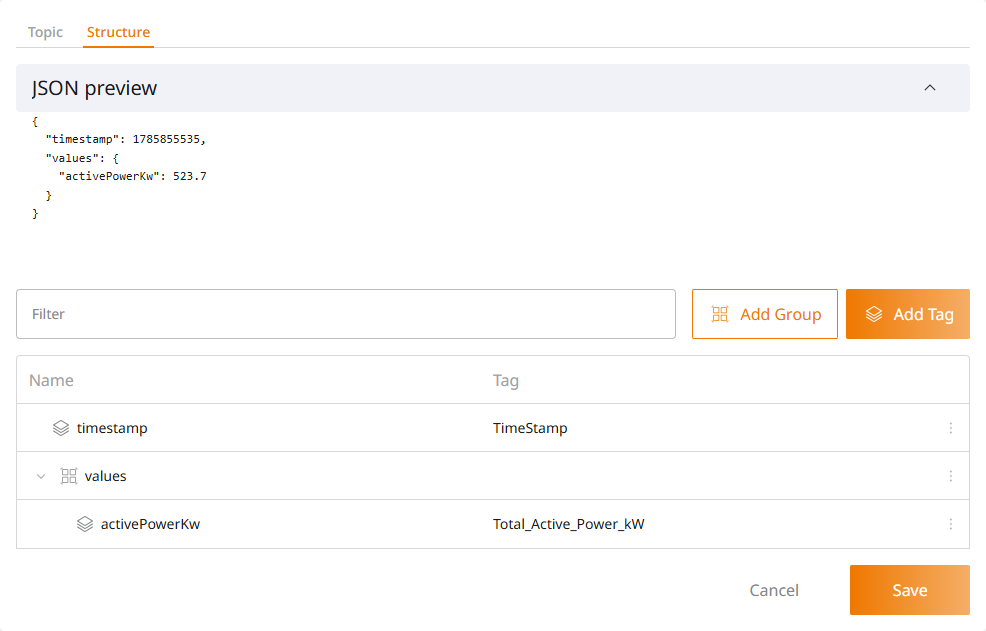
The values timestamp and activePowerKw are to be written to tags. The names of the group and the tags are specified identically.
ResMa®–Connector
Connect to Weidmüller’s ISO 50001-certified energy data management software.
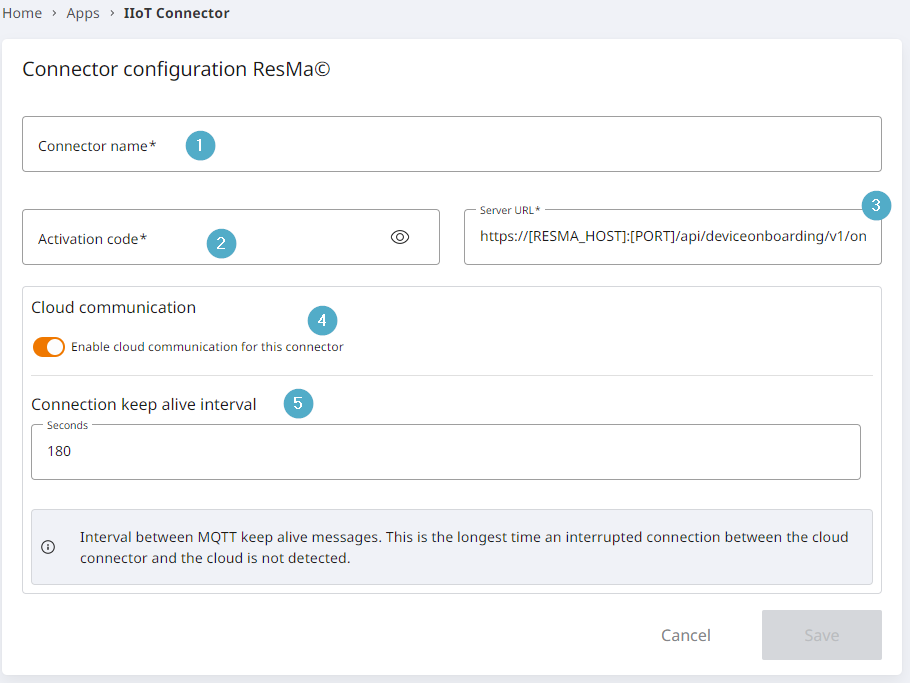
Connector name: Can be freely assigned, but must be unique.
Activation code: This code is used to verify the client’s identity and secure access to the MQTT broker. The code must be generated in ResMa® and entered here. The process for generating the code in ResMa® is described in detail below.
Server URL: For ResMa connections, replace the passage [RESMA_HOST]:[PORT] with the IP or DNS entry of your ResMa server and the corresponding port (default is 8080).
Cloud communication: If deactivated, no values can be received or sent outside of your own network.
Time interval Keep-Alive: The interval defines how often a ping signal is sent to maintain the connection to the broker (default: 180 seconds). A shorter interval increases the stability of the connection, while a longer interval reduces the network load.
Generate activation code in ResMa
To establish the connection between PROCON-Connect and ResMa®, an activation code must be created in ResMa® and then stored in PROCON-Connect.
To do this, carry out the following steps in ResMa®:
Log in to your ResMa® system.
Switch the object tree from the Standard view to the Connector view.
Switch the object tree to edit mode.
Right-click on the location to which you want to add the IIoT Connector. A context menu opens.
Select the New device option in the context menu. This opens the configuration page for the IIoT Connector.
Give the connector a name. This is transferred to the object tree.
Select the activation code from this overview and copy it using the key combination Ctrl + c.
Click on Save to finalise the configuration of the connector.
You can then paste the copied activation code into the configuration of the IIoT Connector in PROCON-Connect using the key combination Ctrl + v.
Data definitions
Data definitions can be added for each of the added connectors. These data definitions can be used to summarise, transmit or read individual or multiple defined values.
Expanding the connector in the overview displays an overview of the data definitions already created and the “Add data definition” button.
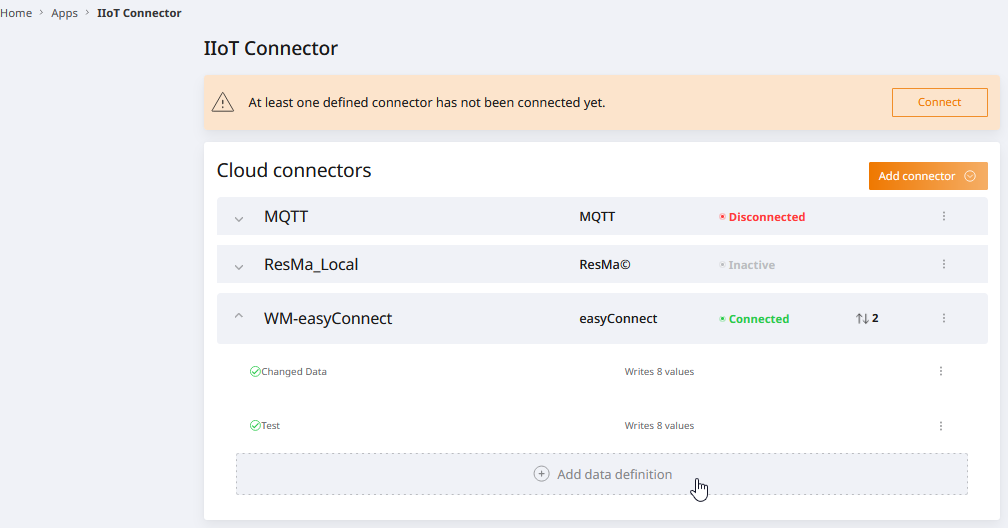
In the following dialogue, the general settings are made first.
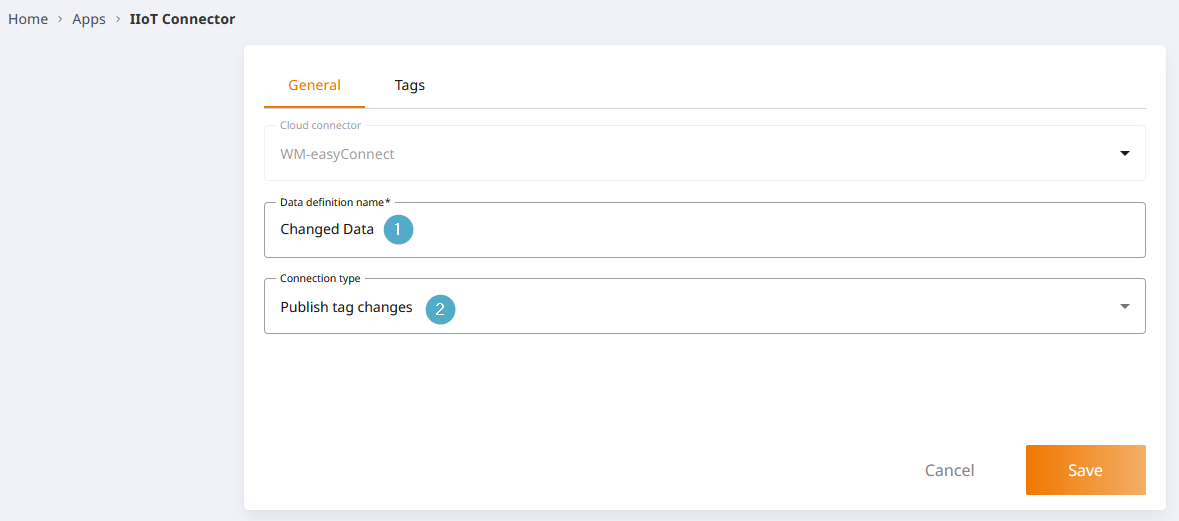
Cloud data definition name: Mandatory, must be unique.
Connection type: Available for selection:
Send tags on value change (publish)
Send tags periodically (publish) > The cycle and the time unit must then be defined here
Read tags (subscribe)
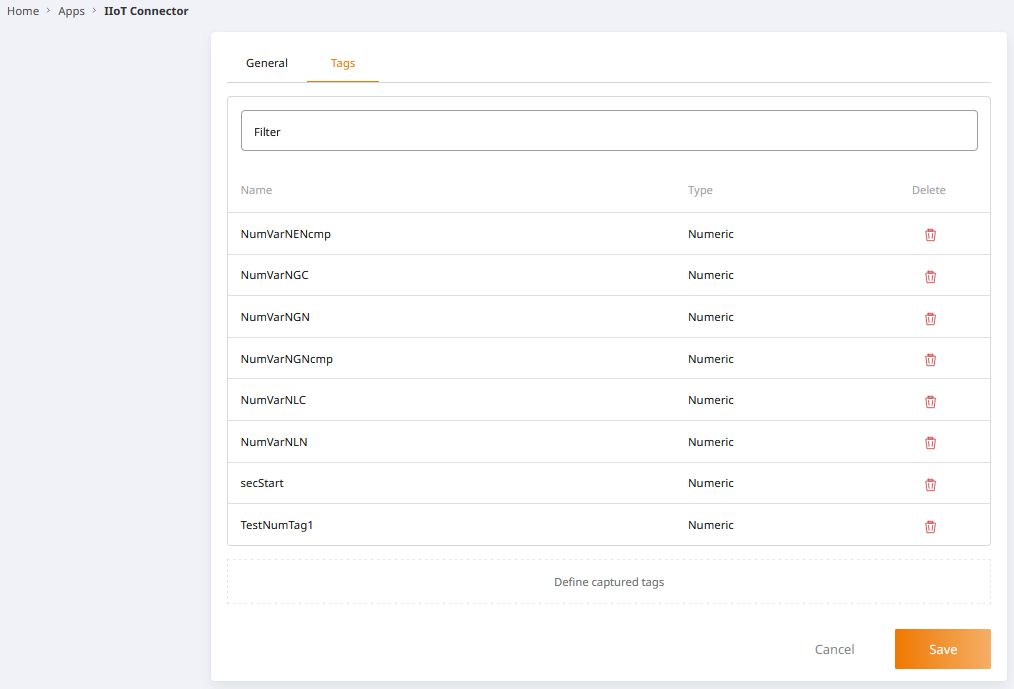
In the Tags tab, you can then select the variables that are to be monitored.
Buffering
See chapter Buffering
Azure IoT Hub
Communication
Basic configurations for establishing a connection are stored in the General tab.
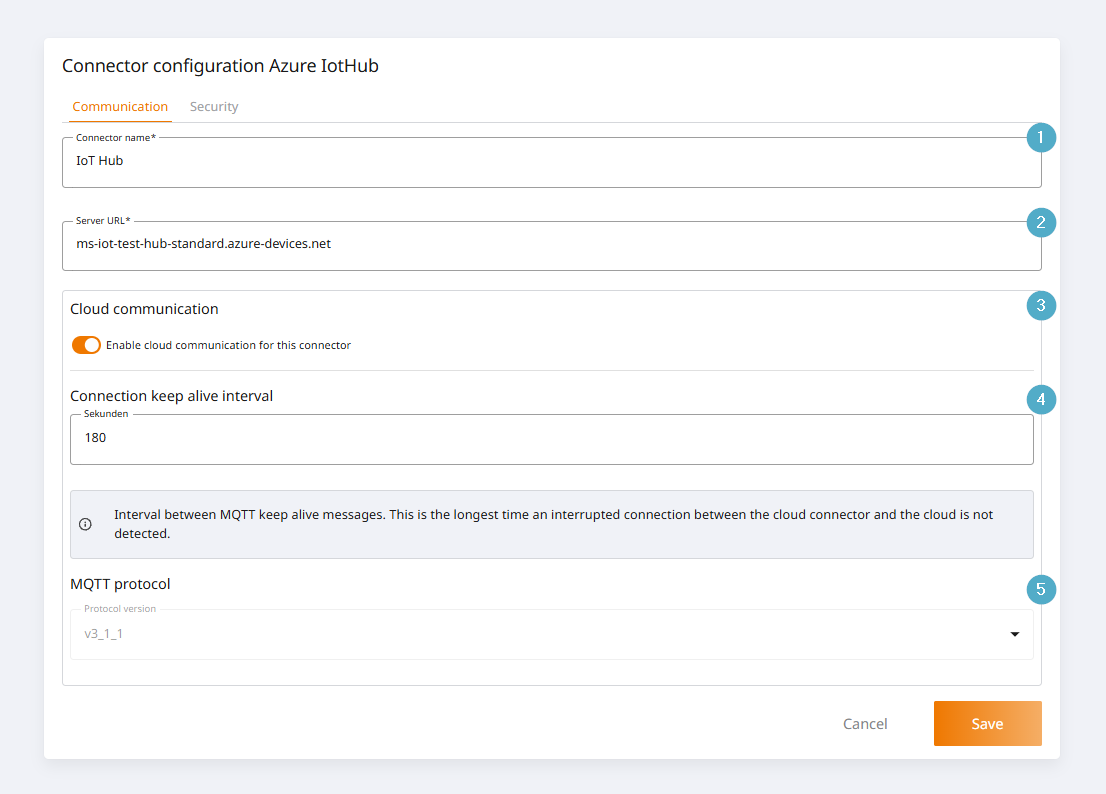
Connector name: Can be freely assigned, but must be unique.
Server URL: URL of the Azure IoT Hub to be connected to.
Cloud communication: If deactivated, no values can be received or sent outside of your own network. Can be deactivated for offline configuration, for example.
Time interval Keep-Alive: The interval defines how often a ping signal is sent to maintain the connection to the Azure IoT Hub (default: 180 seconds). A shorter interval increases connection stability, while a longer interval reduces the network load.
MQTT protocol: The Azure IoT Hub only supports MQTT version 3.1.1. It is not possible to switch to version 5 for connections to an Azure IoT Hub.
Security
The authentication mechanism is configured in the Security tab. Authentication is possible via device ID and SAS token or device ID and x.509 certificates.
By default, the configuration is displayed via SAS tokens. To switch authentication to certificates, the authentication mechanism must be changed in the dropdown. The UI now offers the option of uploading the corresponding files.
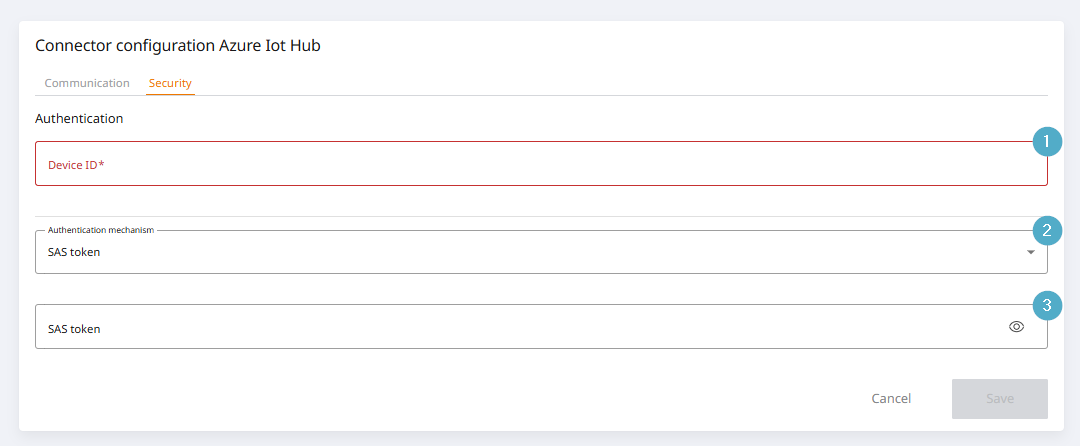
Device ID: ID of the device from the Azure IoT Hub.
Authentication mechanism: Dropdown for switching between SAS tokens and x.509 certificates.
SAS Token: SAS Token from the Azure IoT Hub.
Device Twin
A connection to an Azure IoT Hub can have a maximum of one device twin. The device twin is used to synchronize the status of a system between the device and the Azure IoT Hub in the cloud.
Reported properties are synchronized from the device to the cloud.
Desired properties are synchronized from the cloud to the device.
The entire device twin can be written to a string tag via a request from the Get Device Twin topic. After a reboot of the device, the entire device twin is automatically synchronized via this topic first.
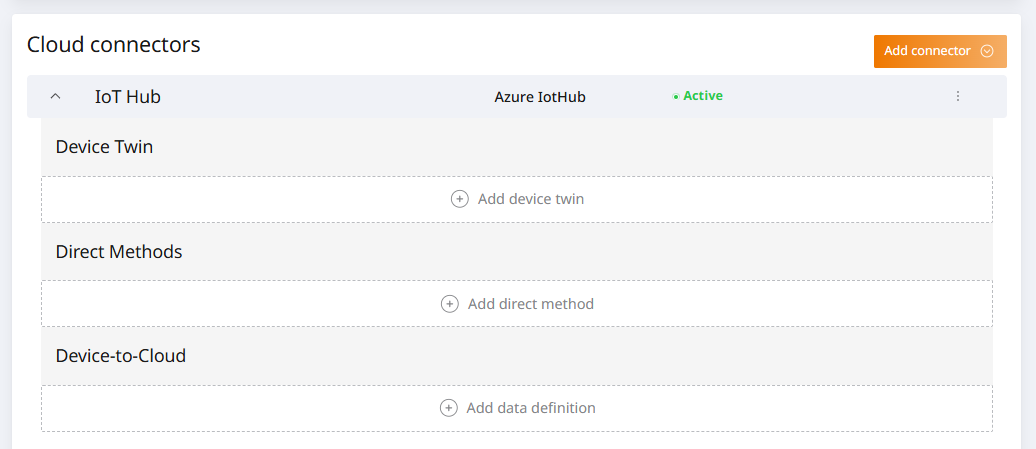
A device twin can be created by expanding the connection to an Azure IoT Hub and clicking on the Add Device Twin button in the Device Twin subsection.
Reported Properties
In the Reported Properties tab, the tags that are to be transferred from the device to the Azure IoT Hub when the value changes can be selected for the device twin. The payload can be configured up to a structure depth of ten levels. The Azure IoT Hub sets the limit.
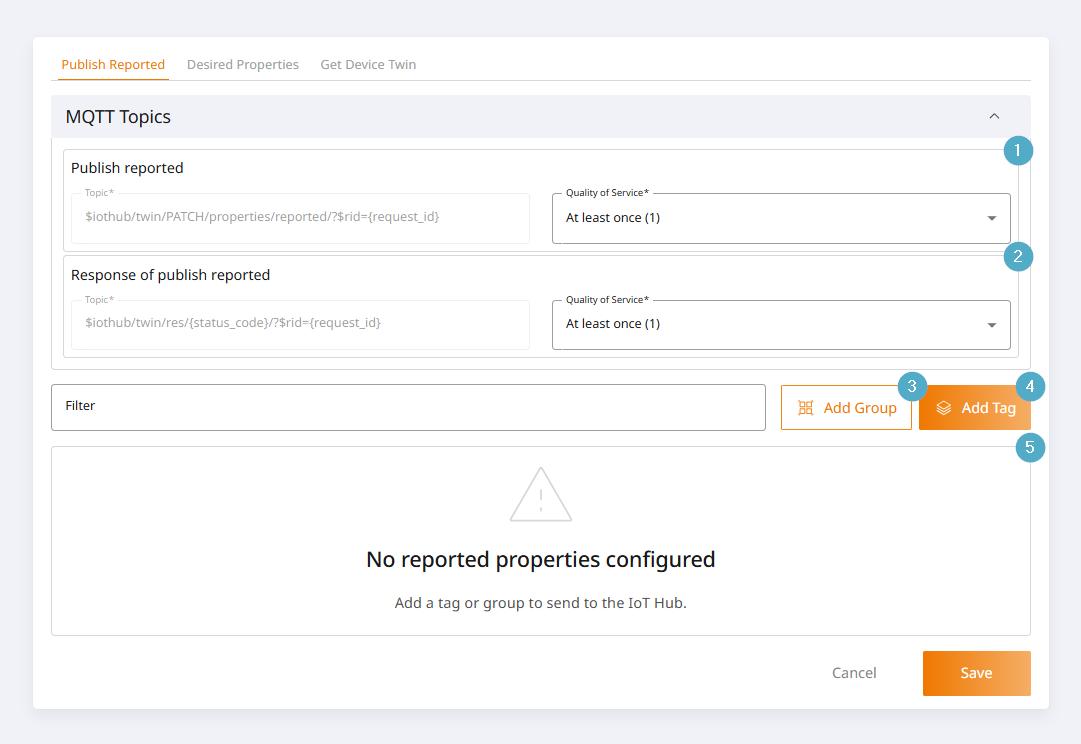
Reported properties: The topic is defined by the Azure IoT Hub and cannot be changed. The quality of service can be selected between 0 and 1. Quality of Service 2 is not supported by the Azure IoT Hub.
Response of reported properties: The topic is defined by the Azure IoT Hub and cannot be changed. The Quality of Service can be selected between 0 and 1. Quality of Service 2 is not supported by the Azure IoT Hub. The responses for Reported Properties and Get Device Twin are published by the Azure IoT Hub on the same topic. A change to the QoS on one of the topics therefore always affects both.
Add group: Button for adding an outline node to the payload.
Add tag: Button for adding a tag to the payload. A dialog for tag selection opens. The tag name is set by default, but can optionally be overwritten. This freely selectable name is transferred to the Azure IoT Hub. If a string tag is selected, the String contains JSON checkbox also appears. If the checkbox is activated, the string is parsed as JSON and added to the payload as JSON.
Payload overview: Overview of the currently configured payload. The sequence and nesting can be modeled using drag & drop. Within an outline level, the order of the items is automatically sorted in ascending alphanumerical order, analogous to Azure IoT Hub.
Reported Properties Payload
JSON example
{
   "temperature": 13.5,
   "doorGroup": {
      "isOpen": true,
      "displayText": "Door is open."
   }
}
Desired Properties
The Desired Properties tab can be used to display the tags for the device twin that are transferred from the Azure IoT Hub to the device when the value is changed.
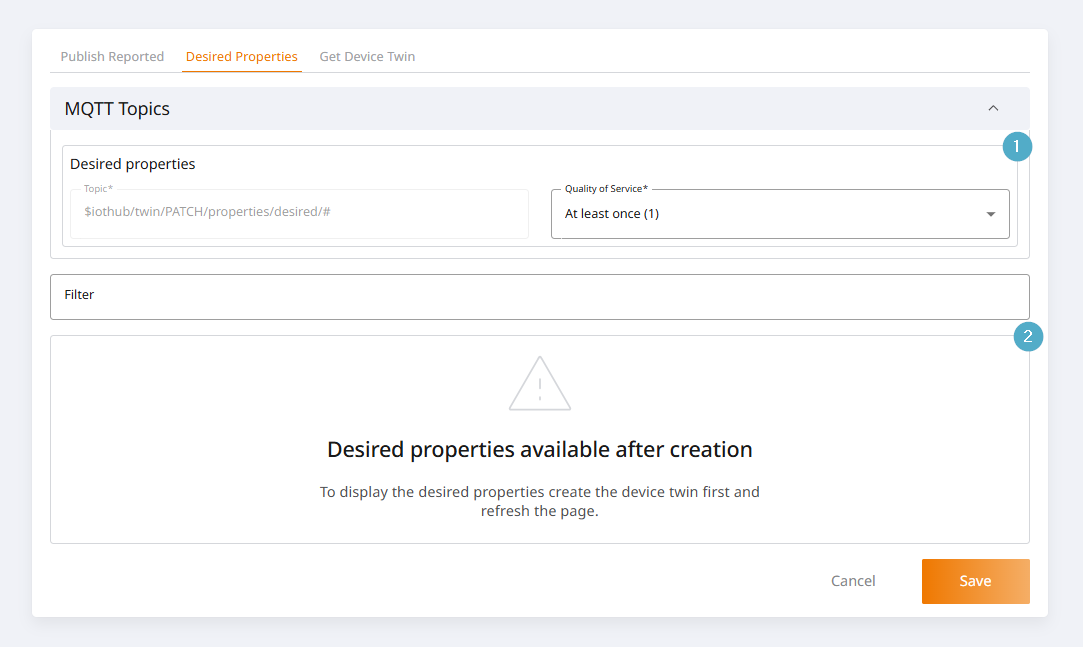
Desired properties: The topic is defined by the Azure IoT Hub and cannot be changed. The quality of service can be selected between 0 and 1. Quality of Service 2 is not supported by the Azure IoT Hub.
Payload overview: Overview of the current payload as configured in the Azure IoT Hub. To view this, the device twin must first be created and the page called up again.
Get Device Twin
In the Get Device Twin tab, you can optionally select a string tag to which the entire device twin is written. The request for the Get Device Twin topic is made automatically when the device is rebooted. The device twin is supplied in the response of the Azure IoT Hub.
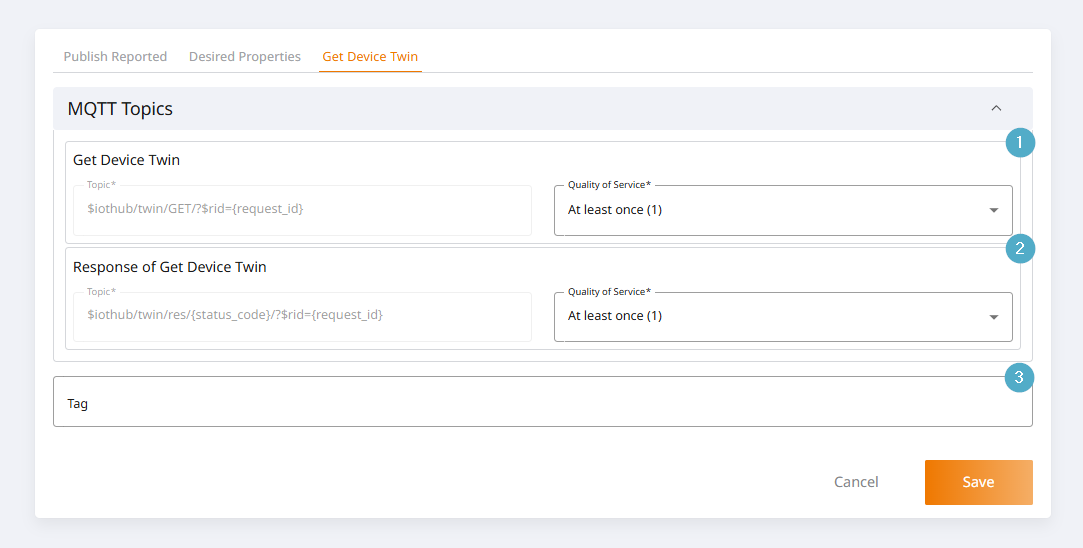
Get Device Twin: The topic is defined by the Azure IoT Hub and cannot be changed. The quality of service can be selected between 0 and 1. Quality of Service 2 is not supported by the Azure IoT Hub.
Response of Get Device Twin: The topic is defined by the Azure IoT Hub and cannot be changed. The Quality of Service can be selected between 0 and 1. Quality of Service 2 is not supported by the Azure IoT Hub. The responses for Reported Properties and Get Device Twin are published by the Azure IoT Hub on the same topic. A change to the QoS on one of the topics therefore always affects both.
Tag: Dropdown for selecting a string tag. The complete device twin is written to the selected tag as JSON, which is included in the payload of the response.
Device to Cloud
A device-to-cloud communication can be created by expanding the connection to an Azure IoT Hub and clicking on the Add data definition button in the Device-to-Cloud subsection.
General
In the General tab, a name is assigned for the send configuration and the send behavior is defined.
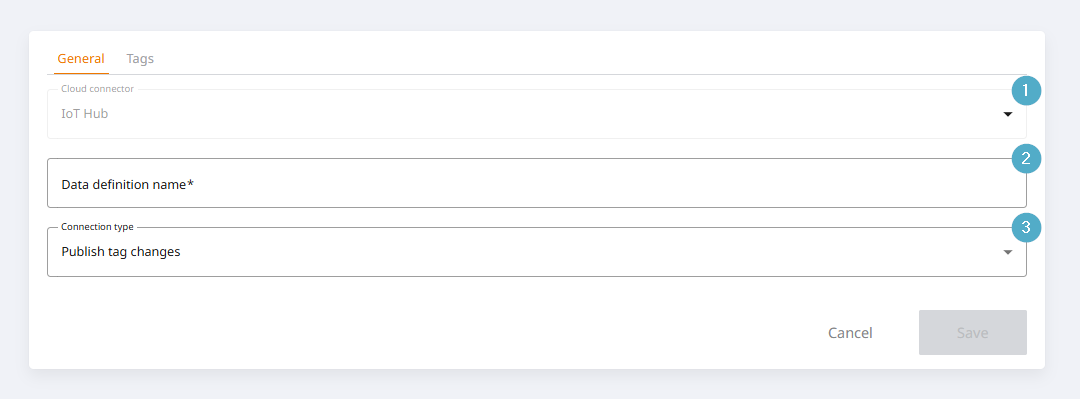
Cloud data definition name: Mandatory, must be unique.
Connection type: Available for selection:
Send tags on value change (publish)
Send tags periodically (publish) > The cycle and the time unit must then be defined here
Tags
The payload to be transferred to the Azure IoT Hub is compiled in the Tags tab. The payload can be configured up to a structure depth of ten levels. The Azure IoT Hub sets the limit.
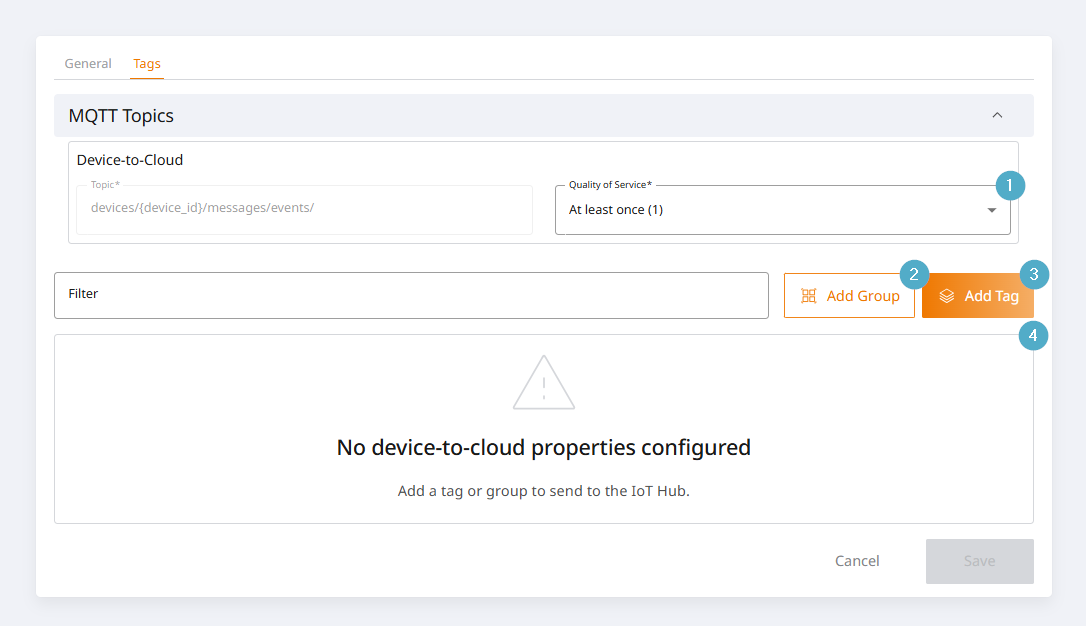
Events topic: The topic is defined by the Azure IoT Hub and cannot be changed. The quality of service can be selected between 0 and 1. Quality of Service 2 is not supported by the Azure IoT Hub.
Add group: Button for adding an outline node to the payload.
Add tag: Button for adding a tag to the payload. A dialog for tag selection opens. The tag name is set by default, but can optionally be overwritten. This freely selectable name is transferred to the Azure IoT Hub. If a string tag is selected, the String contains JSON checkbox also appears. If the checkbox is activated, the string is parsed as JSON and added to the payload as JSON.
Payload overview: Overview of the currently configured payload. The sequence and nesting can be modeled using drag & drop. Within an outline level, the order of the items is automatically sorted in ascending alphanumerical order, analogous to Azure IoT Hub.
Device to Cloud Payload
JSON example
{
   "temperature": 13.5,
   "doorGroup": {
      "isOpen": true,
      "displayText": "Door is open."
   },
   "timestamp": "2025-05-26T14:14:15.000Z"
}
The time stamp is automatically added in ISO 8601 format:
2025-05-26 → Date (year-month-day)
T → Separates date and time
14:14:15.000 → Time (hours:minutes:seconds.milliseconds)
Z → Zulu time, i.e. UTC (coordinated universal time)
Direct Methods
Direct Methods are sent from the Azure IoT Hub to a device to execute a specific method or function on that device, e.g. to restart a device or change a setting. Communication is synchronized, the device responds directly to the request and returns the status of the action performed.
General
The method name for the Direct Method is assigned in the General tab. The method name must be identical to the method name in the Azure IoT Hub, as the subscription is created based on the method name.
Request
The Request tab is used to specify how the request is to be transmitted to the device. There are two options:
Transmission as JSON: The method name, request ID and payload information is passed as JSON from the Azure IoT Hub via PROCON-Connect to the device using a string tag. In this case, the JSON is processed further on the controller.
Payload configuration: Request ID and payload are mapped directly to tags. The value transfer is realized by PROCON-Connect based on the driver connection of the respective tag. The controller only needs to trigger the response based on the request ID. The request ID must be mapped to a numerical tag.
Request via JSON
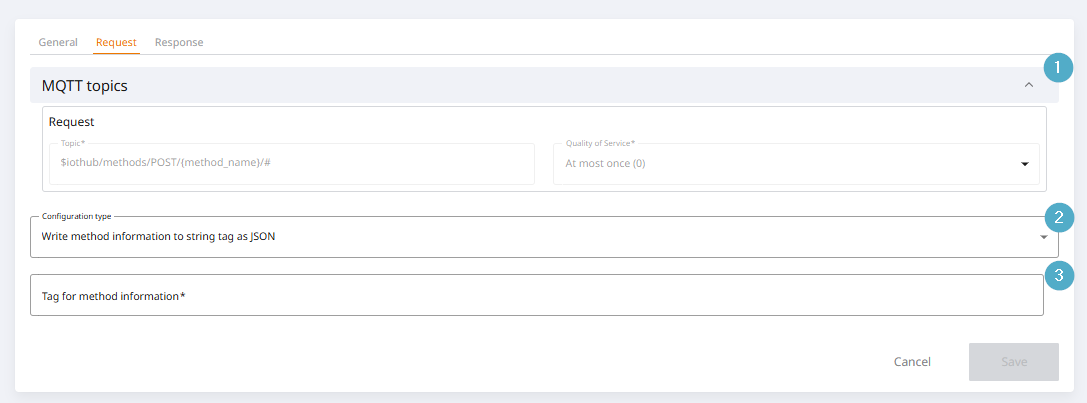
Request Topic: The topic is defined by the Azure IoT Hub and cannot be changed. The method name in the topic is taken from the General tab. The quality of service cannot be set for Request.
Configuration type: Two configuration types are available. Either the entire method information can be transferred to the controller as JSON and the data processed there, or the request ID and payload can be mapped to individual tags.
Tag - Method Information: Dropdown for the selection of a string tag. The metadata and payload of the method from the Azure IoT Hub are written to the string tag.
The payload has the form:
{"methodName":"[methodName]","payload":{"[tagName]":[tagValue]},"requestId":requestId}
Example:
{"methodName":"coolDown","payload":{"target_temperature":19},"requestId":9}
Request via payload configuration
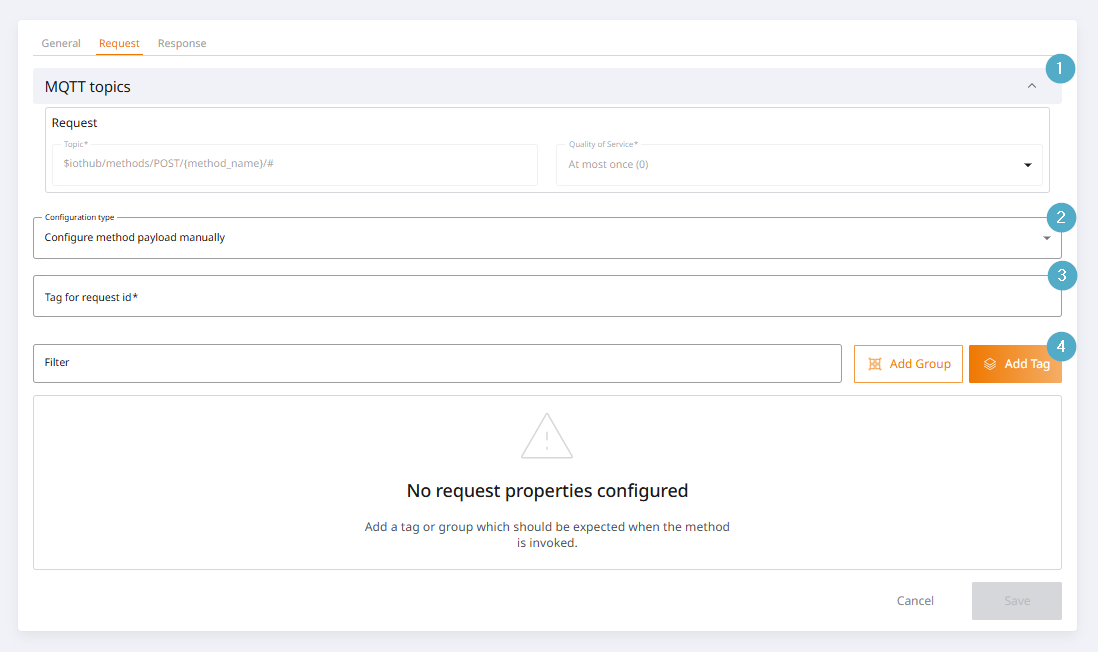
Request Topic: The topic is defined by the Azure IoT Hub and cannot be changed. The method name in the topic is taken from the General tab. The quality of service cannot be set for Request.
Configuration type: Two configuration types are available. Either the entire method information can be transferred to the controller as JSON and the data processed there, or the request ID and payload can be mapped to individual tags.
Tag - Request ID: Dropdown for the selection of a numerical tag. The request ID is written to the tag. The request ID can have the value range [1;255]. It must be processed by the controller and packed into the correlating response. If the Azure IoT Hub does not receive a response with a corresponding request ID, a TimeOut is triggered after the configured Method TimeOut has expired.
Payload configuration: The payload must match the payload in the Azure IoT Hub exactly in terms of nesting and naming. The freely assignable names for the tags are decisive for the match, not the tag names themselves.
Response
The Response tab is used to specify how the response is to be transmitted to the Azure IoT Hub. There are two options:
Transmission as JSON: The information method name, request ID, status code and payload are passed as JSON from the device via PROCON-Connect to the Azure IoT Hub via a string tag.
Payload configuration: Request ID, status code and payload are mapped directly to tags. PROCON-Connect handles the assembly of the message format for the Azure IoT Hub.
Response via JSON
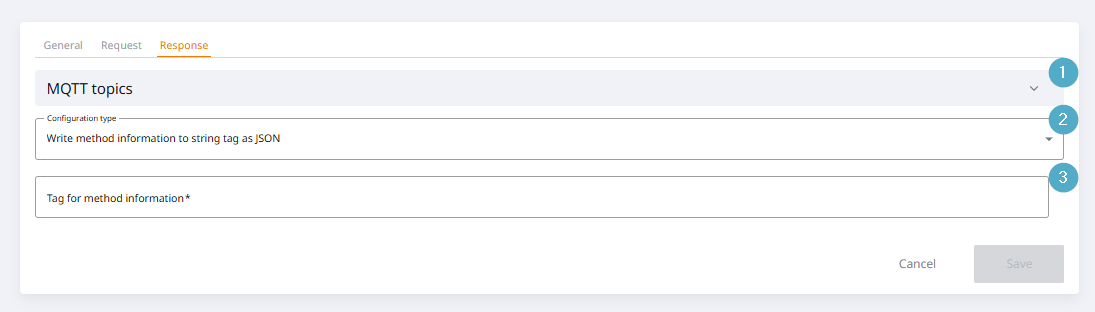
Response topic: The topic is defined by the Azure IoT Hub and cannot be changed. The method name in the topic is taken from the General tab. The quality of service can be set to 0 or 1 for responses.
Configuration type: Two configuration types are available. Either the entire method information can be transferred to the controller as JSON and the data processed there, or the request ID, status code and payload can be mapped to individual tags.
Tag - Method Information: Dropdown for the selection of a string tag. The device must write at least the appropriate request ID to the string tag. If no status code is specified, the status code
200is set by default.Minimum requirement:
{"requestId":[requestId]}
Example:
{"requestId":1}
Complete response:
{"payload":{"tagName":[tagValue]},"requestId":[requestId],"statusCode":[statusCode]}
Example:
{"payload":{"errorMsg":"Wrong formatted request"},"requestId":1,"statusCode":400}
Response via payload configuration
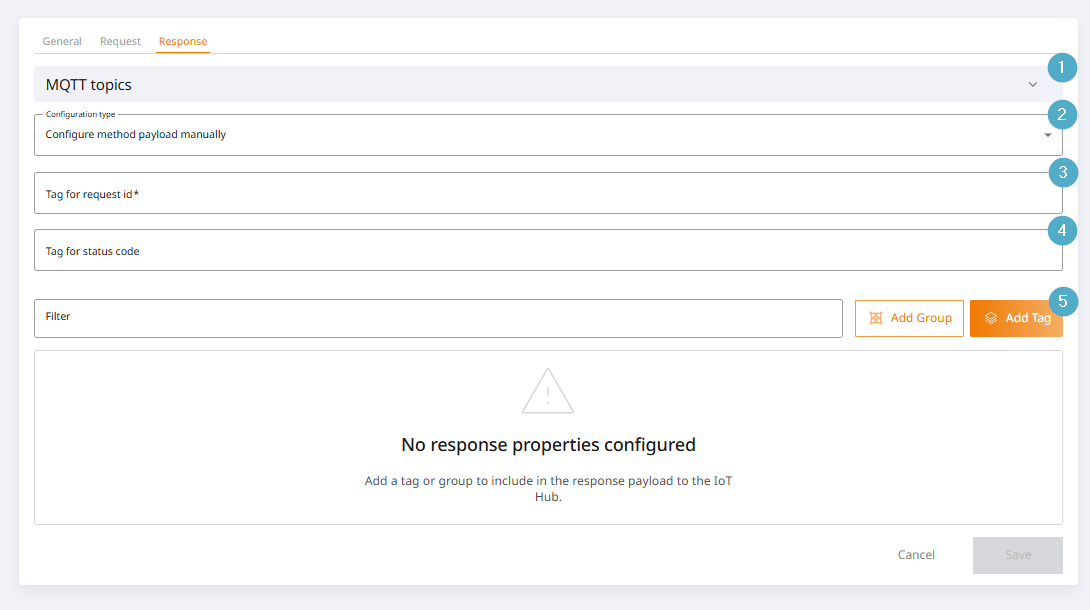
Response topic: The topic is defined by the Azure IoT Hub and cannot be changed. The method name in the topic is taken from the General tab. The quality of service can be set to 0 or 1 for responses.
Configuration type: Two configuration types are available. Either the entire method information can be transferred to the controller as JSON and the data processed there, or the request ID, status code and payload can be mapped to individual tags.
Tag - Request ID: Dropdown for the selection of a numerical tag. The request ID is written to the tag. The request ID can have the value range [1;255]. It must be processed by the controller and packed into the correlating response. If the Azure IoT Hub does not receive a response with a corresponding request ID, a TimeOut is triggered after the configured Method TimeOut has expired.
Tag - Status Code: Dropdown for selecting a numerical tag. The status code is written to the tag. The status code is freely selectable and does not have to follow standards such as HTTP codes. The status code is optional. By default, the status code
200is always sent if it is not assigned, based on the statusHTTP.OK.Payload configuration: The payload must match the payload in the Azure IoT Hub exactly in terms of nesting and naming. The freely assignable names for the tags are decisive for the match, not the tag names themselves.
Buffering
See chapter Buffering
MQTT (deprecated)
Warning
This MQTT configuration has a fixed payload. The successor function is MQTT JSON.
The MQTT (deprecated) feature will be removed from the system in August 2027 as part of a product update. There will be no automatic migration. Existing configurations must be migrated to the new MQTT JSON feature by the user in advance.
The configuration of the MQTT connector is divided into four tabs: Communication, Security, Configuration and Buffering.
Communication
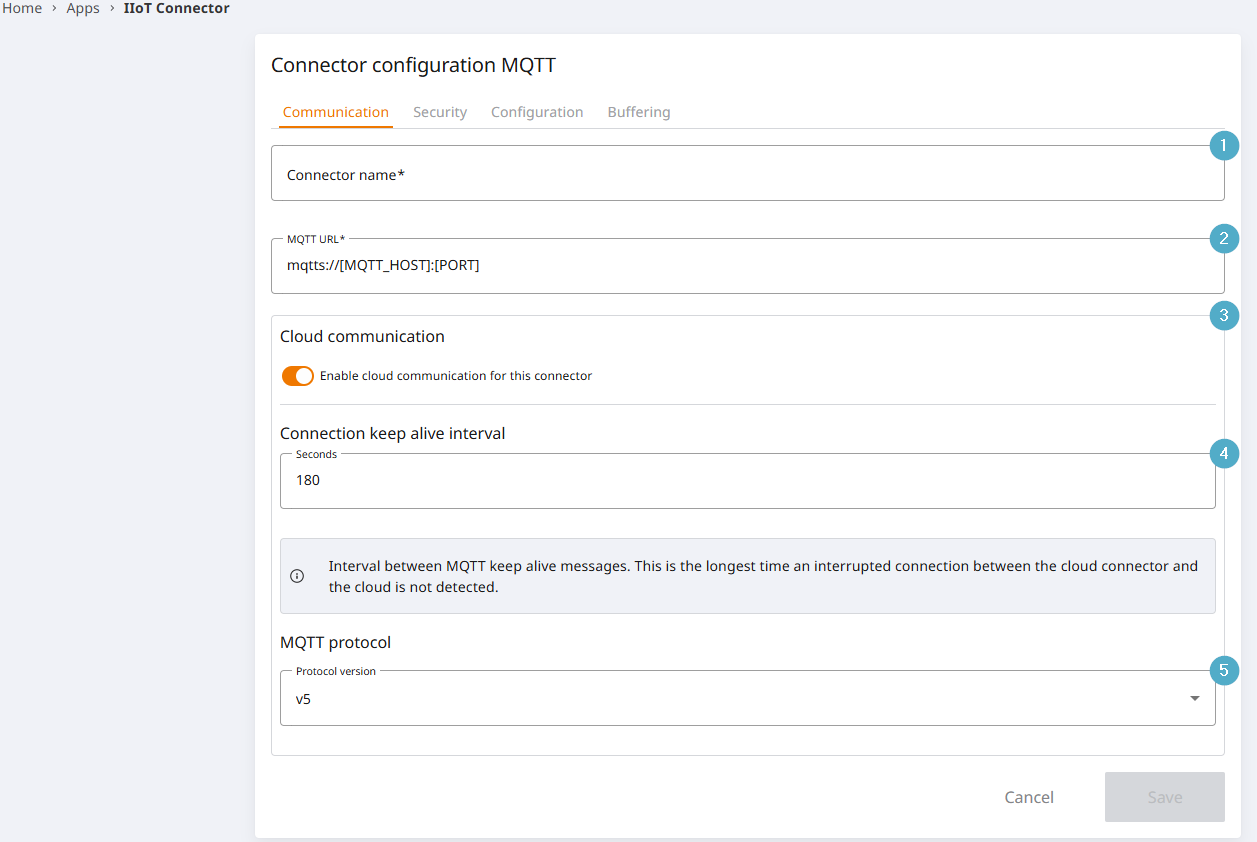
Basic configurations for establishing a connection are stored in this tab.
Connector name: Can be freely assigned, but must be unique.
MQTT URL: Valid URL of the MQTT broker to be connected to.
Cloud communication: If deactivated, no values can be received or sent outside of your own network.
Time interval Keep-Alive: The interval defines how often a ping signal is sent to maintain the connection to the broker (default: 180 seconds). A shorter interval increases the stability of the connection, while a longer interval reduces the network load.
MQTT Protocol: Protocol version. The version must be set to match the MQTT broker you are connecting to. The version determines the status codes used in communication between the MQTT client and the MQTT broker.
Security
The authentication mechanism is configured in this tab.
The MQTT Connector supports both MQTT and MQTTS. To use MQTTS, the following settings must be taken into account:
The URL of the MQTT broker in the Communication tab begins with
mqtts://.The default port for MQTTS in the Communication tab is 8883:
mqtts://[Broker_URL_Goes_Here]:8883.Certificate files are stored in the Security tab.
The
Enable Client Certificatessetting in the Security tab is enabled.
Authentication: Valid user and password for the connector.
Certificates: Activate client certificates and upload them using the button.
Configuration
Configuration of Topics, Quality of Service, Retain and Last Will.
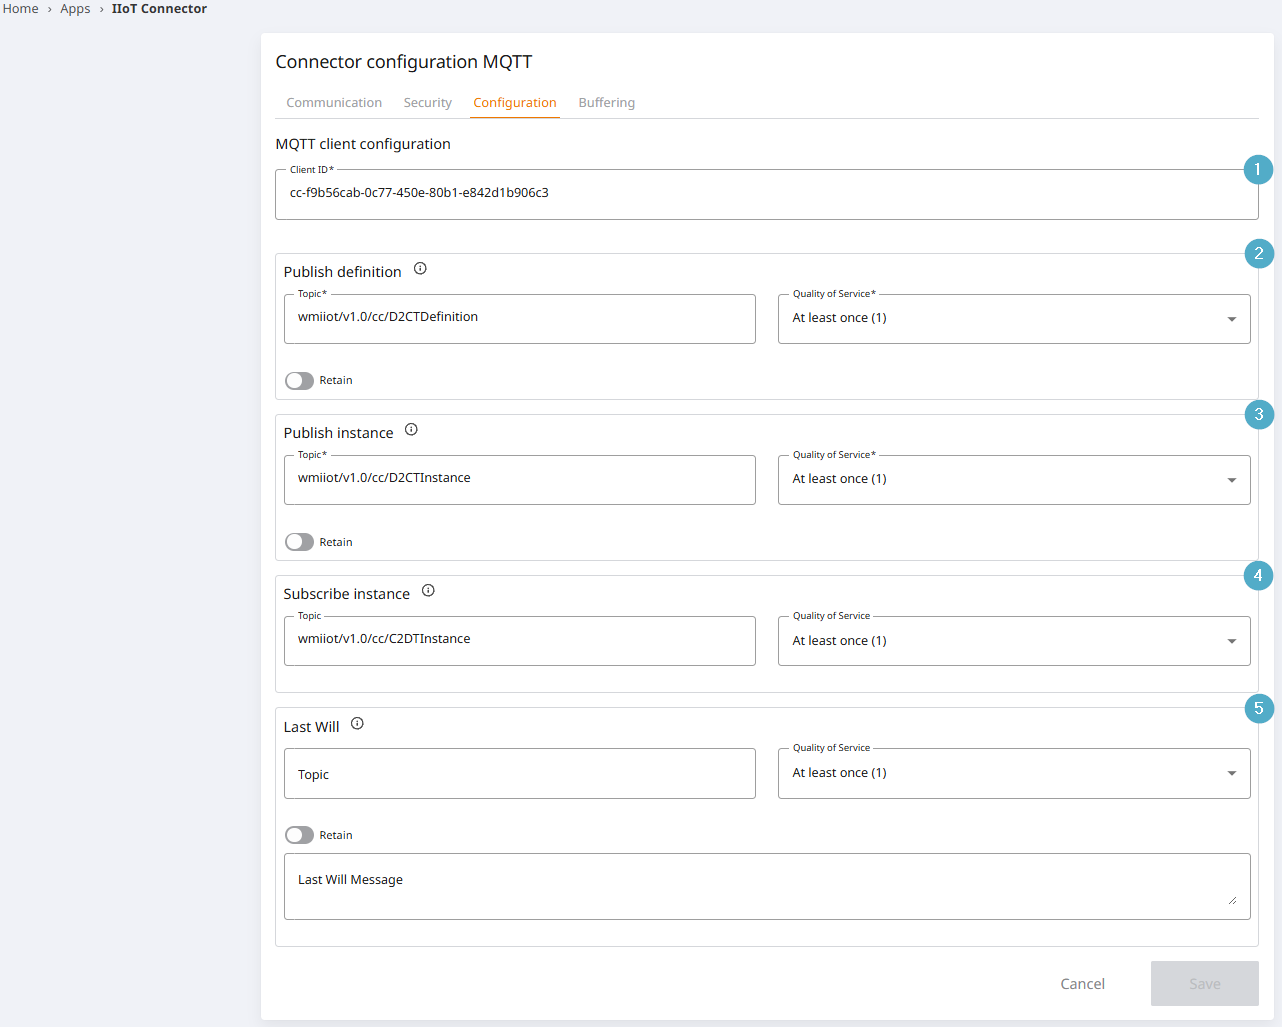
Client ID: Unique ID.
Publish Definition: Topic for the transfer of metric metadata. For details see Payloads.
Publish Instance: Topic for the transfer of time series values. For details see Payloads.
Subscribe Instance: Topic for reading the time series values.
Last Will: The Last Will message informs the broker which message to send to the subscribers if the client unexpectedly loses the connection. This allows other subscribers to be notified of the client’s failure.
Buffering
See chapter Buffering
Payloads
The metric definition and time series values are transferred separately for a load-optimized transfer.
Definition payload
JSON example
[
   {
      "addProps": [
         {
            "cloud": "publish"
         }
      ],
      "arrayQualifier": {
         "maxLength": 10,
         "minLength": 0
      },
      "baseDataType": "Double",
      "definitionUuid": "f6adfde5-07a9-414f-b71b-d5144ab4099a",
      "deviceUuid": "6883f158-561a-4d28-8281-8fe471b0427d",
      "name": "Temperature"
      "numericQualifier": {
         "defaultDecimalCount": "2",
         "lowerBound": "0.00",
         "upperBound": "100.00"
      },
      "subType": "None"
   }
]
addProps: Additional properties that the user can set freely. This section is optional. Configuration possible via tag editor in UI.
arrayQualifier: Maximum and minimum length of arrays. Is also used for strings. minLength is then always 0, maxLength the maximum string length.
baseDataType: Data type of the tag.
definitionUuid: UUID of the tag. This can be used to make a JOIN with the instance payload.
name: Tag name.
NumericQualifier: Data type-specific additional information for numerics. This section is only transmitted for numeric values. Number of decimal places, minimum value and maximum value.
SubType: Subtype, e.g. resource counter. Configuration possible via tag editor in UI.
Instance payload
JSON example
[
   {
      "arrayIndex": 1,
      "definitionUuid": "f6adfde5-07a9-414f-b71b-d5144ab4099a",
      "metricValue": {
         "type": "double",
         "value": 0
      },
      "statusCode": "GOOD",
      "timestamp": 1744120850000
   }
]
arrayIndex: Index within the array. Always 1 for simple values.
definitionUuid: UUID of the tag definition. This can be used to make a JOIN with the definition payload.
type: Data type of the tag.
value: Value of the tags.
statusCode: Quality of the transmission. BAD indicates outdated values, e.g. if the tag could not be read or the connection to the controller has been interrupted.
Timestamp: Timestamp of the value as a UNIX timestamp in millisecond format.
Data definitions
Data definitions can be added for each of the added connectors. These data definitions can be used to summarise, transmit or read individual or multiple defined values.
Expanding the connector in the overview displays an overview of the data definitions already created and the “Add data definition” button.
In the following dialogue, the general settings are made first.
Cloud data definition name: Mandatory, must be unique.
Connection type: Available for selection:
Send tags on value change (publish)
Send tags periodically (publish) > The cycle and the time unit must then be defined here
Read tags (subscribe)
In the Tags tab, you can then select the variables that are to be monitored.