User management
Warning
When you set up the system, you will be prompted to create a username and password. This initial user is automatically named Admin User.
If you lose your username or password, you will be permanently locked out of the system. This may result in the loss of the project configuration and all recorded data. Neither the device manufacturer nor the software developer will be able to grant you access.
Save your login details immediately using a suitable tool! (KeePass 2 or similar)
Overview
PROCON-Connect’s user management enables centralized and secure administration of user accounts. It is based on a role-based authorization concept that allows flexible assignment of access rights. Authentication is performed via standardized interfaces such as OAuth 2.0 and OpenID Connect.
User
The page displays an overview of users in the system and provides entry points for editing them.
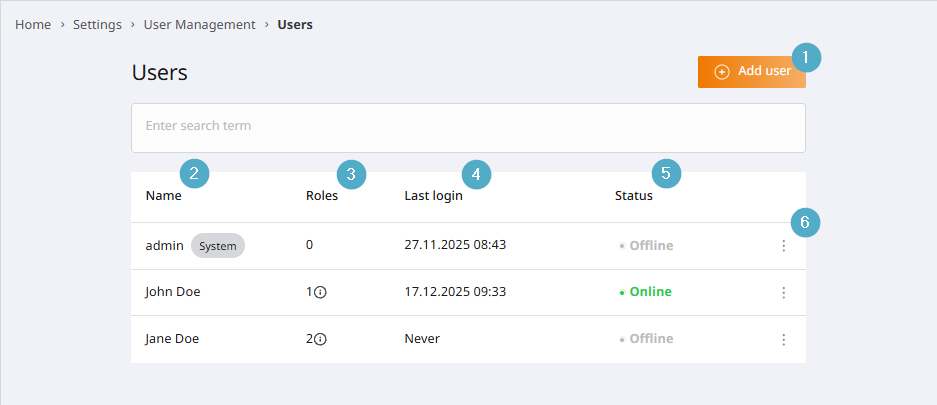
Add user: Opens the dialog for adding a user.
Name: Unique name of a user. Specified when the user is created and displayed in overviews. Can be changed or anonymized later. The following characters are allowed:
Capital letters [A-Z]
Lowercase letters [a-z]
Digits [0-9]
Underscore _
Hyphen -
Maximum length: 64 characters
Roles: Number of roles assigned to the user. When you hover over the info icon, a tooltip with the names of the roles is displayed.
Last login: Timestamp of the last login time in local time.
Status: A user can have three different statuses:
Online: The user is active and logged into the system.
Offline: The user is active but not logged into the system.
Disabled: The user is disabled. It is no longer possible to log in to the system.
Menu: Entry point for managing a user. The following options are available:
Edit: Opens the dialog for editing the user. Here, you can edit the same properties as in Add user.
Logout: The user’s session is terminated immediately.
Deactivate: The user is deactivated. If the user has an open session at the time of deactivation, it is terminated. Deactivated users can no longer log in to the system. When attempting to log in, the user simply receives a generic message stating that the username or password is invalid. The message must be generic so as not to provide a potential attacker with information about the failure of a login attempt.
Change password: Opens the dialog box for setting the password. This option is only displayed if the user has the appropriate authorization. For security reasons, changing your password always logs out all sessions of the affected user. After a password has been set by a third party, the user must assign their own password the next time they log in before using the system.
Delete user: The user will be deleted from the system. This action cannot be undone.
Special feature: Admin User
The user who is initially created on the system is the admin user. The admin user can be identified in the user overview on the Admin tag behind its name.
The following special features apply to this admin user:
It cannot be deactivated.
It cannot be deleted.
No roles can be assigned to him.
He implicitly has all permissions on the system.
If additional services such as edgeML are installed, they bring additional permissions into the system. These are also automatically assigned to this user.
The admin user should therefore be managed by the system administrator.
Add user
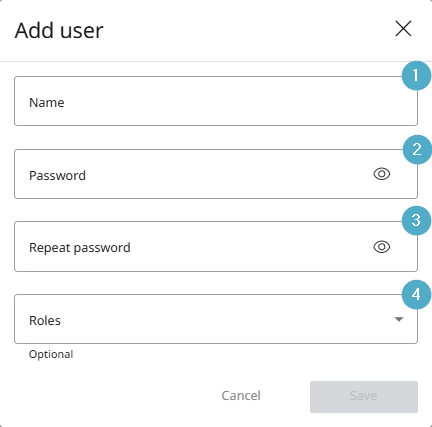
Name: Unique name of a user. Specified when the user is created and displayed in overviews. Can be changed or anonymized later. The following characters are allowed:
Capital letters [A-Z]
Lowercase letters [a-z]
Digits [0-9]
Underscore _
Hyphen -
Maximum length: 64 characters
Password: Initial password for the user. The password must comply with the parameters of the password policy that has been set. When logging in for the first time, the user will be prompted to assign their own password before they can use the system.
Repeat password: Repeat the password to ensure that it does not contain any errors.
Roles: Using the dropdown menu, one or more roles can be assigned to a user directly during creation. Role assignment is optional and can alternatively be done later by editing the user or the corresponding roles.
Roles
The page shows an overview of the roles in the system and provides entry points for editing them.
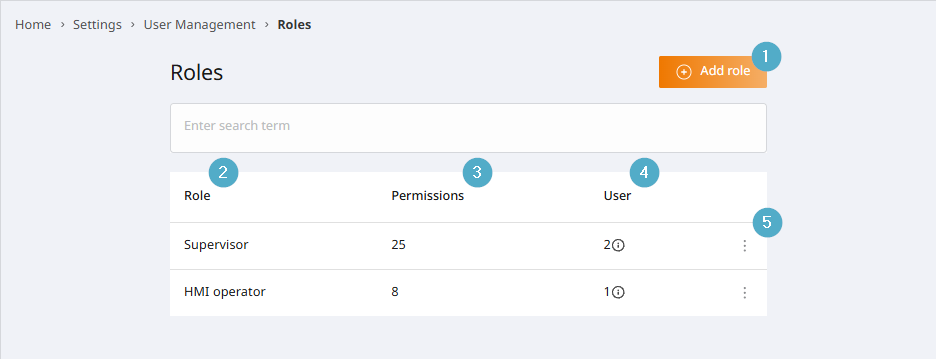
Add role: Opens the dialog for adding a role.
Role: Unique name of the role. Specified when creating a role and displayed in overviews. Can be changed later.
Permissions: Number of permissions assigned to a role.
Users: Number of users assigned to a role. When you hover over the info icon, a tooltip with the names of the users is displayed.
Menu: Entry point for managing a role. The following options are available:
Edit: Opens the dialog for editing the role. Here, you can edit the same properties as in Add role.
Delete: The role will be deleted from the system. This action cannot be undone.
Add role
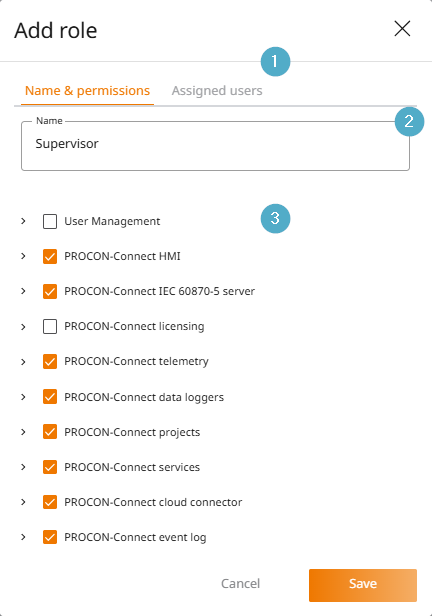
Permissions tab: The dialog box has two tabs. In the first tab, you can assign the role name and associated permissions.
Name: Unique name of the role. Displayed in overviews. Can be changed later.
Permissions: List of system permissions. Permissions can be added or removed from this role by selecting or deselecting the checkboxes.
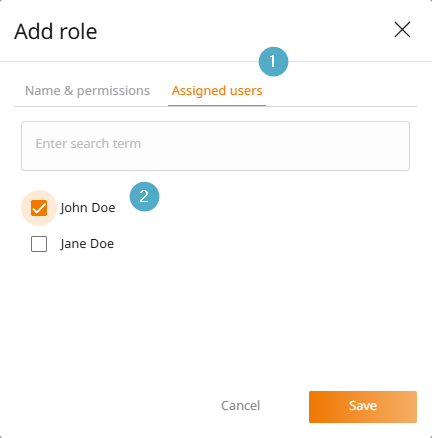
User tab: The dialog box has two tabs. In the user tab, users can be assigned directly to a role during editing. Alternatively, roles can be assigned via the users.
Users: List of users of the system. Users can be added or removed from this role by selecting or deselecting the checkboxes.
Permissions
The page shows an overview of the system permissions and provides insight into which roles the permissions are assigned to. Direct interaction is not possible on this page.
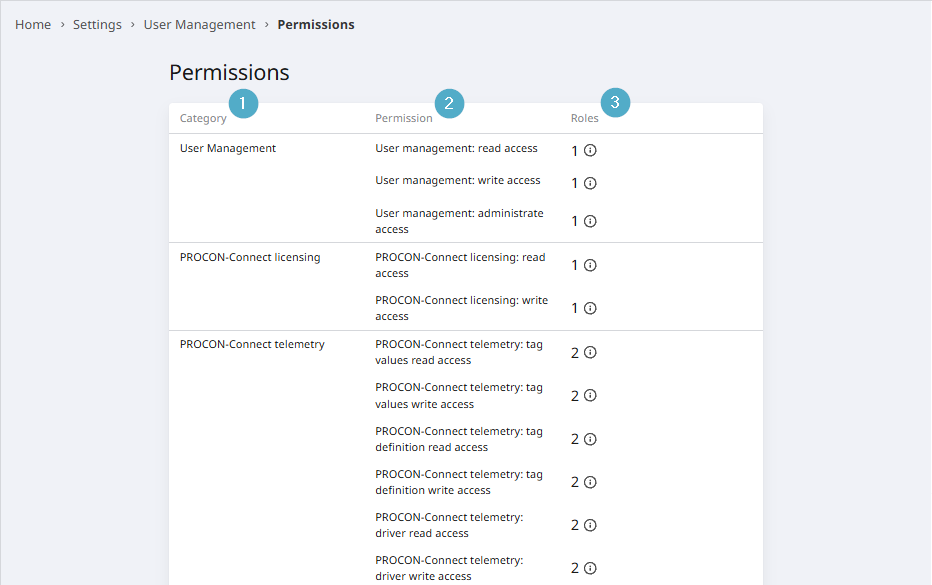
Category: Name of the component that provides the permission.
Authorization: Name and authorization level of an individual authorization. A distinction is often made between read and write permissions. These authorizations can be assigned individually.
Roles: Number of roles in which an authorization has been assigned. When you hover over the info icon, a tooltip with the names of the roles is displayed.
User management permissions
User management offers three permissions. No permission is required to set or change your own password. Access points for functions are only displayed if the user also has permission to execute them. The list below shows the range of functions associated with each permission.
Read access
View user management and subpages in the navigation.
Access user management pages and display data.
Write access
Add, edit, and delete users. Restriction: Set passwords for other users.
Add, edit, and delete roles. This also includes assigning permissions and users to roles.
Administrative access
Set passwords for other users.
End active sessions of users.
Deactivate users so that they can no longer log in to the system.
Edit user management settings.
Sessions
The page shows an overview of the system’s active sessions and offers the option to schedule them.
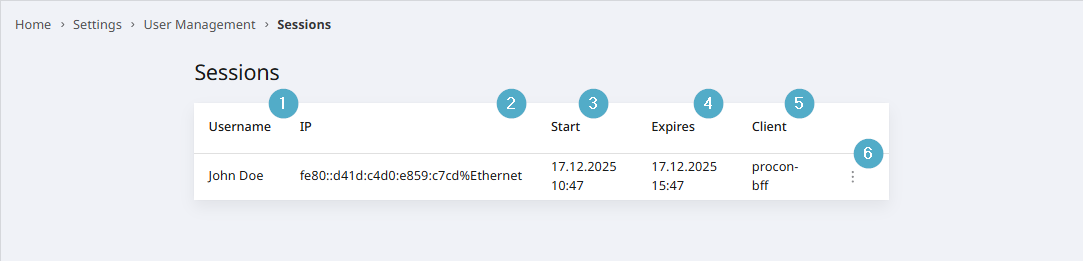
User name: Name of the user who opened the session.
IP: Client IP addresses.
Start: Last refresh of the access or refresh token as a timestamp in local time.
Expires: Expiration of the access or refresh token as a timestamp in local time.
Client: Name of the OpenID Connect client used. Provides information about the app that is logged in.
Menu: Entry point for deleting a session. This immediately terminates the session.
LDAP
PROCON-Connect supports user authentication via an LDAP (Lightweight Directory Access Protocol) server. This allows users to log in using their centrally managed credentials, such as those from an Active Directory or OpenLDAP system.
LDAP configuration is performed in the User Management → LDAP section.
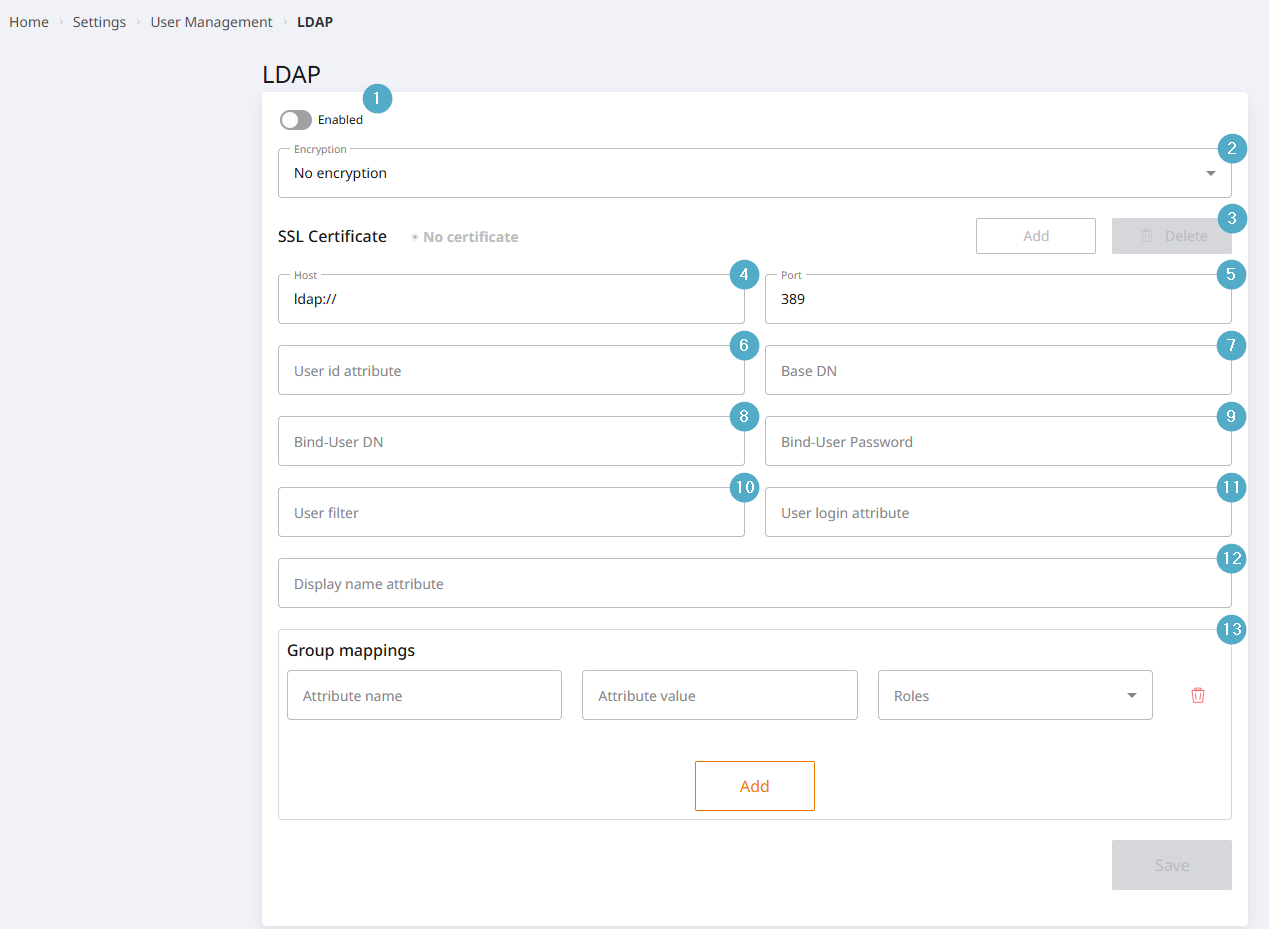
Enabled: Enables or disables the LDAP connection.
Disabled: LDAP is not used. Users authenticate exclusively through local PROCON-Connect user accounts.Enabled: Authentication is performed via the configured LDAP server. Local PROCON-Connect user accounts can also be used.
Encryption: Specifies how the connection between PROCON-Connect and the LDAP server is secured. For production systems, an encrypted connection (LDAPS) should always be used. The available options are
no encryption,STARTTLS, andSSL.SSL Certificate: Used when setting up an encrypted LDAP connection. Click
Addto upload the LDAP server’s certificate.Host: Address of the LDAP server.
Example:
ldap://ldap.example.comor, if encryption is used,ldaps://ldap.example.com.
Port: The LDAP server’s TCP port. When the encryption method is changed, the port is automatically set to the default port for the selected encryption method.
User ID Attribute: LDAP attribute that stores the unique user ID.
Examples:
objectGUID(Active Directory),uidNumber(OpenLDAP).
Base DN: Defines the starting point for the user search in the LDAP directory. The more specific the Base DN is, the faster the user search will be.
Example:
OU=Users,DC=company,DC=local.
Bind User DN: The user account that PROCON-Connect uses to log in to the LDAP server to retrieve user information. The user must have read permissions for the relevant directory entries.
Example:
CN=ldap-reader,OU=ServiceAccounts,DC=company,DC=local.
Bind User Password: The password for the service account specified under “Bind User DN.”
User Filter: An LDAP filter used to restrict which users are allowed to log in to PROCON-Connect. If no filter is specified, all users within the configured base DN are included. Examples:
Active users only:
(&(objectClass=user)(enabled=TRUE))Only members of a group:
(memberOf=CN=PROCON_USERS,OU=Groups,DC=company,DC=local)
User Login Attribute: LDAP attribute used for login.
Examples:
sAMAccoutName(Active Directory),uid(OpenLDAP)
Display Name Attribute: LDAP attribute from which the username displayed in PROCON-Connect is retrieved.
Examples:
displayName,cn,name.
Group Assignment: Group assignment allows LDAP users to be automatically assigned roles in PROCON-Connect. Three values are defined for each assignment rule:
Attribute Name: The LDAP attribute to be evaluated. Examples:
department,memberOf,title.Attribute value: The value that is compared with the user object. Examples:
Engineering,CN=PROCON_ADMIN,OU=Groups,DC=company,DC=local.Roles: The PROCON Connect roles that are automatically assigned to the user.
Attribute name |
Attribute value |
Role |
|---|---|---|
memberOf |
CN=PROCON_ADMIN,OU=Groups,DC=firma,DC=local |
Administrator |
memberOf |
CN=PROCON_OPERATOR,OU=Groups,DC=firma,DC=local |
Operator |
User settings
The page provides entry points for configuring the mechanics of user management.
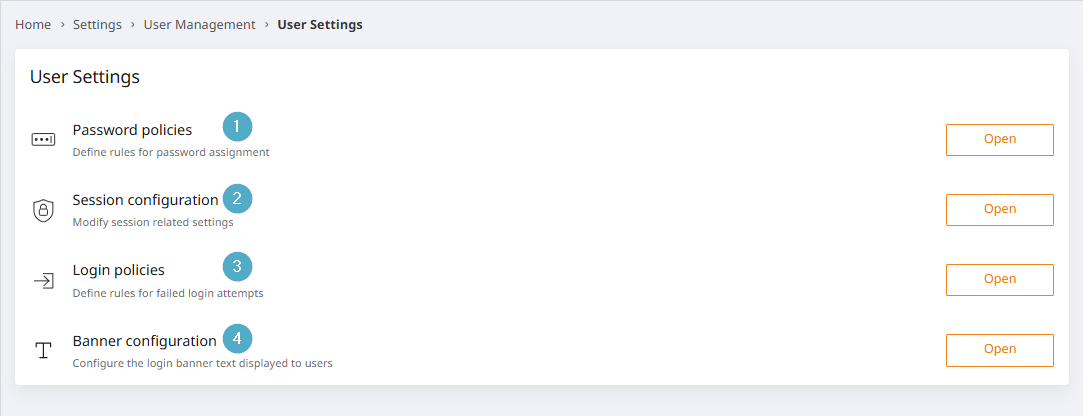
Password policies: Opens the dialog for configuring the Password policies.
Session settings: Opens the dialog for configuring the Session settings.
Login policies: Opens a dialog for configuring the Login policies.
Banner Configuration: Opens the dialog for configuring the Banner configuration.
Password policies
The dialog box allows you to customize the password policy for the system globally. The default password policy is based on the recommendations of the German Federal Office for Information Security and provides the following parameters:
Username must not be included in password
Minimum length 8 characters
At least 1 digit [0-9]
At least 1 lowercase letter [a-z]
At least 1 uppercase letter [A-Z]
At least 1 special character
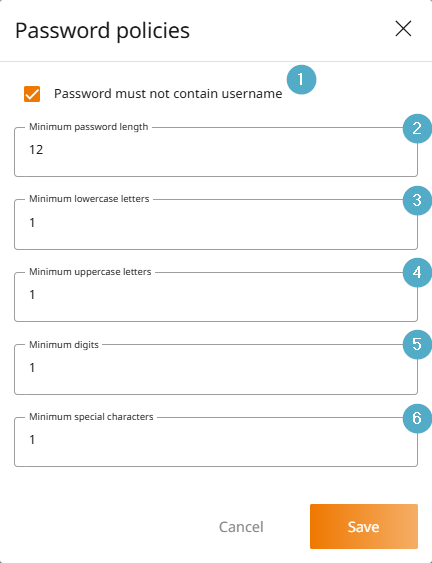
Password must not contain username: The mechanism checks whether the username is part of the password.
Minimum number of characters: The mechanism checks the number of characters contained in the password. Only the total number is considered, not the type of characters.
Minimum number of lowercase letters: The mechanism checks the number of lowercase letters contained in the password. This includes [a-z].
Minimum number of uppercase letters: The mechanism checks the number of uppercase letters contained in the password. This includes [A-Z].
Minimum number of digits: The mechanism checks the number of digits contained in the password. This includes [0-9].
Minimum number of special characters: The mechanism checks the number of special characters contained in the password. Special characters are anything that is neither a letter nor a number.
Session settings
The dialog box allows you to customize the session settings for the system globally. The default setting does not provide for automatic logout.
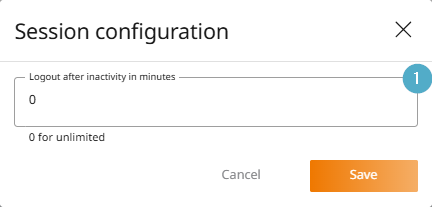
Logout after inactivity in minutes: Sessions are automatically terminated after n minutes of inactivity. Some functions use so-called long polling, which means that inactivity cannot be detected. Consequently, depending on how the system is used, logout cannot currently be guaranteed after the time period has expired.**Logout after inactivity in minutes:** Sessions are automatically terminated after n minutes of inactivity. Some functions use so-called long polling, which means that inactivity cannot be detected. Consequently, depending on how the system is used, logout cannot currently be guaranteed after the time period has expired.
Login policies
The dialog box allows you to customize the login policy for the system globally. The default login policy does not provide for checking failed logins.
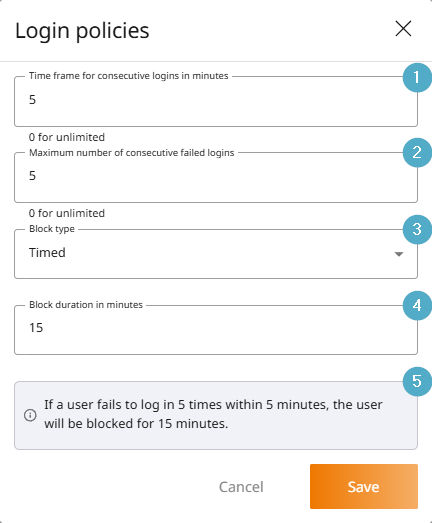
Time period for consecutive logins in minutes: Time interval of observation in minutes. The time interval starts with the first unsuccessful login attempt.
Maximum number of consecutive failed logins: Number of failed logins that must occur within the configured time interval for the user to be locked out.
Lock type: Determines whether the user is automatically unlocked after a lock due to failed logins after a certain period of time or must be manually unlocked by an administrator. The person unlocking the account requires administrator rights for user management.
Lock duration in minutes: If automatic unlocking is configured, the duration can be specified here in minutes.
Configuration info: The configuration fields above are related to each other. The configuration is summarized here once again in words to clearly present the configured constellation to the user.
Banner configuration
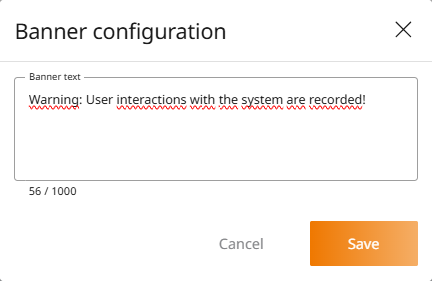
The dialog box allows you to enter text that will be displayed to users when they log in. No text is preset by default.
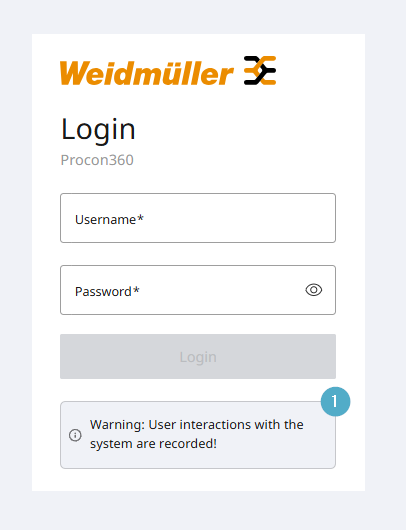
Below is an example of a banner displayed in the login dialog.
Security
User management meets the requirements of IEC 62443-4-2 with at least security level 2 and the requirements of EN 18031 (cybersecurity of the Radio Equipment Directive | RED).
A few specific security aspects are described in more detail below.
Default passwords
The use of default passwords is not permitted. When starting up the software, you must assign your own password before you can use the system.
When adding a new user, an administrator assigns a password for the new user. This means that the password is known to a third party. The user must assign their own password when logging in for the first time before they can log into the system.
Password security
The security of passwords depends on their length and the characters used. Users who have not yet developed a strategy for creating complex passwords may find complex password requirements annoying.
In this case, it is possible to customize the Password policies to suit your own requirements. The customization should meet the security requirements of the application. The default password policy is based on the specifications of the German Federal Office for Information Security.
Anwenderinformation bei fehlgeschlagenen Logins
Failed logins can have a variety of reasons, for example:
The user does not exist (anymore) in the system.
The password is incorrect.
The user has been blocked.
From a user-friendliness perspective, the user could be informed of the reason. However, this is not permitted for security reasons, as an attacker could use the information to optimize their attack.
As a result, regardless of the technical reason for a failed login, the user always receives the same error message. The error message reads Invalid username or password.
Failed login attempts are documented in the Event log.
Brute force protection
A brute force attack is a method in which an attacker systematically tries all possible combinations of passwords or keys to gain unauthorized access to the system. It is a time-consuming and resource-intensive approach that relies purely on computing power without exploiting vulnerabilities in the target system.
The threat is countered by an exponentially increasing time delay between failed login attempts, so that only a small number of passwords can be checked in a finite amount of time.
An unsuccessful login attempt \(n\) delays the time until the next login attempt by \(2^n\) seconds. The exponential growth is limited to a maximum of 900 seconds.
The time until the next login attempt is displayed to the user in the login dialog.