Licensing
Overview
The individual functions are licensed as required using WIBU CodeMeter on the basis of license tickets. Configuration is carried out via the PROCON-Connect interface.
PROCON-Connect is designed to license a large number of systems in as little time as possible. The system therefore starts with the productive default setting of WIBU licensing.
On u-OS, PROCON-Connect has a predefined range of functions without any further licensing. Here you will find further details.
For validation purposes, it is possible to switch to Demo mode, which makes the entire functionality available for 60 minutes.
Activation of demo mode is offered to the user after login if the system detects an unlicensed status. A changeover can also be made manually via the License overview.
Warning
Please read the chapter Hardware-Fingerprint before activating a license.
Changes to hardware or virtual machine (VM) configurations may render your license unusable.
Navigation
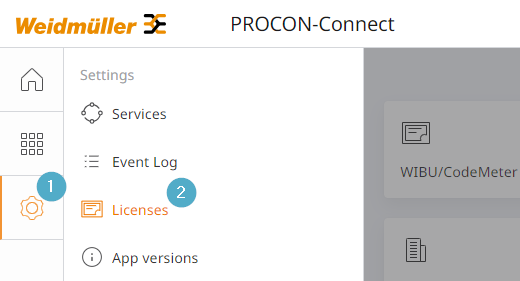
Click on the cogwheel (1) to open the submenu for the settings.
This is also the entry point for the licenses (2).
License overview
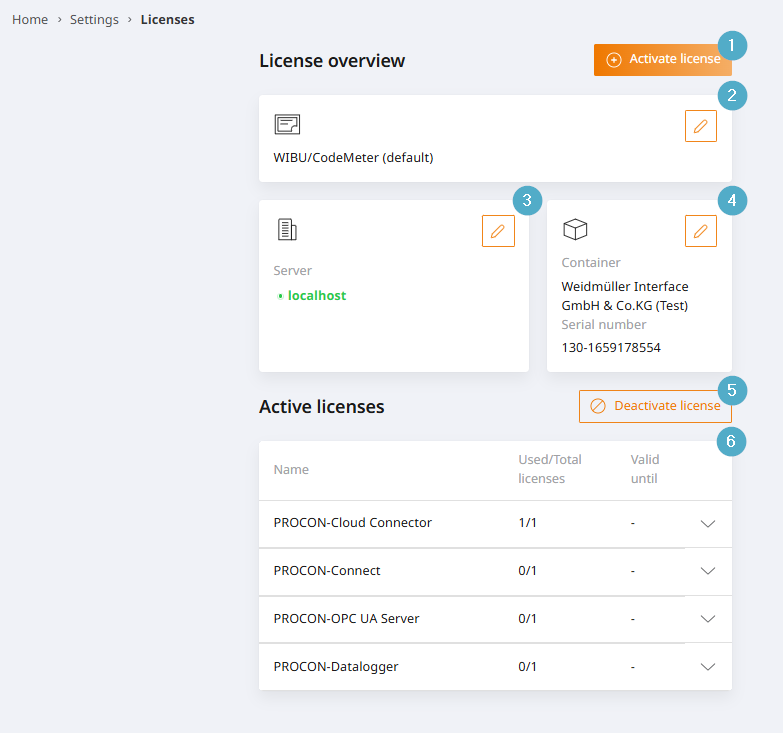
Activate license: Entry point for activating licenses based on license tickets. Opens dialog box.
Licensing mechanics: Selection of the licensing mechanics. The pen button can be used to open the selection dialogue for switching the licensing mechanism.
By default, licencing is carried out using WIBU CodeMeter. This setting always applies to new projects. To activate a license ticket, the WIBU CodeMeter setting must be selected.
Some existing projects still work with license files, in this case select entry LIC file (deprecated). The range of functions is described in chapter Licensing via LIC file (deprecated).
The range of functions of Demo mode is described in chapter Demo mode.
CodeMeter server: Currently selected CodeMeter runtime. The pen button can be used to open the dialogue for browsing and selecting a CodeMeter runtime.
CodeMeter container: Currently selected CodeMeter container. The pen button can be used to open the dialogue for selecting a CodeMeter container. The container selection depends on the currently selected CodeMeter runtime.
Deactivate license: Entry point for deactivating licenses based on license tickets. Opens dialog box.
License overview: Overview of already activated licenses.
Name: Name of the specific license.
Used/Total licenses: Number of licenses used and available.
Valid until: Expiry date for time-limited test licenses.
Demo mode
Demo mode limits the use of the software to 60 minutes. After this time has elapsed, the services are stopped. A notification informs the user that the time has expired. Restarting PROCON-Connect also restarts this timer.
The range of functions in demo mode is not limited, so that all functions can be tried out in full.
It is possible to request time-limited test licenses that do not require an hourly restart of the services.
CodeMeter
CodeMeter explained
CodeMeter is a comprehensive platform for managing software licenses and, in conjunction with PROCON-Connect, regulates access permission to certain components. CodeMeter allows the enforcement of flexible access options on the basis of license tickets.
The CodeMeter User Runtime must be installed directly on the host system of the device on which a software component is to be licensed.
Install CodeMeter under Linux
To license PROCON-Connect, the WIBU CodeMeter User Runtime must be installed on the system. This can be downloaded here:
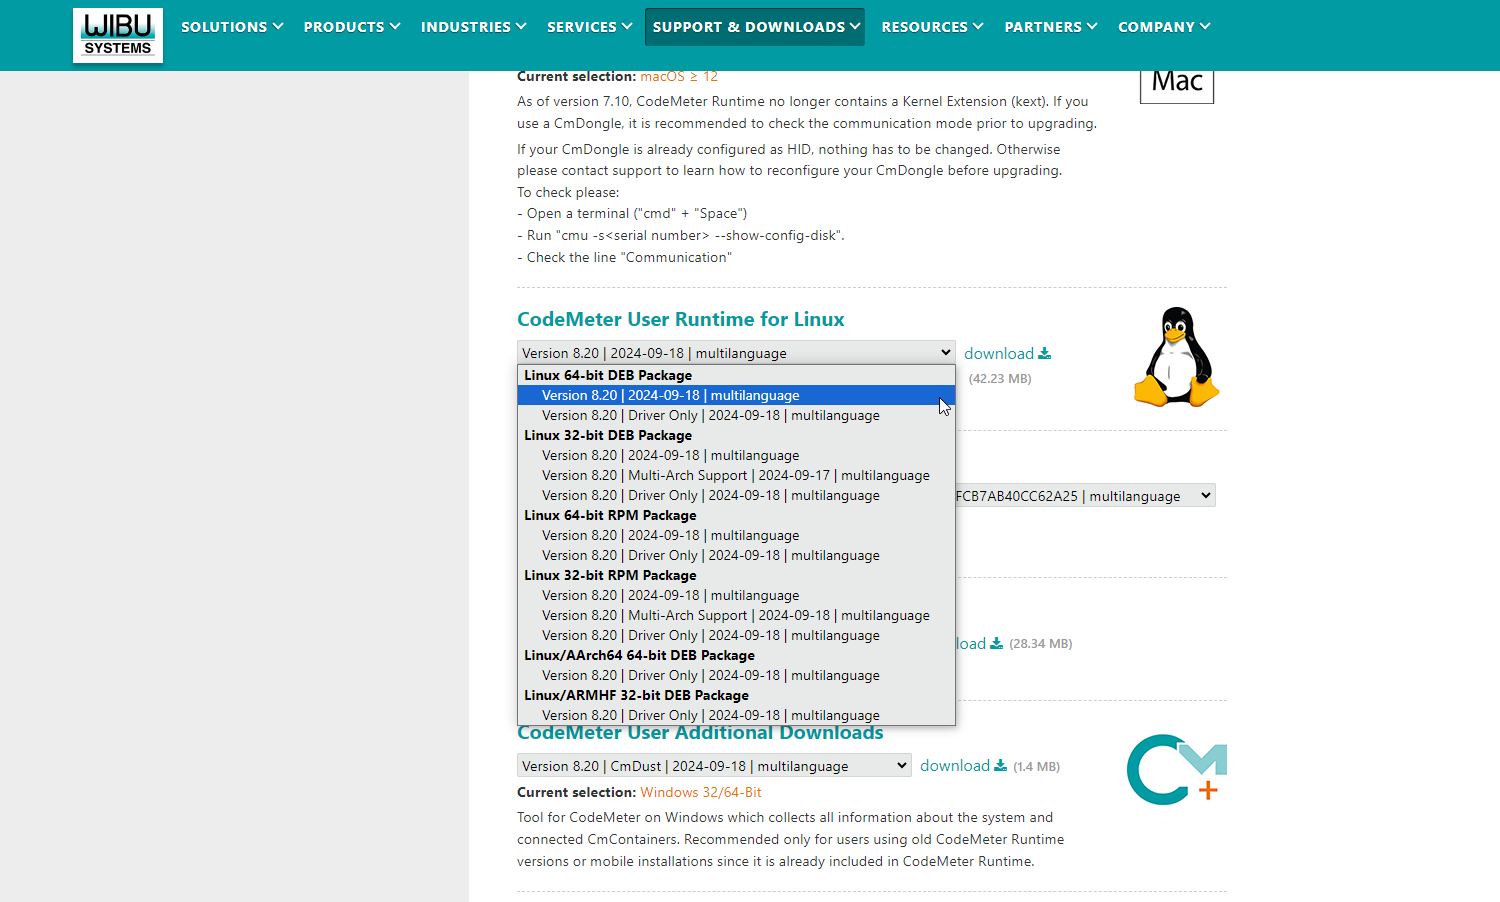
The Linux 64-bit DEB package is suitable for an Intel- or AMD-based IPC running a Debian-based Linux.
The AArch64 64-bit DEB and ARMHF 32-bit DEB packages are suitable for ARM-based devices running a Debian-based Linux, e.g. popular single-board computers such as the Raspberry Pi.
Make sure you choose the right architecture for your device. Refer to the manufacturer’s documentation to check the processor type and whether it is 32-bit or 64-bit.
After selecting the appropriate package, click on the download button to the right of the selection to go to the download page.
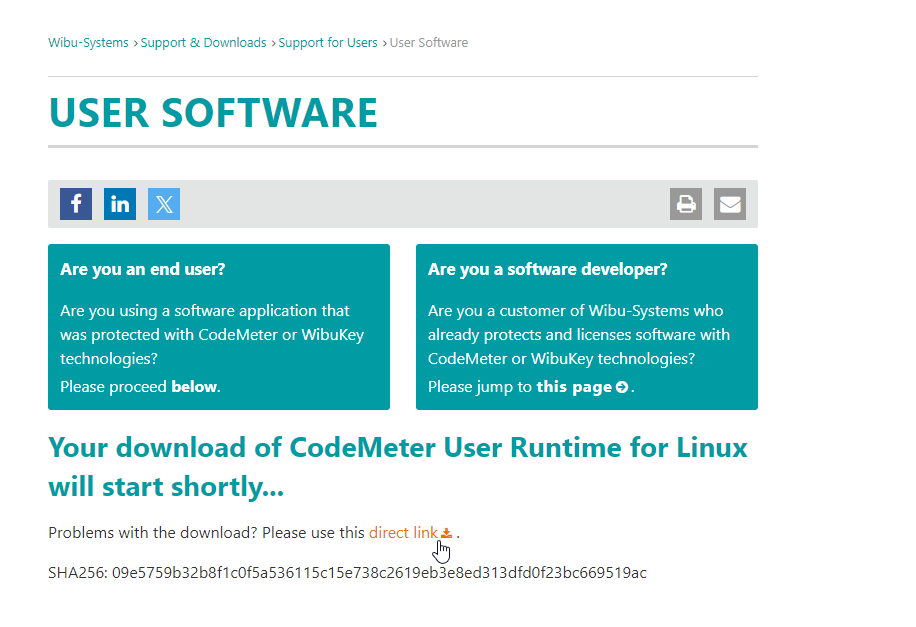
Right-click on the
direct linkand copy the URL.Use
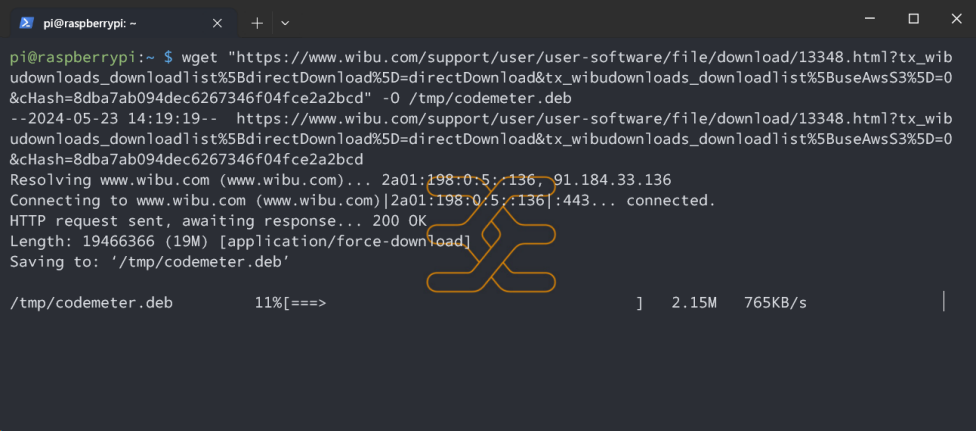
wgetand the URL you just copied to download the CodeMeter User Runtime package to your Linux system. Be sure to enclose the URL in inverted commas and add the -O flag and a filename of your choice. The example shown here will use the file path/tmp/codemeter.deb.
1wget "PASTE URL HERE" -O /tmp/codemeter.deb
Use
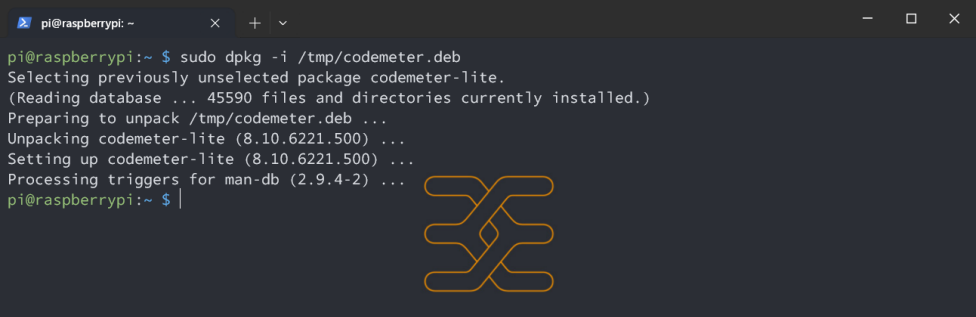
apt-get install -fto install the CodeMeter package. You must execute this command as root, e.g. precede it withsudo.
1sudo apt-get install -f /tmp/codemeter.deb
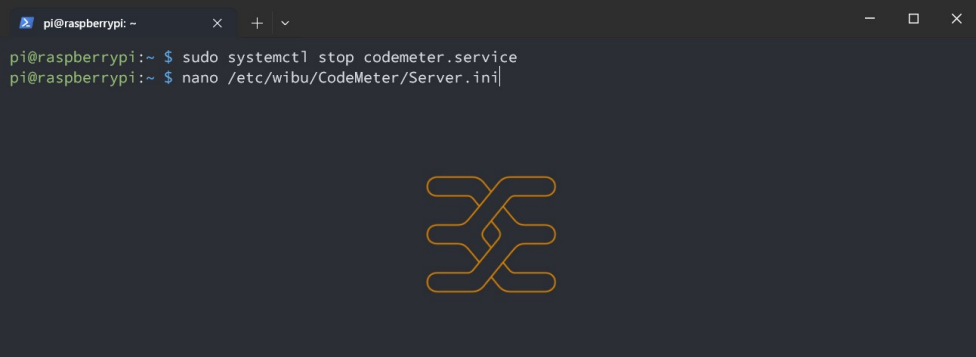
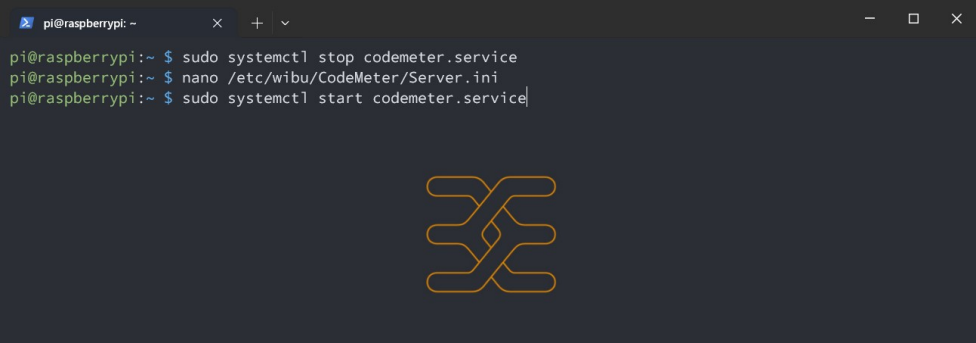
CodeMeter does not run as a network server by default. This must be changed so that PROCON-Connect can recognize it. To change this setting, first stop the CodeMeter service by running
sudo systemctl stop codemeter.service. Then open the configuration fileServer.iniwith a text editor such as nano or vim.
1sudo systemctl stop codemeter.service
1sudo nano /etc/wibu/CodeMeter/Server.ini
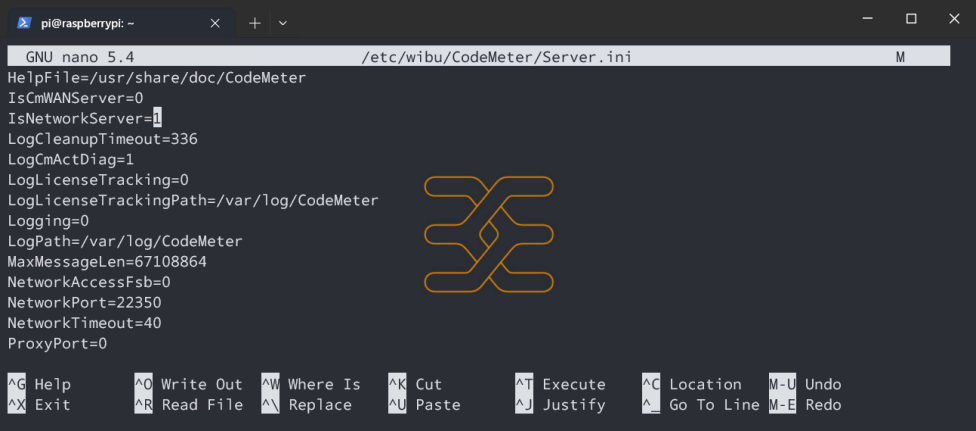
Navigate to the line that says
IsNetworkServer=0and change it toIsNetworkServer=1.
Save the changes and restart the service via
sudo systemctl start codemeter.service.
1sudo systemctl start codemeter.service
CodeMeter is now installed on your system.
Install CodeMeter under Windows
To license PROCON-Connect, the WIBU CodeMeter User Runtime must be installed on the system. This can be downloaded here:
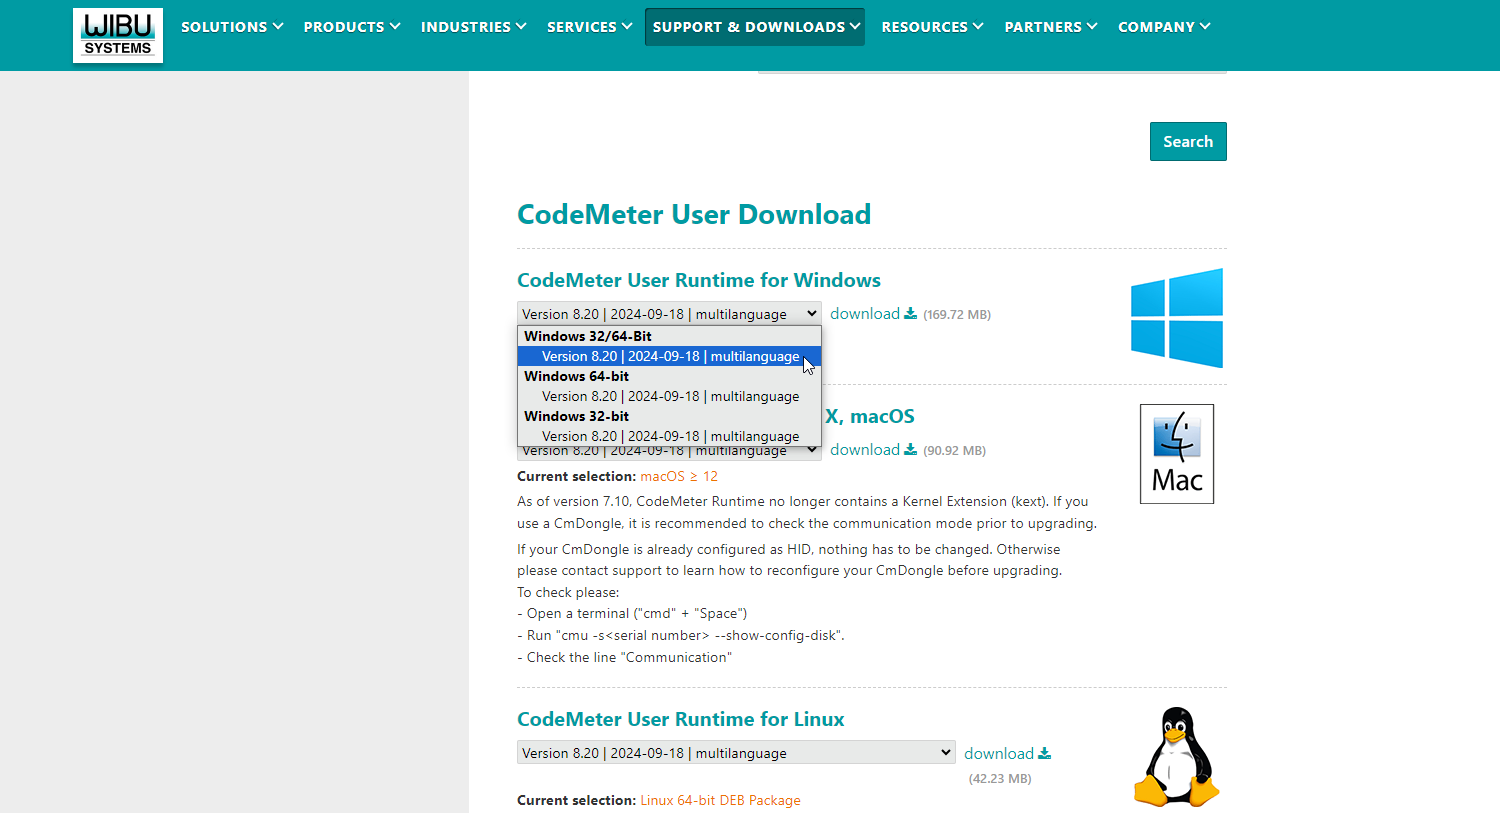
After selecting the appropriate package, click on the download button to the right of the selection to go to the download page.
If the browser download does not start directly, click on the
direct link.Start the file
CodeMeterRuntime.exein your download directory.Follow the installation steps of the setup. Adjustments to the default settings are not necessary.
The CodeMeter Runtime is now installed. You can access it via http://localhost:22352.
Important
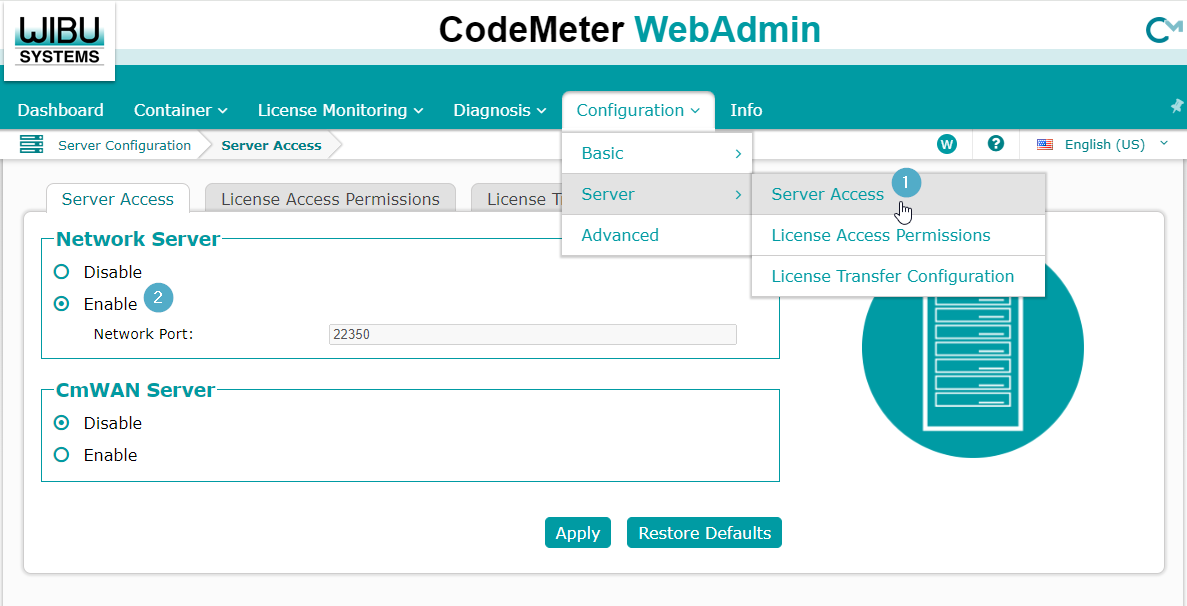
If you are using containerised versions of PROCON-Connect, you must activate the “Network server” function of the Codemeter runtime after you have installed it on your host system.
1. To access these settings, open a browser and navigate to http://localhost:22352 and navigate to the “Network server” settings via Configuration > Server > Server access > Network server
Direct link to the configuration: http://localhost:22352/configuration/server_access.html
2. Activate the network server.
License tickets
License tickets are digital tokens or certificates that represent a specific license for one or more functions. Each ticket contains information about the scope of functions, validity (unlimited or limited) and other license conditions (e.g. number of permitted users).
License tickets can be used to activate licenses and thus enable functions. However, license tickets can also be used to deactivate functions and transfer them to another PROCON Connect instance, for example. Licenses can be conveniently managed via the PROCON Connect interface.
License tickets are displayed in the format XXXXX-XXXXX-XXXXX-XXXXX-XXXXX. When handling, make sure not to copy any spaces before or after the actual ticket.
Licensing with WIBU
Prerequisites
The following requirements must be met in order to carry out licensing:
PROCON-Connect is installed/deployed on the system.
WIBU CodeMeter User Runtime is installed on the system.
License tickets are available.
The hardware or VM configuration is finalized, see Hardware-Fingerprint.
Hardware-Fingerprint
Our software uses the WIBU CodeMeter license management system, which is based on a hardware fingerprint, among other things. This fingerprint is used to clearly link the license to a specific system and prevent unauthorized use.
Warning
Changes to the configuration of your (virtual) machine after license activation may result in the license being recognized as invalid.
In this case, the software can no longer be started until the license status has been clarified and a new license has been activated.
Affected hardware features
CPU
Model
Number of cores
CPU frequency
Random access memory (RAM)
Type
Size
Network card
MAC address - Must not be generated dynamically for VMs
Number and type of network interfaces
Hard disk
Model
Serial number
SATA/IDE/SSD device detection
Attention: Changes when using snapshot-based backups or during migration
Mainboard and BIOS data
Motherboard serial number
BIOS version and manufacturer
DMI data (Desktop Management Interface)
System identifiers
System UUID (often generated by the VM platform)
Hostname
Domain information (in some configurations)
Virtual environment detection
Hypervisor signatures (e.g. VMware, Hyper-V, VirtualBox)
Virtual hardware devices and their properties
Configuration of the VM files (e.g. .fmx for VMware)
Recommendations for trouble-free license operation
Finalize the VM configuration/hardware before licensing.
Only activate the license once the (virtual) machine has been set up and no more changes are expected. This includes in particular the affected hardware features. If you need to make changes to the (virtual) machine after activating the license, proceed as follows:
Deactivate license.
Make changes to the (virtual) machine.
Reactivate license.
Set the MAC address of the virtual network card manually.
Do not use an automatically generated MAC address, as this may change.
Use a USB license dongle (CmDongle) if you require flexible VM management.
Licenses on a dongle are not bound to the hardware and remain valid even after changes to the VM or the physical hardware.
Activation methods at a glance
The licenses can be activated either online or offline on the basis of the license tickets.
Online activation is more convenient. However, the target device requires an Internet connection during the activation process.
A few steps must be carried out manually for offline activation. However, the target device does not need to be connected to the Internet during the activation process.
Both methods are described in separate chapters below.
Online activation of license tickets
Call up the license overview as described in chapter Navigation.
Select the licensing mechanism WIBU CodeMeter, the desired CodeMeter Runtime and the corresponding container in the License overview.
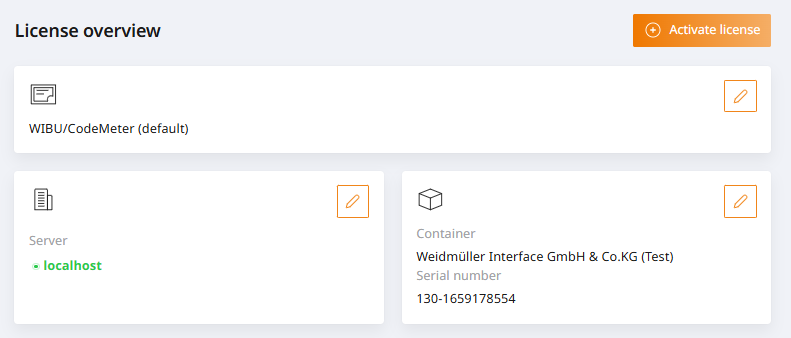
Click the
Activate Licensebutton to open the ticket entry form.Enter your license ticket.
Select the desired CodeMeter container.
Select the processing method online. For online processing of the activation, the system requires an Internet connection to the WIBU license server.
Confirm the activation dialog by clicking on
Activate license.
Offline activation of license tickets
Call up the license overview as described in chapter Navigation.
Select the licensing mechanism WIBU CodeMeter, the desired CodeMeter Runtime and the corresponding container in the License overview.
Click the
Activate Licensebutton to open the activation dialog.Enter your license ticket.
A ticket can contain multiple licenses. Select all licenses you want to activate and confirm the activation dialog by clicking on
Activate License. The system recognizes that no connection to the licensing server can be established and displays the instructions for offline activation of license tickets.Click on the first step to download the digital fingerprint of the device via the browser. The file will be required in a subsequent step.
For the second step, you need a device with an Internet connection and a browser. Copy the URL from the second step and open the website in the browser.
This step is only displayed if you have a Windows or Linux license. Select the correct licensing type: Dongle, Computer, or VM (Virtual Machine). This step must be performed correctly, otherwise the license may become unusable for its intended purpose. This step is not displayed for u-OS licenses.
Click on the
Select filebutton on the website and select the previously downloaded file of type.WibuCmRaC.Click on the
Transfer licensebutton on the website. You will be forwarded to the next step.Click on the
Download license update filebutton on the website. A file of the type.WibuCmRaUwill be downloaded via your browser.Click the
Nextbutton on the website to proceed to the next step.Go back to the licensing process in PROCON-Connect. Click on the fourth step and select the downloaded file of type
.WibuCmRaU. Wait until the upload has been completed.Click on the fifth step in PROCON-Connect to download the acknowledgement file.
Click on the
Select filebutton on the website and select thereceipt.WibuCmRaCfile you have just downloaded.Click on the
Upload receipt nowbutton on the website.Click the
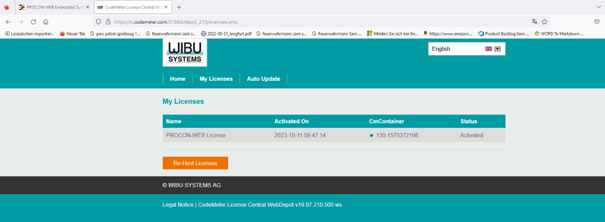
Okbutton on the website.You will now see an overview of the activated licenses on the website.
Deactivation of license tickets
A license ticket contains one or more licenses. These can not only be activated on a system but also deactivated.
The original ticket ID is required for deactivation.
Call up the license overview as described in chapter Navigation.
Select the license provider
WIBU/CodeMeter (default). If the system was previously licensed with WIBU, the entry is already selected.Select the
serverwith the CodeMeter runtime on which you want to deactivate a license ticket.Select the
Containeron which you want to deactivate a license ticket.Click on the
Deactivate licensebutton.
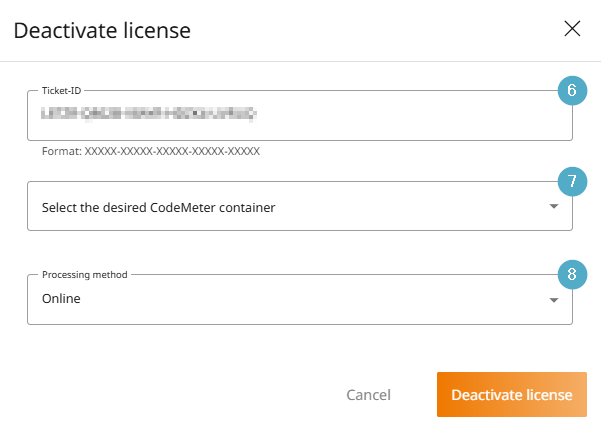
Enter the ticket ID you want to deactivate.
No CodeMeter container needs to be selected for deactivation. The selection can be skipped.
Finally, click on
Deactivate license. The system requires an Internet connection to the WIBU license server in order to process the deactivation online.Follow these instructions from step 6 onwards to perform offline processing Offline activation of license tickets.
License overruns
If a license is exceeded, the status of the service is displayed in the service overview as “License exceeded”. The service is then blocked until the license is complied with again.
This state can occur, for example, if a project is imported whose number of tags exceeds the number of licensed tags.
Licensable components
The following components can be licensed individually. The PROCON-Connect Runtime contains the basic system and is always required. Additional components can be licensed as required.
PROCON-Connect Runtime
Modbus driver
Codesys driver
Allen-Bradley driver
TIA driver
OPC UA driver
IEC 60870-104 Server and client
MQTT connector, quantity-dependent: 100, 250, 500, 1 000, 2 500, 5 000, 10 000
Azure IoT Hub connector
License scope of the PROCON-Connect app on u-OS
On u-OS, the PROCON-Connect app includes a free range of functions. Additional functions can be activated via licensing.
The free functions on u-OS include:
Codesys driver
OPC UA driver
Modbus driver incl. device templates
Connection to generic MQTT brokers of up to 100 tags
Connection to ResMa without limitation
Connection to easyConnect without limitation
Data storage on local SQLite database without limitation
Licensing via LIC file (deprecated)
Licensing via license files is still technically possible, but is to be removed from PROCON-Connect in the long term and should therefore no longer be used.
LIC files activate a fixed set of licensed functions that cannot be changed:
PROCON-Connect Runtime
PROCON-HMI Runtime
Drivers: Modbus, OPC-UA, Codesys and UC20 Web
IIoT Cloud Connector coupling to ResMa and easyConnect (no coupling to a generic MQTT broker)
Data logger (SQLite, InfluxDB v2) without restriction