User administration
The user administration offers the possibility of creating users and a legal structure for the project. Rights are linked to roles and users are assigned to one or more roles. There are at least one, but also many rights per role (worker, fitter). Depending on the characteristics of the company that operates a machine, an employee can only perform the worker role there, or several roles can be accumulated (worker, setter, service).
Typically, only those users are created in the project planning system that the machine supplier needs for the maintenance of an interface by the service staff and a customer admin who then creates all other customer logins.
To ensure that users of the standard user administration created during runtime are not lost in the event of a project update, the configuration was divided into a runtime part and a project part. The runtime saves the settings / changes in a separate file (UserManagementRuntimeConfig.xml). This file is created when the project is started for the first time and is a copy of the UserManagementConfig.xml. If the UserManagementConfig.xml changes (indicated by a time stamp that is stored in the file), the changes are compared with the runtime configuration.
The following rules are considered during the comparison:
The rights and groups are completely taken over from the project configuration, as these cannot be changed in the runtime.
If a group has been removed from the configuration, the assignment is removed from all users created during runtime who were members of this group.
Users created in the designer are completely adopted.
If such a user was changed / deleted in the runtime, these changes will be undone.
Exception 1: If a user already exists with the name that was created in the runtime, this user will not be changed.
Exception 2: If the configured user was changed in the runtime (he changed his password, or the user was edited) then this user will no longer be replaced by the data from the project configuration. Important: A user can only be changed via a project update by deleting the user in the runtime or deleting and creating a new one in the Designer.
Ident readers can be used for logging on, for example with transponders, via additional technical equipment. This should be done in close coordination with GTI support.
Configuration user administration
Configuration of security/authorisation

Key name |
Input |
Meaning |
|---|---|---|
Password for project protection |
Possibility to assign a password for the project |
|
Admin can be deactivated |
Possibility to deactivate the default administrator at runtime |
Configuration of data management (only SCADA)

Key name |
Meaning |
|---|---|
Data storage |
Indicates, whether the user information is stored as a file in the project database, in the project directory or in a file path |
Storage path |
Path to store the user database (if chosen above). It must be ensured, that the path exists on the target system |
Should only be changed at the beginning of project planning |
General user administration
With the user administration editor, the required users and guidelines can already be defined in the design phase. These users can be changed, or new users created in the runtime. The creation of user groups and the assignment of rights to the user group are not possible in the runtime.
To individualise the appearance of the dialogs for the user administration in the runtime, they can be customised via the style guide (go to Chapter “Style Guide”).
User
The users required in the runtime are created or edited with the “User” editor.

The editor is used to create, edit, and delete users. The “Admin” user, who is assigned to the “Administrators” user group, exists by default for every project.The user “admin” cannot be deleted either and is used for the administration of the system. It can be used to modify other groups and users, which is why it should only be used as a fallback if, for example, nobody can log in anymore.
Important
If the password of the admin user is forgotten and there is no further user with system rights, there is no other way of accessing the system except for resetting the entire user database! A project update via the designer is then necessary!
For this reason, separate users and groups should always be defined for the actual rights system and given appropriate rights.To create new users, the context menu is opened, and the entry create or copy User is selected if an existing user is selected.

An empty user is created, and attributes must be assigned. The following table shows the attributes that a user can have.
Important
The username Admin is assigned by the system and cannot be deleted in the runtime and can also not be removed from the administrator group. The admin user can only be changed if you are logged in as an admin.
Attribute |
Meaning |
|---|---|
Username |
Specifies the name by which the user logs in. A maximum of 31 characters is possible |
Full name |
The full name of the user is entered here. A maximum of 100 characters is possible. |
Description |
A text to describe the user can be entered here. This text can be multilingual. A maximum of 255 characters possible. |
Password |
Password to authenticate the user |
Password aging |
This option enables / disables the password aging. This means that the password must be changed after “X” days. The password aging period is set in the password policies |
Password must be changed the next time you log in. |
If this option is activated, the user will be forced to assign a new password at the next login. |
Group |
Specifies the group to which the user is assigned. |
Enter the e-mail address |
|
Mobile phone |
Indication of the mobile phone number |
Phone |
Indication of the telephone number |
Notification type |
Preferred type of notificationPossible values: E-Mail, SIP-SMS, PageControl SMS, PageControl Phone |
Notification group |
Member of the following notification groups |
Language |
Specification of the language for this user |
Important
The username cannot be duplicated or empty. The gesture password will be implemented later.
Guidelines
Under this point, all settings relating to password security are adjusted. By default, all password policies are activated or set with default values.
To achieve FDA conformity of the user administration, correspondingly restrictive settings for the user administration must be made (see white paper FDA conformity). Passwords are stored in encrypted form in all cases and cannot be read out.
Account policies

The account lockout threshold is defined under the account policies group. By default, the account is blocked after three unsuccessful attempts to enter the data.
Important
The setting in “Account lockout threshold” also applies to the “Admin” user.
Password policies

The second group of policies are password policies. The available tag tools are listed in the following table. The password guidelines are already checked when assigning the passwords in the Designer.
Directive |
Meaning |
|---|---|
Password aging |
By activating password aging, the password expires after the maximum password age has expired and must be reassigned. |
Maximum password age |
The number of days after which the password will expire. |
Enforcing strong passwords |
When this guideline is activated, the password corresponds to the requirements for secure passwords (the guidelines are evaluated at least one uppercase and lowercase letter, at least one number and at least one special character). |
At least one upper- and lower-case letter |
The password must contain at least one uppercase and one lowercase letter |
At least one number |
The password must contain at least one number. |
At least one special character |
The password must contain at least one special character. |
Must meet the complexity requirements |
Password complies with complexity requirements (the minimum password length and “enforce strong password” guidelines are evaluated). |
Minimum password length |
The minimum password length required is specified here. |
Password history |
If the password history is active, the last five passwords of the user are saved and cannot be assigned as new passwords. |
Roles and rights
This editor is divided into two parts. In the top you can find the possibility to create a new group. In the lower section you can efine new task / right groups.
Roles / groups
In this area new groups are created, existing ones edited, or certain ones deleted. It is also possible to copy an existing group. The “Administrators” group is predefined by default and cannot be deleted. Others can be created via the context menu.

The available tag tools are listed in the following table.
Attribute |
Meaning |
|---|---|
Role / group name |
Specifies the name of the user group; the name must not be empty or duplicated. The group name is a textitem |
Description |
Here the user can enter a description for the respective group. |
Task / right |
Here the user specifies which tasks or rights a group has. |
Area |
Selection of the area for which the role can be selected, if the project has several. |
External group mapping |
Mapping of an internal user group on an external one.Eithter Microsoft AD or an OAuth provider. |
Important
The group name and the group description can be configured in multiple languages.
After the group has been created, rights can be assigned to the group. The right column shows the name of the right. If more than one right has been assigned to the group, “[more]” is displayed. The button opens a dialog in which the rights can be selected.

All available rights are grouped by rights group in this dialog. The right can be assigned to the group via the “Assigned” column. If “Right denied” is activated, the user group has no access to the rightThe changes are applied when you click the OK button and are discarded when you click the cancel button.
Special position of administrators group The group “Administrators” is a group predefined by the system, whose members have ALL system rights and can modify other groups and users.
This also applies to the standard user “admin”, who is automatically a member of this group and should not be deleted from it.
It is recommended that you only use this group for administration purposes and that you always define your own groups and assign them rights for the actual rights system. A user can only be added to, removed, or modified from the administrator group by another user of it, even if another group has the right to “Assign other group” or “Change user” or “Change other users’ password”.
Task / rights
In the area “Task / Rights Group” the account and password policies can be configured.

An empty rights group is created to which various user-specific rights can be assigned.

A right is created that can later be added to a symbol or image.
Views
There are two views for user management, user list and user groups, which can each be displayed in a grid (user management grid) at runtime.
User list view
The user list view can display all attributes of a user in table form.
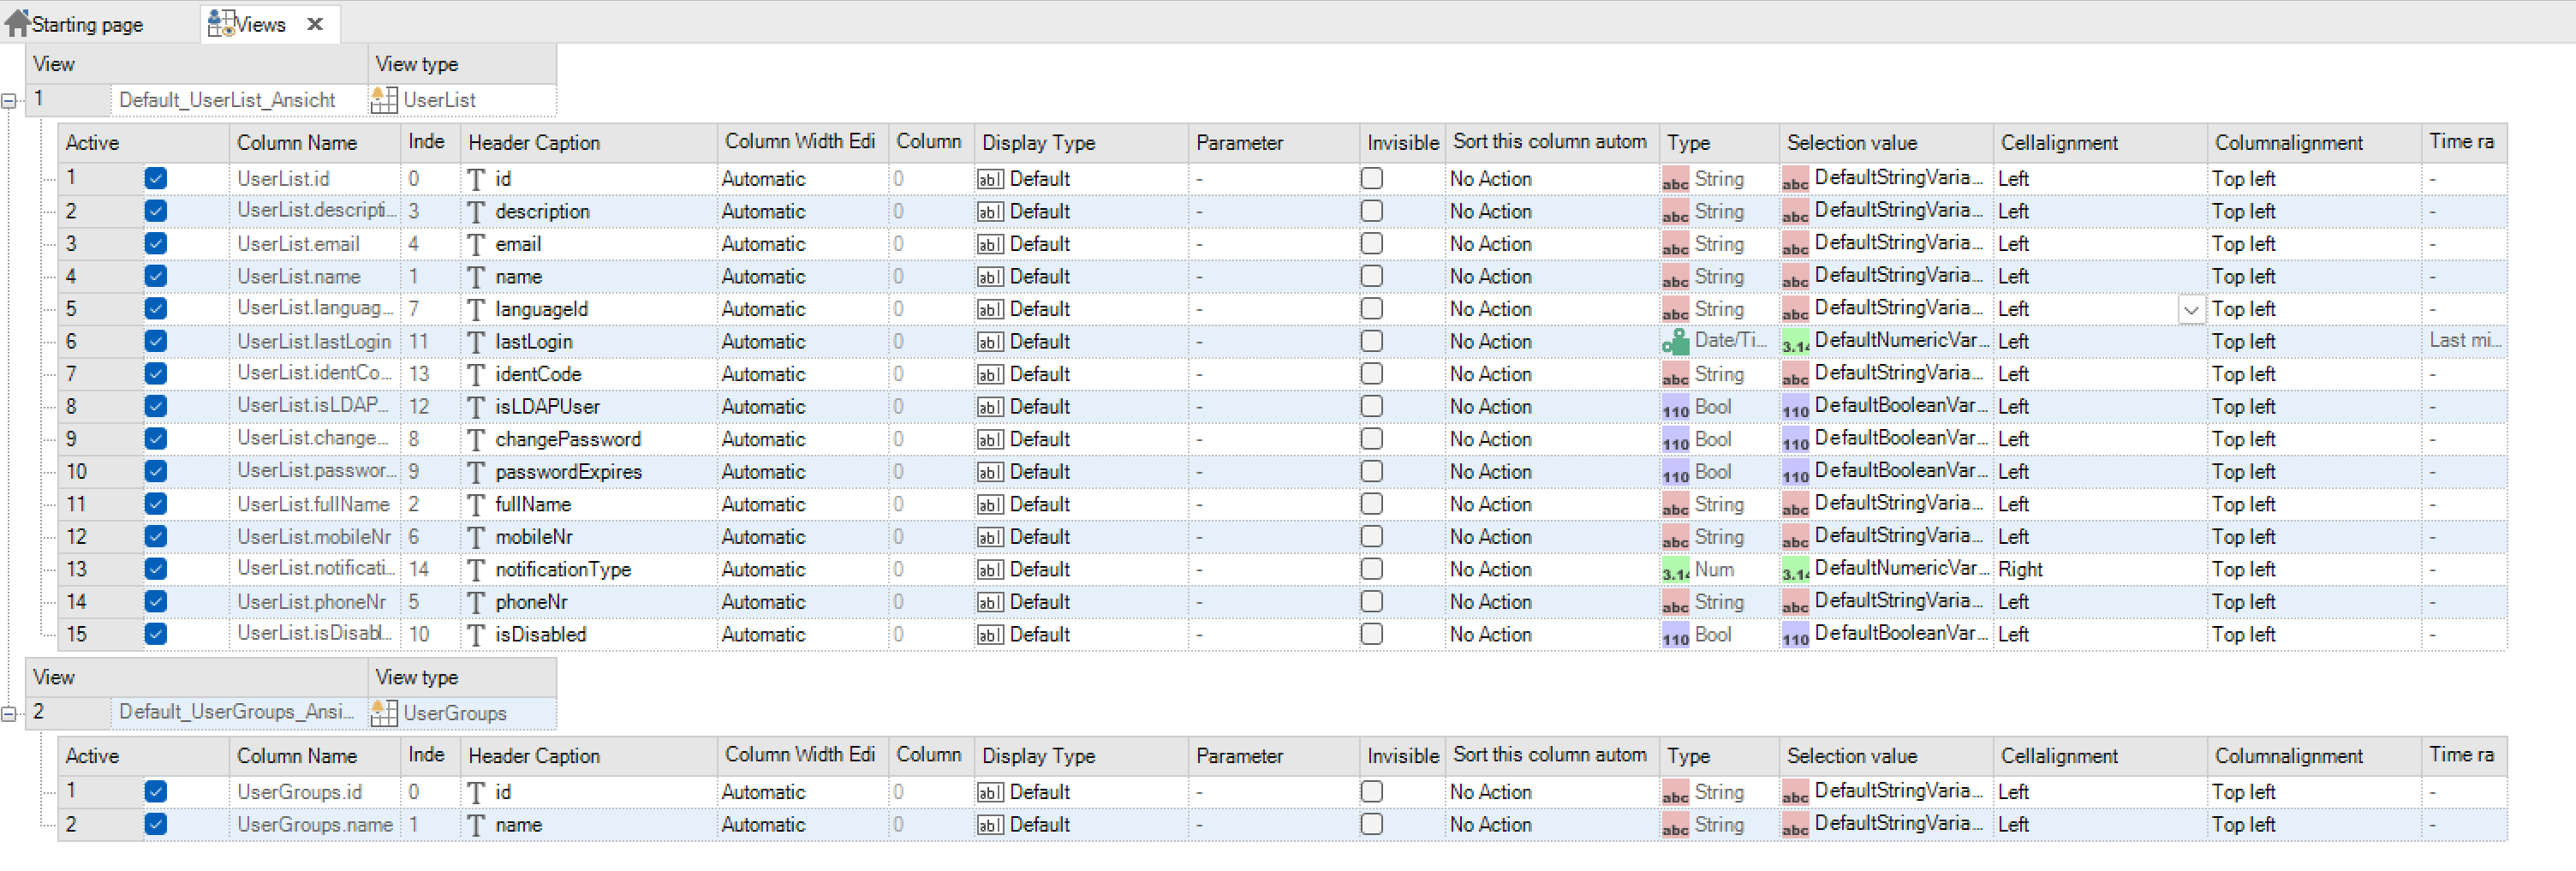
User group view
The user group view can display the created user groups in table form.

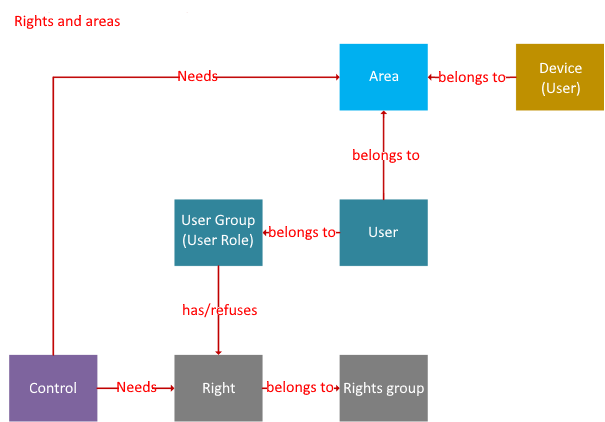
Rights and areas
In addition to rights, areas can also be assigned for all input options in images. This links the functional right to change a value with the geographical right to only be allowed to do this on certain clients. In this way, a critical setpoint change can be restricted to a specific right as well as being executed via a specific control panel.
The graphic below illustrates the relationship between users, user groups and rights and areas:
Rights system during the runtime
User login dialog
The users authenticate themselves on the system with the login dialog. If the login is cancelled by pressing the “Close” symbol (top right), any logged in user remains logged in. The registration is carried out via the register button.
If an error occurs when logging in, for example a wrong password, the error message is displayed directly in the dialog:

Note texts are also displayed in this way. For example, it shows that the password will expire in x day (s).
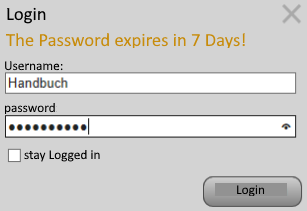
The dialog then closes automatically after a few seconds. (Default after 5 seconds)
Check of rights
The checking of the rights required to be able to carry out an action is carried out in two places during runtime. A change in the rights of a logged-in user only takes effect when the user has logged off and logged in again. If you assign several rights to an object, then all rights must be available.
Check in the client
Rights to entries, for example, are checked in the client.
Check in the server
Rights that are defined on tags are checked on the server side. This means that setpoint changes based on a hacked client could also be intercepted and rejected by the server.
Authentication (only SCADA)
In PROCON-WEB, in addition to the internal User management also integrates an OAuth2 (token authentication).This can also be made available externally in order to provide external Applications to enable validation of users.
In addition, there is also the possibility of using external OAuth2 providers instead of of the PROCON-WEB internal OAuth2 provider to e.g. external To connect user administrations. For this, a corresponding mapping of the user groups.
There are 3 choices (authentication type) available:
Internal (current internal PROCON-WEB user management)
Microsoft Active Directory (currently only MS AD is supported)
OAuth2 Provider
Definition in the designer
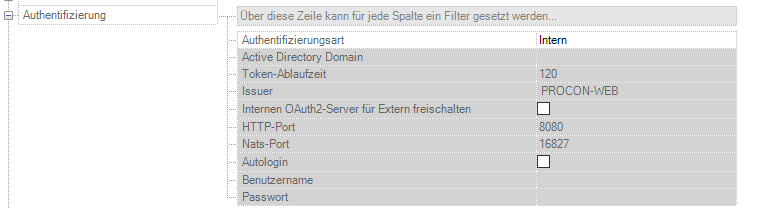
No further settings need to be made for the “internal” selection become.
To select “Microsoft Active Directory”, the Active Directory Domain and the domain name of the Actve Directory domain are recorded.
The following entries are available for selecting “OAuth2 Provider”:
Attribute |
Meaning |
|---|---|
Token expiration time |
Time in minutes in which the token is valid: Default: 120 |
Issuer |
Issuer that is entered into the JWT token. This will determine who issued the token. When using multiple PROCON-WEB instances the issuer should be unique in every instance |
Enable Internal OAuth2 Server for External |
Der PROCON-WEB interne OAuth2 Server wird für externe Applikationen freigeschaltet. Er ist über folgende URL erreichbar: ‘http://{MACHINENAME}:{HTTPPORT}/user-management/api/v1/oauth2/token’ (MACHINENAME ist der Name/IP Adresse der Maschine, auf der der Dienst läuft, HTTPPORT ist der konfigurierte http Port) |
HTTP-Port |
HTTP port under which the internal OAuth2 server is used for external use is available. |
Nats Port |
Port for internal communication of the user management |
Autologin |
The user login dialog is always displayed when no user is availableis logged in or logged out |
Username |
When entering a username, this user is automatically Logged in when the visualization starts. |
If no user is specified, the login dialog appears |
|
Password |
The password of the user that is automatically set when the visualization is startedis registered |
Runtime with external authentication
In principle, external authentication (both via Microsoft Active Directory as well as via OAuth Provider) always has a Authentication with PROCON-WEB own users possible. If a Authentication on the external server (Active Directory domain or external OAuth provider) fails, an internal Authentication attempted. Does the user exist as an internal PROCON-WEB User (He is configured as a user in the designer or at runtimenewly created) the login takes place as this user
Microsoft Active Directory Authentication
The user login works as without a connection to the Microsoft Active Direcotry.
If the domain controller is not found or if access is denied, no login is initially possible, then only users from PROCON-WEB will work.
Once a user is successfully authenticated via the domain, this is “buffered”, a later login is then also possible if the domain controller is offline.
Domain users can only be changed conditionally in PROCON-WEB. Other settings (e.g. group assignments) must be made in the domain. This means, removing a user with domainmapping has to be done within the domain itself.
Changes can be made to user information necessary for notifications (mail, phone number, assignment to notification-groups) or the IdentCode for legic-login.
Password guidelines, blocked users, etc. are completely managed by the domain, PROCON-WEB settings are ignored. In addition to the domain settings, the complexity of the password must also satisfy the settings in PROCON-WEB
Initially only users from PROCON-WEB are displayed in the UserManager. Domain users can only be displayed if a domain user is logged on. Only those users of the domain are displayed who are also members of a “mapped group”. Deactivated or blocked users will be hidden.
OAuth2 Authentication
Similar to Microsoft Active Directory pairing, it also works the user login is normal when authenticating via OAuth2 as without the external coupling.
In addition, OAuth2 authentication also offers the option of to authenticate itself directly with a token string if it is defined by of the external OAuth2 infrastructure. This can e.g. through an email or a text file on a USB stick, which was made available to the user. The token must then be accessed via the clipboard can be pasted or typed in.
However, unlike Microsoft Active Directory, there is NO buffering of the Bentzers on the system possible, it must ALWAYS be used for authenticationthe OAuth service will be available because the tokens have a certain expiration timeand must always be recreated.
OAuth users cannot be changed in PROCON-WEB either. The Group membership is determined by the roles from the OAuth serviceand with it the rights.
Also, additional user information cannot be customized because all user information about the token at authenticationcan be provided. As a result, there is no IdentCode and Legic login possible.
In the UserManager, therefore, only users from PROCON-WEB are displayed.”
PROCON-WEB Viewer
It is not possible to connect an Ident Reader via a “normal” browser such as Internet Explorer or Firefox. A PROCON-WEB Viewer was developed to circumvent this restriction.
Description
There is a new file called “PROCON-WEB_Viewer.exe” in the runtime directory. This is a framework application that contains a browser control. You can also connect the Ident Reader via a COM interface and forward the information from the Ident Reader for visualisation.
Operation and functions
The “PROCON-WEB_Viewer.exe” file has no dependencies and can therefore be copied and executed on any Windows-based system with .NET Framework 4.5.2 or newer. The browser engine of the Internet Explorer on the system is used. It must therefore be ensured that it is up to date (10 or newer). When the application is started for the first time, a configuration window appears:

The URL of the PROCON-WEB server must be specified here. Further options can also be set.
Kiosk mode: If the check mark is set, PROCON-WEB Viewer is started without a frame in full-screen mode. Exiting the visualisation is only possible via ESC-ESC if the user has the necessary rights.
Ident reader
Configuration of the Identreader
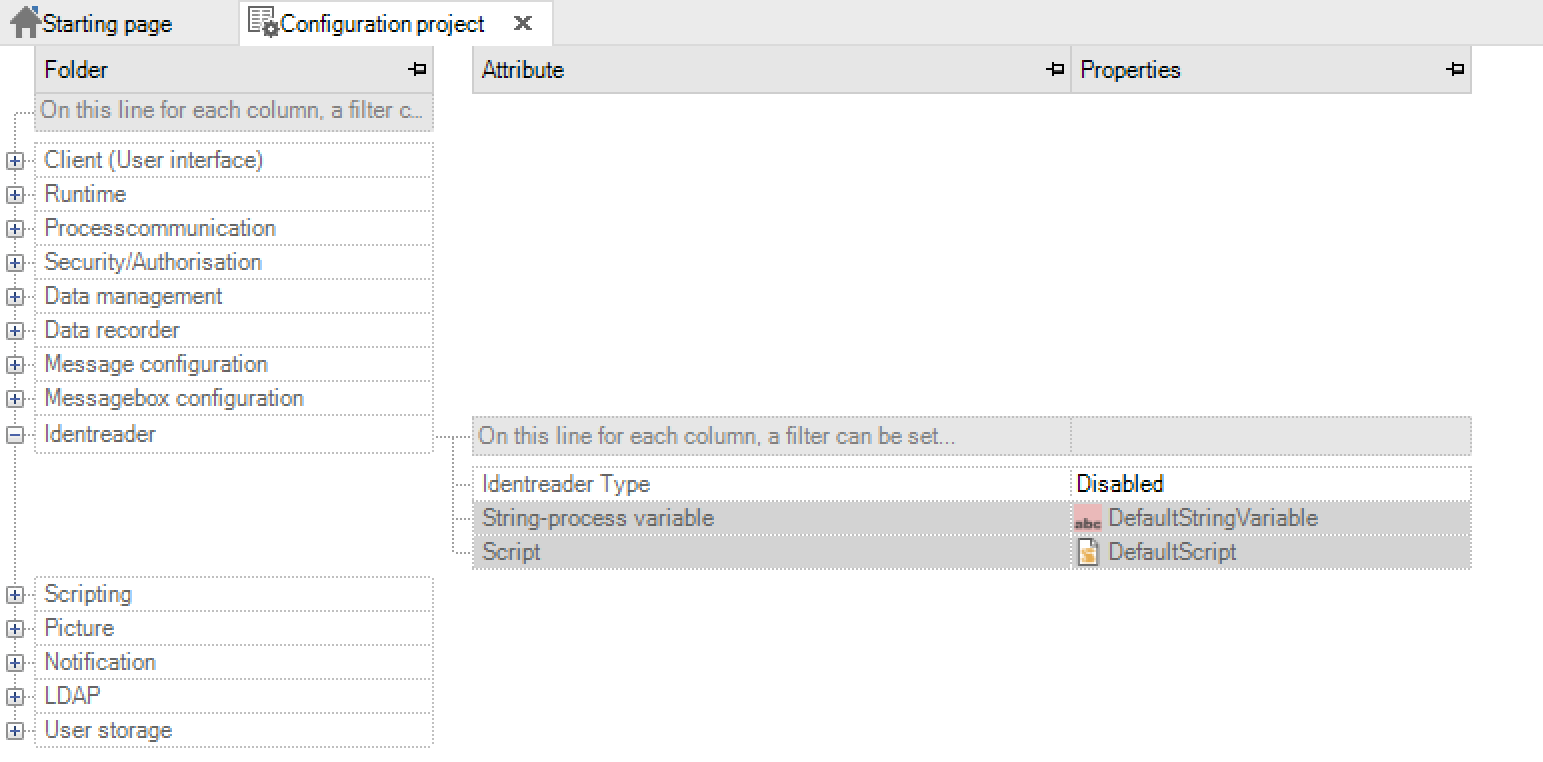
Key name |
Input |
Meaning |
|---|---|---|
Identreader type |
Default value: deactivated |
Setting how the Identreader should work, if available |
String variable |
Default value: DefaultString variable |
String variable that receives the token read by the identity reader |
Script |
Default value: DefaultScript |
Script that is to be executed after logging in via the Identreader |
Requirements
The Ident reader must output the code in text form and end it with a carriage return and / or a new line feed.
Use the Ident Reader for authentication
If in the project configuration it is set that the Ident Reader should be used for authentication, a text field “Ident Code” appears in the “Edit user” dialog of the user administration. While the dialog is open, a token can be placed, and the content of the text field is automatically filled.
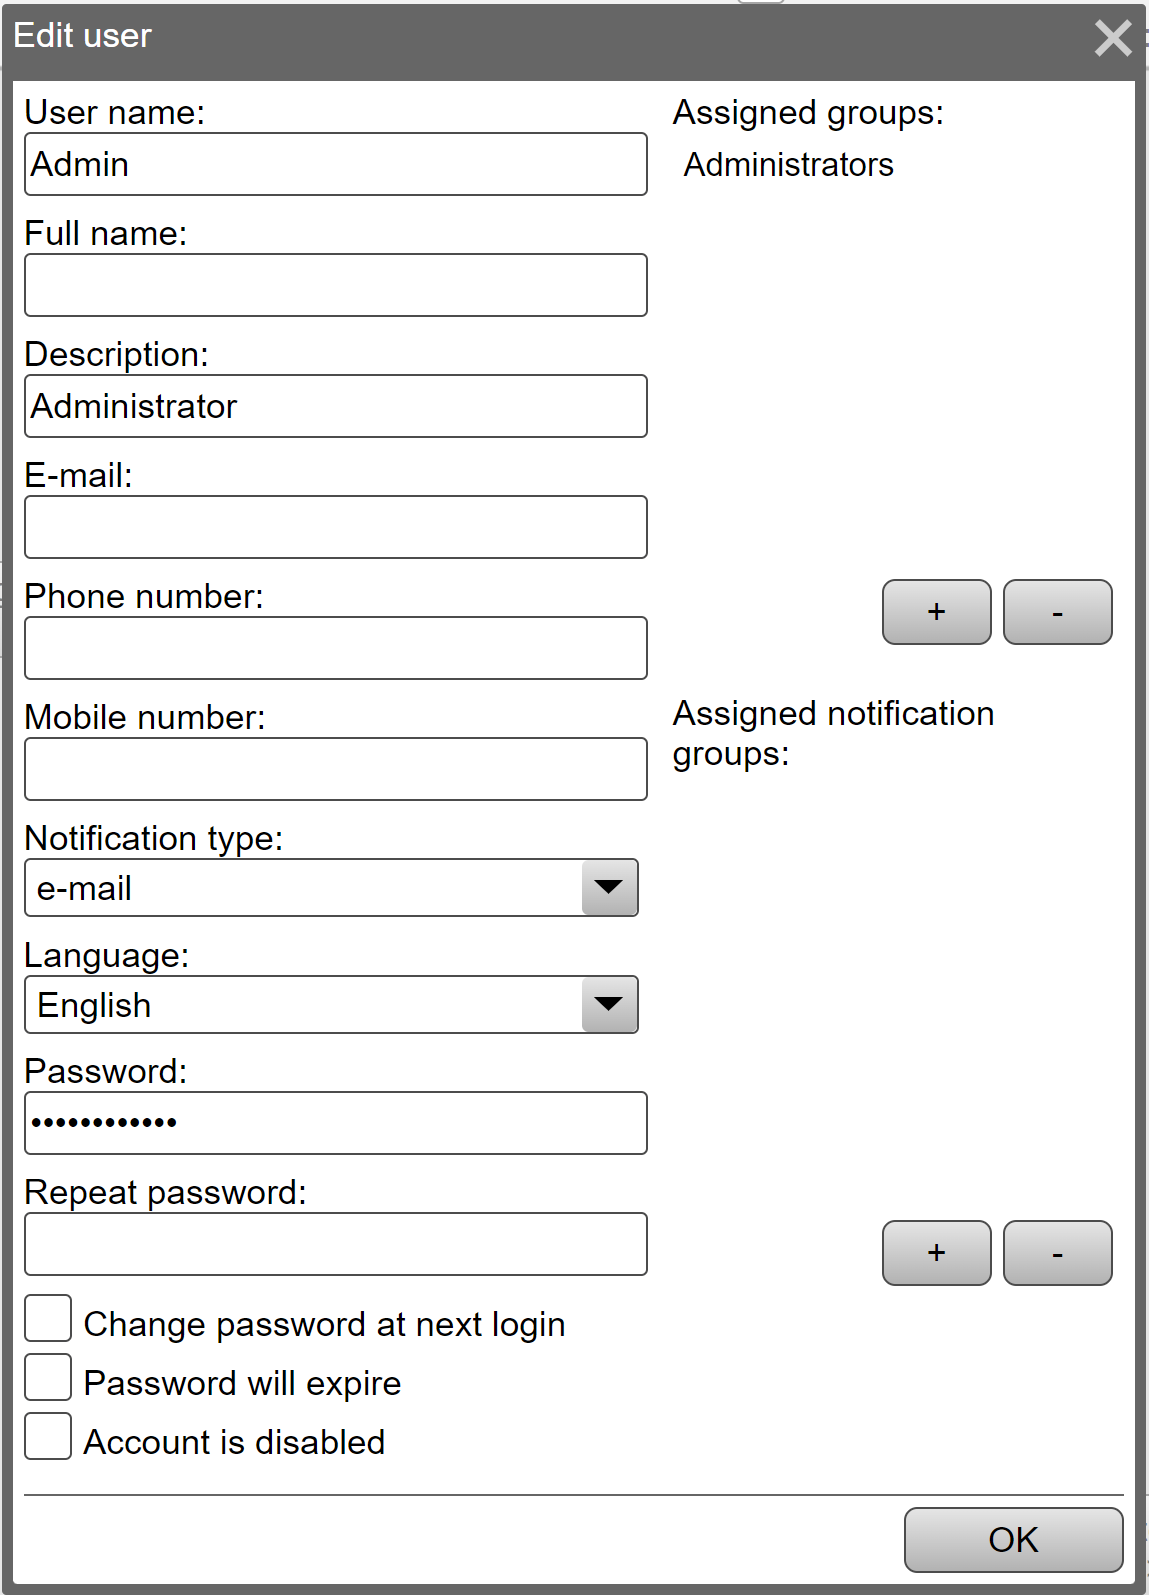
The user can then log on by placing a token.
Using the Ident Reader for custom actions
Alternatively, the Ident Reader can be used for user-defined actions. A text variable and / or a script can be specified in the project configuration. If a token is placed on the Ident Reader, the content of the token is written to the text variable and the specified script is then executed.
Login with token
Login via URL Parameter „token”
As with other parameters (e.g. “picture” or “client”)a user can be logged in directly via the URL.
An example would be:
Input in the URL line: http://localhost/?token=jwt123
Note
The value “jwt123” would not be a vallider token!
More information about JWT can be found here:
Automatic login at system start
The client tries to log in in the following row is an option is not given, the next one is used:
Login via URL parameter
Login via user who has activated “stay logged in”
Login of the default user, if available
Loading the last language used (no user)
default user
It is now possible to configure a default user. This default user is automatically logged in if no other user is logged in. As soon as the user makes a logout call, the current user is logged out and the default user is logged in.
Clientscript function „loginByJWT“
There is a new Clientscriptfunction with the signature:
loginByJWT(token:string):void: Promise<void>
This function allows as well the login via URL-parameteras the authentication with a token.
OAUth2 Provider
In this menu item, provider for authentication can be administered

A provider needs the following values:
Attribute |
Meaning |
|
|---|---|---|
Issuer (Name) |
Name of the provider, indicated in the decoded Token |
|
URL Forwarding |
The URL used for authentication |
|
Algorithm |
It can be choosen between ES256 and RS256 |
|
Activated |
Indicates if the provider is active or not |
|
PublicKeyFile |
The PuclicKeyFile of the provider has to be selected here for validation. |
|
Username |
Field in the decoded token where the username (Login-name) is stored. |
|
Mapping Name |
The field in the decoded token where the external user roles / User groups are stored. It can be a single user group or, a string array of multiple groups can be supplied. These names correspond to the external group names in the group mapping. |
|
Roles |
The password of the user that is automatically set when the visualization is startedis registered |
|
Use JWKS (JSON Web Key Set) |
This configuration can be used as an alternative to the PublicKeyFile. |
|
JWKS-Type (active, if JWKS is active) |
Selection between URL and file. |
|
JWKS (active, if JWKS is active) |
Either an URL oder a json-file (depending on the selected JWKS-type) |
|
Overwrite expiration |
||
Expiration (in minutes) |
active if “overwrite expiration” is activated |