Client / server Applications (only SCADA)
General note
In terms of structure, PROCON-WEB is basically a client-server system. For classic single-user applications with additional surfaces, for example for smartphones, little attention needs to be paid to client-server applicationsIt is different in the case of complex SCADA (control technology) applications because several clients are active at the same time and can influence data. In addition, ‘local’ rights for certain operator actions should be considered. For this purpose, various extensions have been added to the system that should be considered when planning the project. This includes:
Global and local tags (see process coupling - creating process variables)
Area assignment in fault processing
Dedicated and non-dedicated clients (configuration - network)
Areas (configuration - areas)
Within a local system, there are usually no security-relevant considerations with regard to the transmission between server and client. This is different for complex applications that can also be cross-network. For this there is the possibility of creating encrypted transmissions.
Adjustments to the project
Network configuration
The network configuration represents the image of the PROCON-WEB client / server network structure.

Example machine network The previous figure shows the following example:
The dedicated clients 1-3 are assigned to area A.
The dedicated client 4 is assigned to area B.
The dedicated client 5 is assigned to the area C.
There are also non-dedicated clients 6 and 7
Result: For clients 1-7, licenses are tied to the specific devices and cannot be taken over by other participants
Two further clients are assigned dynamically
Restrictions regarding operation or fault processing can be assigned for the clients assigned to the areas (e.g., only client 1-3 sees the faults from area A and can change critical setpoints there, clients 4-7 may not)
The network configuration is called up via Configuration Network in the project tree
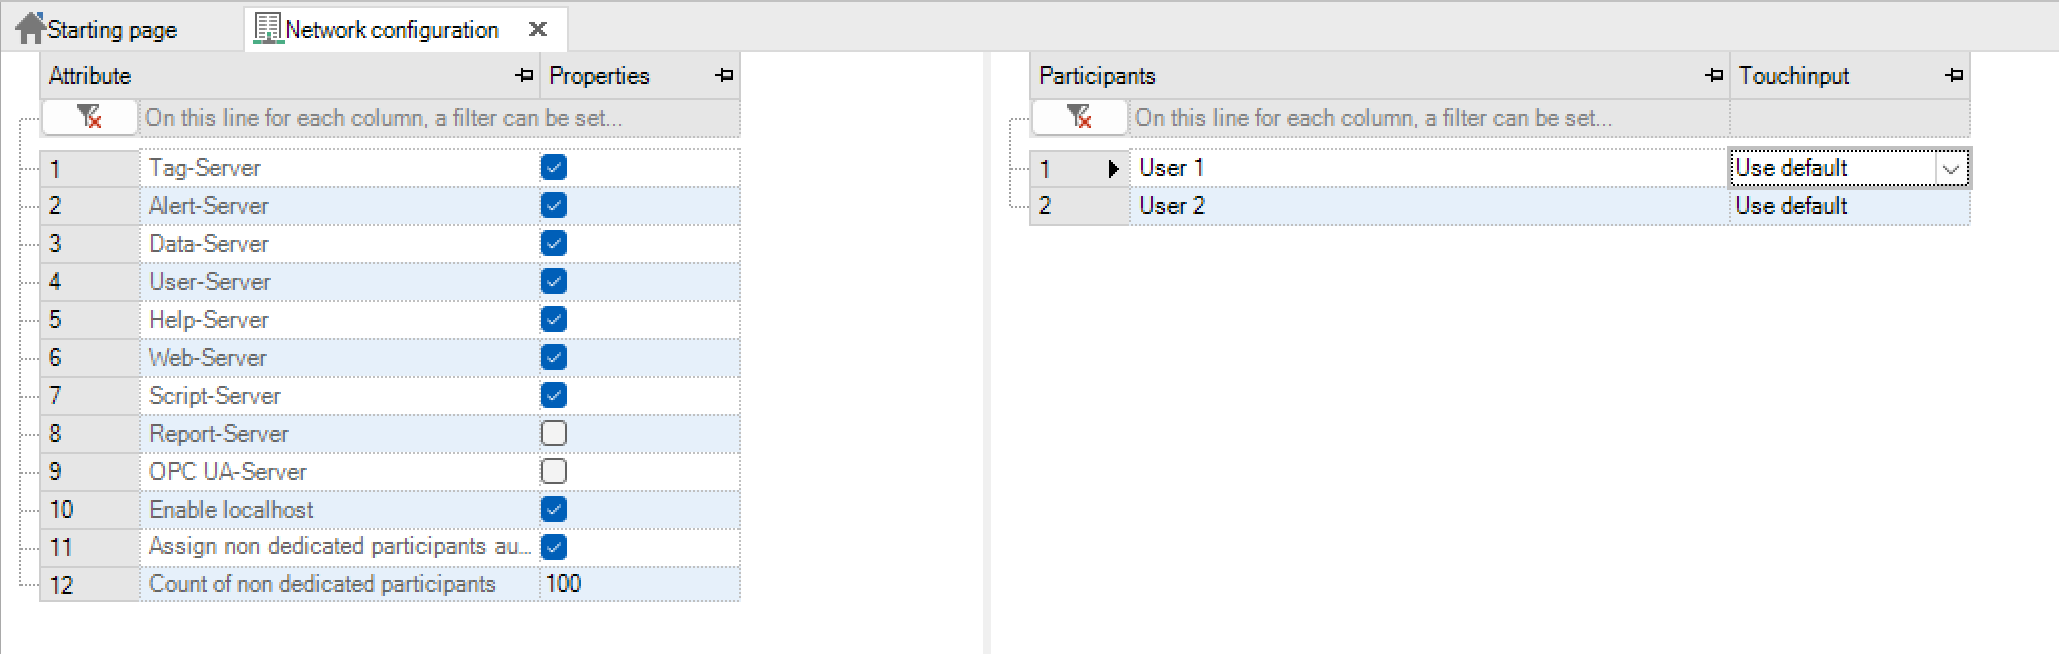
In the left part, the server components required for the project are activated or deactivated. Depending on the configuration, it is possible that not all server components are required. ::: :::{important} WebServer, TagServer, AlertServer, ScriptServer and DataServer should be present in every project. ::: :::{note} An additional license is required for the OPC UA server.
BEISPIEL:
http://192.168.10.20?client=1/
Allow localhost: This option makes it easy to configure a quasi-single-user system.
Automatically reassign non-dedicated participants if the device ID is unknown: With this option, the non-dedicated participant is automatically reassigned if the device ID is unknown.
Number of non-dedicated participants: Determines the number of non-dedicated participants in the project.
Attendees: This list on the right determines the number and names of the dedicated (= known by name) clients.
The terminal device is made known by name as a dedicated client via teaching in the web runtime. This process only needs to be carried out once for a device and is noted for all subsequent registrations.
Teaching takes place either automatically if the number of non-dedicated clients has been exceeded, or manually by calling up special function 431, for example using a button.
However, this should only be done with admin authorisation and the user should then log on to the device himself. For this reason, the active user is automatically logged off after the teach-in process
An existing link between the device and the client can be removed using the “Disconnect” button, for example to enable a dedicated client to log on when the maximum number of dedicated clients has been reached.
However, the function only deletes the assignment. The client itself is not separated from the system in terms of communication.
Important
Cookies must be allowed in the browser so that the assigned client is still known after a restart. The browser history must not be deleted either, otherwise the assignment will also be lost.
Process variables
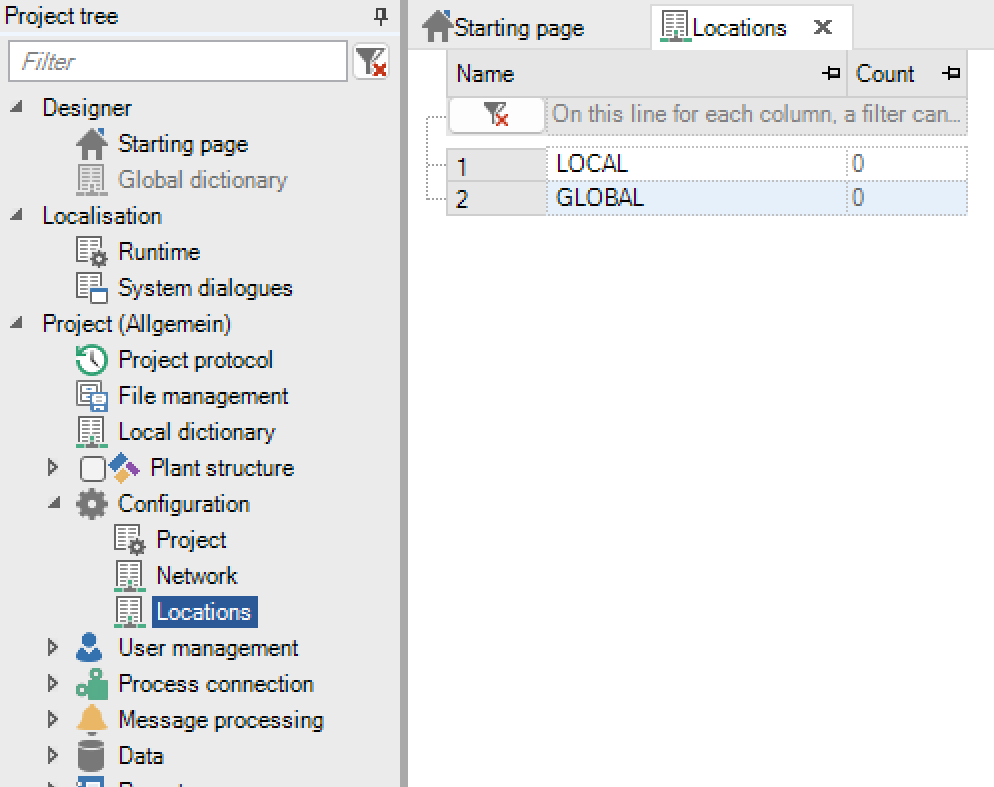
Process variables can be defined either globally or locally.

A global definition means that the process variable is known throughout the entire system and has the same value. If the value is changed in one client, the change is visible on all clients.
A local definition means that each client has its own variable of this type. If the value is changed in one client, the change is visible on all clients.
Example: If data that are to be managed in a recipe are to be changed by several participants at the same time, then these must be created as local variables.
Note
A variable with driver coupling is generally defined globally.
Important
A variable that is used in the script should be defined globally. Otherwise, the value changes are not visible in the client.
Alarms and messages
Alarms and messages are managed by the alert server. The column “range” must be filled in for each alarm in the alarm definition. The area in which the alarm should be displayed must be specified here.
An alarm can be assigned to the areas “Local”, “Global” and a “User-defined area”. Each alarm is entered in the AlertServer with the PC name when it is triggered. If the alarm is assigned to the “Local” area, it can only be seen or acknowledged on the viewer of the relevant computer. If the alarm is assigned to the “Global” (= standard) area, it is displayed on all viewers in the network regardless of its trigger computer. If the alarm belongs to a “user-defined area”, the alarm can be displayed and acknowledged on all computers in this area.
The areas can be defined in the tree under Configuration -> Areas.
Important
If alarms are triggered by process variables, these must be defined as process variables of the global server.
Note
Further information can be found in the Designer documentation or the OnlineHelp.
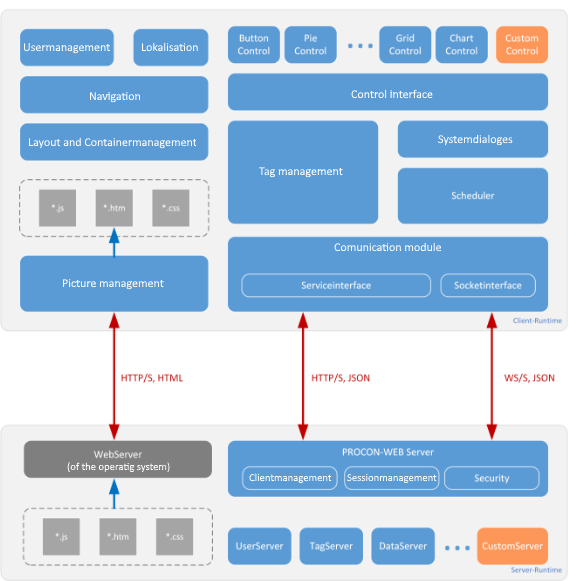
Structure of the PROCON-WEB server (SCADA)
The PROCON-WEB server carries out the data exchange with the control system(s) (the process) and is responsible for the central administration of data (recipes, logs, …). He serves the clients with the data necessary for the image construction, but without knowing the images or their contents.

Image data is generated as web files via the designer and transferred to the web server for delivery to the client. Additional configuration files should describe the tasks of the various server modules (services). Each module is responsible for a different task and the specific constellation of modules (services) can be adapted to the specific application.
SystemServer
SystemServer-Console
The system server console provides an insight into the servers configured or required for the project.
The SystemServer Console offers the following functions:
Display of all servers managed by the SystemServer and their information (e.g. current status)
Display of all clients logged on to the system server and their information
Control of the server (e.g., start, stop)
Control of the PROCON-WEB system (shutdown, reboot)
Control of the active clients
Display which clients have connected to a server
Interactive project switching / project update
Display of the log files of the server

The SystemServer Console is divided into two window parts. In the left part the image of the network configuration with the server components and the clients is shown in a tree structure. If available, further information can be found on the right.
Server status: In the tree on the left, the SystemServer Console shows the status of the individual servers with a corresponding icon.The following table lists and describes the icons shown for the system status of the individual servers using the AlertServer as an example. The following diagram illustrates the structure of the WebClient and its communication with the server components.
Server |
Status |
|---|---|
|
Active |
|
In Pause |
|
Inactive |
|
Status unknown |
|
Projectupdate |
|
Change of status |
|
Undefined state |
|
Active, but cannot communicate with dependent server |


Client-Status In the tree on the left, the SystemServer Console shows the status of the individual clients with a corresponding icon.The icons shown for the system status of the individual clients are listed and described in the following table.
Client |
Status |
|---|---|
|
Dedicated client (taught) / localhost inactive |
|
Dedicated client (taught) / localhost active |
|
Dedicated client (not taught) / localhost inactive |
|
Non-dedicated client inactive |
|
Non-dedicated client active |


The menu of the SystemServer-Console offers the possibility to carry out further diagnostics.

The following submenu items are available under the “System” menu item.
Menu item |
Meaning |
|---|---|
Exit |
Exit the console |
Reboot |
Restart the system server service |
These submenu items are available via the “Operating” item:
Menu item |
Meaning |
|---|---|
Startup server system |
Start the system server |
Server system in Pause |
Stopping the system server |
Shut down server system |
Shut down the system server |
The following submenu items are available under the “Diagnostic” menu item.
Menu item |
Meaning |
|---|---|
TagServer console |
Calling up the TagServer Console |
Start System |
Must be run as an administrator. Starts the runtime |
Stop System |
Must be run as an administrator. Ends the runtime |
Kill System |
Must be run as an administrator. Cancels the runtime |
Within the menue item “Configuration”, there are the following submenu items availabel:
Menu item |
Meaning |
|---|---|
Console |
Settings for the SystemServer Console can be made under this point. The refresh rate of the SystemServer Console is entered here. |
Runtime Database |
Administration of the databases possible |
Databases can be deleted, restored from a backup. A backup can also be initiated (the selected database can be saved as a .bak file in a directory that can be selected) |
The following submenu items are available under the “Help” menu item.
Menu item |
Meaning |
|---|---|
Help |
Calling up the online help for the SystemServerConsole |
Info |
Calls the information window of the SystemServerConsole. Among other things, details about the license are displayed here. |
TagServer
TagServer-Console
Tag management in the TagServer can be monitored or controlled with the TagServer Console.

The following table shows the columns of the tag list:
Column |
Description |
|---|---|
Name |
Tag name possibly with field index |
ID |
Tag index from tag table |
NewID |
Unique ID for all variables |
Value |
Current variable value |
Access |
Access type, R = read (Read), W = write (Write) |
Quality |
Quality of the variable (0 or 1 = OK, see next table) |
HiOut |
Max. value range exceeded |
LoOut |
Min. value range exceeded |
IsLocal |
Configuration of the variable locally or globally |
The following table lists the error numbers from the “Quality” column of the tags:
Error number |
Description |
|---|---|
-12 |
Access to driver DLL or dependent DLL not possible, initialisation error |
-11 |
Data job canceled |
-10 |
last external error (sent by the communication partner) |
-8 |
Set float error, float suppression in the driver ini file |
-7 |
wrong float format |
-6 |
first external error (sent by the communication partner) |
-5 |
Parameter assignment error of a variable definition |
-4 |
Initialisation error of the driver |
-3 |
Memory error in the driver |
-2 |
Communication transmission error |
-1 |
Communication timeout error |
0 |
OK |
1 |
waits until the variable has been updated (status until the first update) |
The buttons and tabs are described in the following table
Button / tab |
Description |
|---|---|
Connect |
Connects the TagServer Console to the Tagserver |
Disconnect |
Separates the TagServer Console from the Tagserver |
New Session |
TagServer Console opens a new, separate session for communication with the TagServer |
Use existing Session |
TagServer Console uses an existing session to communicate with the TagServer |
Top |
Jumps to the beginning of the selected list |
Next |
Jumps further in the selected list |
Previous |
Jumps back in the selected list |
Botton |
Jumps to the end of the selected list |
Boolean Tags |
List of logical variables |
Numeric Tags |
List of numeric variables |
String Tags |
List of text variables |
In the menu Watchlist > Save Watchlist Tags a list of all the currently displayed tags will be saved as a CSV-File. The file can be used for diagnostic purposes.
Terminate existing connections: In the Connection-> Session’s menu there is a new sub-item for each session with the meaning “CloseSession”:

An existing connection to the TagServer can be hard terminated via this menu item. To be on the safe side, this must be confirmed again via a dialog:
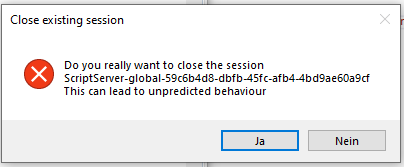
The connection of this session to the TagServer is then hard terminated and the TagServer clears up all data structures belonging to the connection, e.g., deletes all local variable values.
What the affected client does at this point depends on the client; most clients will try to re-establish the connection afterwards.
With the function “show only referenced variables” under the menu point “Configuration” all tags with the status “not registered” will be hidden.
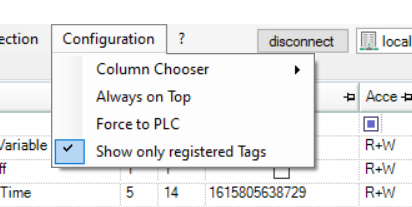
Therefore, the taglist will be clearer, since only variables used in the currently shown picture will be displayed.In addition to the SystemServer-Console and the TagServer-Console, there are other servers, some of which can be administered via their config files. These components are also elementary parts of the entire runtime system.
The following chapters explain the services in detail.
With the Dropdown menue on the right side, existing connections or watchlists can be selected.
In preparation for the conversion of the consoles to a uniform SystemServerState page, starting with version 6.9, there is still an entry”System”. This has no significance at the moment. At Selection, all tags are displayed as “not registered” in red, without, that this has an effect.
WebServer
The PROCON-WEB-WebServer serves as the central interface between the server components and the WebVisu. It ensures that the files generated are made available to an Internet browser.
The web server of the operating system (can also be installed by PROCON-WEB) transfers the web application to the client with the files required for the image build-up (* .js, * .htm, * .css).The PROCON-WEB-WebServer is implemented as a service.
He has the following tasks:
Receipt of requests from WebVisu and forwarding to the appropriate server
Receipt of the server response and forwarding to the WebVisu
Session handling of the clients
To perform these tasks, the web server communicates with all other servers.
PROCON-WEB_WebServer.exe.config The “PROCON-WEB_WebServer.exe.config” file is used to configure the web server service and can be found in the “PROCON-WEB Runtime “ directory. This is automatically adjusted during the installation via the setup. Changes are only to be made in individual cases!
Only the important entries are described here.
<serviceconfig>
Parameter |
Description |
Default |
|---|---|---|
ServiceName |
Name of the SystemServer service |
PROCON-WEB Web Server |
ServiceDebug |
false |
|
UseSystemServer |
The service is controlled via SystemServer |
true |
Dependencies |
Dependencies on other services |
|
DependentService name |
Service name (the specified service is entered as a dependency during the service installation) |
<log4net>
Parameter |
Description |
Default |
|---|---|---|
level |
og level for system server, default ring protocol over 10 files. |
Allowed levels in ascending order:
OFF
Fatal
Error
Warn
Info
Debug
Error
<appSettings>
Parameter |
Description |
Default |
|---|---|---|
WebSocketAddress |
Standard address and port of the WebSocket |
ws://0.0.0.0:16825/ |
WebSocketAddressSecure |
Standard address and port of the secure web socket |
wss://0.0.0.0:17825/ |
WebServer1Address |
Standard port of the web server for http |
|
WebServer2Address |
Alternative port of the web server for http |
|
<system.serviceModel>

In diesem Abschnitt wird die Kommunikation der Server untereinander konfiguriert.
Important
This section must not be changed!
SystemServer general informations
The system server is the central component in the PROCON-WEB client / server system. It coordinates all other servers and ensures that a project is started up and shut down properly. It also offers various diagnostic functions via the SystemServer console. The SystemServer console can be used to influence the system administratively. The SystemServer is implemented as a service.The SystemServer offers the following functions / components:
central client / server monitoring and control
entral configuration management for clients and servers
central query of logs (diagnosis)
central license management
central point for software updates
central version information
central, simplified terminal server management
PROCON-WEB_SystemServer.exe.config The “PROCON-WEB_SystemServer.exe.config” file is used to configure the system server service and can be found in the “PROCON-WEB Runtime “ directory. This is automatically adjusted during the installation via the setup.Only the important entries are described here:
<log4net>
Parameter |
Description |
Default |
|---|---|---|
level |
Log level for system server, default ring protocol over 10 files. Allowed levels in ascending order: OFF, Fatal, Error, Warn, Info, Debug |
Error |
<ServiceConfig>
Parameter |
Description |
Default |
|---|---|---|
ServiceName |
Name of the SystemServer service |
PROCON-WEB System Server |
ServiceDebug |
false |
|
Dependencies |
Dependencies on other services |
|
DependentService name |
Service name (the specified service is entered as a dependency during the service installation) |
<ReplicationConfiguration>
Parameter |
Description |
Default |
|---|---|---|
User |
SQL user for replication in the redundant client / server system |
|
Password |
Password of the SQL user for replication in the redundant client / server system |
|
Frequency_Master |
Frequency in seconds for replication of the GTIM database |
0 |
Frequency_Project |
Frequency in seconds for replication of the GTIP database |
0 |
Frequency_Runtime |
Frequency in seconds for replication of the GTIR database |
0 |
MergeTimeout |
Timeout for merging the databases in seconds |
0 |
SnapshotTimeout |
Timeout for creating snapschots of the databases in seconds |
0 |
RunTimeout |
Timeout for execution of the replication in seconds |
0 |
ConnectionTimeout |
Timeout for connection establishment of the replication in seconds |
0 |
Additionallist |
Additional databases for replication can be specified here with a freely selectable frequency in seconds |
!–<Additional Database=”MMM” Frequency=”55”/>–> |
<system.serviceModel>
In this section the communication between the servers is configured.
Important
This section must not be changed!
AlertServer
The AlertServer is used for the central connection to the database for the storage of alarms and the AuditTrail. Microsoft SQL ServerExpress 2012/2016 is installed by default as the database via the setup. A full-fledged Microsoft SQL Server can also be used for more complex applications. The AlertServer is implemented as a service.
He has the following tasks:
Central handling of all alarms in a client / server visualisation project
Processing of alarms with local and global triggering
Management of the alarm status of all client systems
Management of the alarm log of all client systems
Distribution of the alarm boxes to all client systems (display of the alarm boxes)
Central handling of the logbook entries (AuditTrail)
To fulfil these tasks, the AlertServer communicates with the TagServer and the WebServer.
PROCON-WEB_AlertServer.exe.config The configuration file „PROCON-WEB_AlertServer.exe.config“ is used to configure the AlerServer service and can be found in the directory „PROCON-WEB Runtime “. This is automatically adjusted during the installation via the setup.
Only the important entries are described here.
<log4net>
Parameter |
Description |
Default |
|---|---|---|
level |
Log level for system server, default ring protocol over 10 files. Allowed levels in ascending order: OFF, Fatal, Error, Warn, Info, Debug |
Error |
<ServiceConfig>
Parameter |
Description |
Default |
|---|---|---|
ServiceName |
Name of the SystemServer service |
PROCON-WEB Alert Server |
ServiceDebug |
false |
|
UseSystemServer |
The service is controlled via SystemServer |
true |
Dependencies |
Dependencies on other services |
|
DependentService name |
Service name (the specified service is entered as a dependency during the service installation) |
<system.serviceModel>

In diesem Abschnitt wird die Kommunikation der Server untereinander konfiguriert.
Important
This section must not be changed!
Important
The configuration of the alarm database and other parameters of the AlertServer is done using ServerConfig.xml
DataServer
The DataServer is used for the central connection to the database for the recording of data and administration of databases, recipes, and orders. Microsoft SQL ServerExpress 2012/2016 is installed by default as the database via the setup. A full-fledged Microsoft SQL Server can also be used for more complex applications. The DataServer is implemented as a service.
He has the following tasks:
Central data recording of the data logger
Management of databases, recipes and orders
Provision of an ODBC interface
To fulfil these tasks, the DataServer communicates with the TagServer and the WebServer.
PROCON-WEB_DataServer.exe.config The configuration file “PROCON-WEB_DataServer.exe.config” is used to configure the DataServer service and can be found in the directory “PROCON-WEB Runtime “. This is automatically adjusted during the installation via the setup.
<log4net>
Parameter |
Description |
Default |
|---|---|---|
level |
Log level for system server, default ring protocol over 10 files. Allowed levels in ascending order: OFF, Fatal, Error, Warn, Info, Debug |
Error |
<ServiceConfig>
Parameter |
Description |
Default |
|---|---|---|
ServiceName |
Name of the SystemServer service |
PROCON-WEB Data Server |
ServiceDebug |
false |
|
UseSystemServer |
The service is controlled via SystemServer |
true |
Dependencies |
Dependencies on other services |
|
DependentService name |
Service name (the specified service is entered as a dependency during the service installation) |
<system.serviceModel>
In this section the communication between the servers is configured.
Important
This section must not be changed!
Important
The configuration of the data storage database and other parameters of the DataServer is done through the ServerConfig.xml
SkriptServer
The script server is used for the central processing of tasks and scripts. The script server is implemented as a service.
Cyclical processing of tasks
Event-controlled processing of scripts
To fulfill these tasks, the ScriptServer communicates with the TagServer, the AlertServer, the DataServer and the WebServer.
PROCON-WEB_ScriptServer.exe.config The configuration file “PROCON-WEB_ScriptServer.exe.config” is used to configure the ScriptServer service and can be found in the directory “PROCON-WEB Runtime “. This is automatically adjusted during the installation via the setup.Only the important entries are described here:
<log4net>
Parameter |
Description |
Default |
|---|---|---|
level |
Log level for system server, default ring protocol over 10 files. Allowed levels in ascending order: OFF, Fatal, Error, Warn, Info, Debug |
Error |
<ServiceConfig>
Parameter |
Description |
Default |
|---|---|---|
ServiceName |
Name of the SystemServer service |
PROCON-WEB Script Server |
ServiceDebug |
false |
|
UseSystemServer |
The service is controlled via SystemServer |
true |
Dependencies |
Dependencies on other services |
|
DependentService name |
Service name (the specified service is entered as a dependency during the service installation) |
<system.serviceModel>

In diesem Abschnitt wird die Kommunikation der Server untereinander konfiguriert.
Important
This section must not be changed!
UserServer
The UserServer is used for the central connection to the database for user administration in PROCON-WEB. Microsoft SQL ServerExpress 2012/2016 is installed by default as the database via the setup. A full-fledged Microsoft SQL Server can also be used for more complex applications. The UserServer is implemented as a service.
He has the following tasks:
Verification of users, groups, and rights
Change, add, delete users
Change, add, delete groups
To fulfil these tasks, the UserServer communicates with the WebServer.
PROCON-WEB_UserServer.exe.config The “PROCON-WEB_UserServer.exe.config” file is used to configure the UserServer service and can be found in the “PROCON-WEB Runtime “ directory. This is automatically adjusted during the installation via the setup.
Only the important entries are described here.
<log4net>
Parameter |
Description |
Default |
|---|---|---|
level |
Log level for system server, default ring protocol over 10 files. Allowed levels in ascending order: OFF, Fatal, Error, Warn, Info, Debug |
Error |
<ServiceConfig>
Parameter |
Description |
Default |
|---|---|---|
ServiceName |
Name of the SystemServer service |
PROCON-WEB User Server |
ServiceDebug |
false |
|
UseSystemServer |
The service is controlled via SystemServer |
true |
<system.serviceModel>
In this section the communication between the servers is configured.
Important
This section must not be changed!
HelpServer
The HelpServer is used for the central connection to the database for the administration of the help topics. Microsoft SQL ServerExpress 2012/2016 is installed by default as the database via the setup. A full-fledged Microsoft SQL Server can also be used for more complex applications. The HelpServer is implemented as a service.
He has the following tasks:
Management of help topics
Change, add, delete help entries
To perform these tasks, the HelpServer communicates with the WebServer.
PROCON-WEB_HelpServer.exe.config The “PROCON-WEB_HelpServer.exe.config” file is used to configure the HelpServer service and can be found in the “PROCON-WEBRuntime” directory. This is automatically adjusted during the installation via the setup.
Only the important entries are described here.
<log4net>
Parameter |
Description |
Default |
|---|---|---|
level |
Log level for system server, default ring protocol over 10 files. Allowed levels in ascending order: OFF, Fatal, Error, Warn, Info, Debug |
Error |
<ServiceConfig>
Parameter |
Description |
Default |
|---|---|---|
ServiceName |
Name of the SystemServer service |
PROCON-WEB Help Server |
ServiceDebug |
false |
|
UseSystemServer |
The service is controlled via SystemServer |
true |
<system.serviceModel>

In diesem Abschnitt wird die Kommunikation der Server untereinander konfiguriert.
Important
This section must not be changed!
Important
The configuration of the data storage database and other parameters of the DataServer is done through the ServerConfig.xml
ReportServer
The ReportServer is used to display preconfigured CrystalReports reports in the web interface as HTML pages. The ReportServer can also generate a PDF from the reports.The ReportServer is implemented as a service.
He has the following tasks:
Management of reports and display as HTML page
Export of reports as PDF
PROCON-WEB_ReportServer.exe.config The “PROCON-WEB_ReportServer.exe.config” file is used to configure the ReportServer service and can be found in the “PROCON-WEBRuntime” directory. This is automatically adjusted during the installation via the setup.
Only the important entries are described here.
<log4net>
Parameter |
Description |
Default |
|---|---|---|
level |
Log level for system server, default ring protocol over 10 files. Allowed levels in ascending order: OFF, Fatal, Error, Warn, Info, Debug |
Error |
<ServiceConfig>
Parameter |
Description |
Default |
|---|---|---|
ServiceName |
Name of the SystemServer service |
PROCON-WEB Report Server |
ServiceDebug |
false |
|
UseSystemServer |
The service is controlled via SystemServer |
true |
<system.serviceModel>
In this section the communication between the servers is configured.
Important
This section must not be changed!
OPC UA-Server
PROCON-WEB can also act as an OPC UA server for other components. The OPC UA server makes permanently defined data of the PROCON-WEB system available to the outside.The OPC UA server is implemented as a service.
He has the following tasks:
To make data of the PROCON WEB system available as OPC UA
PROCON-WEB_OpcServer.exe.config The “PROCON-WEB_OpcServer.exe.config” file is used to configure the OPC UA server service and can be found in the “PROCON-WEBRuntime” directory. This is automatically adjusted during the installation via the setup.
Only the important entries are described here.
<log4net>
Parameter |
Description |
Default |
|---|---|---|
level |
Log level for system server, default ring protocol over 10 files. Allowed levels in ascending order: OFF, Fatal, Error, Warn, Info, Debug |
Error |
<ServiceConfig>
Parameter |
Description |
Default |
|---|---|---|
ServiceName |
Name of the SystemServer service |
PROCON-WEB OPC UA Server |
ServiceDebug |
false |
|
UseSystemServer |
The service is controlled via SystemServer |
true |
<system.serviceModel>
In this section the communication between the servers is configured.
Important
This section must not be changed!
Important
An extra license is required for the OPC UA server
Important
The OPC UA server has the following URL: opc.tcp://localhost:16929/PROCON-WEB/OpcUaServer
Configuration OPC UA Server during the runtime
The runtime configuration of the OPC UA server can currently only be carried out manually using an XML configuration file (PROCON-WEB_OPCServer.Config.xml)Most of the settings should be left at their default settings and are relevant for the underlying OPC UA Toolkit from Softing, on which the PROCON-WEB OPC UA server is based.Currently, the configuration file only needs to be adapted for access control to the OPC UA server.
Authorisation of the client
Application certificates are used to authenticate clients that can access the OPC UA server.The use of certificates is in the chapter “Encryption for communication with the client” further down here explained. The OPC UA server generates its own certificate when it is started for the first time, which it uses to communicate with clients. It is saved in the folder:C:PROCON-WEBRuntimeOpcUaServerCertificateStoreownBy default, the OPC UA server is set so that it trusts all clients, regardless of which certificate the client is using. If only certain clients are to be used, the following entry in the config file (PROCON-WEB_OPCServer.Config.xml) must be adapted:<AutoAcceptUntrustedCertificates> false </AutoAcceptUntrustedCertificates>Then the OPC server only allows connections from clients whose certificate is filed the directory:C:PROCON-WEBRuntimeOpcUaServerCertificateStore rustedcerts.If a client tries to log on without an accepted certificate, this is rejected by the OPC UA server, and the certificate is stored in the folderC:PROCON-WEBRuntimeOpcUaServerCertificateStore ejectedcertsfor verification. From there it can be moved by the system administrator to the trusted folder to grant the client appropriate access.
Secure data transfer
On the one hand, OPC UA offers secure data transfer between server and client. Different communication transmissions can be selected in the configuration file:The different transmission methods are described in the official OPC UA documentation:<https://profiles.opcfoundation.org/profilefolder/474>By default, all transmission methods are activated, the client can select a communication that suits him.In the configuration file are as well three entries mentioned, which are in the meantime declared as deprecated by the OPC foundation. They are already commented out and MUST NOT ACTIVATED anymore. They are just for reference there.
<SecurityPolicies>
   <ServerSecurityPolicy>
      <SecurityMode>Sign_2</SecurityMode>
      <SecurityPolicyUri>http://opcfoundation.org/UA/SecurityPolicy#Basic256Sha256</SecurityPolicyUri>
   </ServerSecurityPolicy>
   <ServerSecurityPolicy>
      <SecurityMode>None_1</SecurityMode>
      <SecurityPolicyUri>http://opcfoundation.org/UA/SecurityPolicy#None</SecurityPolicyUri>
   </ServerSecurityPolicy>
   <ServerSecurityPolicy>
      <SecurityMode>SignAndEncrypt_3</SecurityMode>
      <SecurityPolicyUri>http://opcfoundation.org/UA/SecurityPolicy#Basic256Sha256</SecurityPolicyUri>
   </ServerSecurityPolicy>
   <ServerSecurityPolicy>
      <SecurityMode>Sign_2</SecurityMode>
     <SecurityPolicyUri>http://opcfoundation.org/UA/SecurityPolicy#Aes128_Sha256_RsaOaep</SecurityPolicyUri>
   </ServerSecurityPolicy>
   <ServerSecurityPolicy>
      <SecurityMode>SignAndEncrypt_3</SecurityMode>
      <SecurityPolicyUri>http://opcfoundation.org/UA/SecurityPolicy#Aes128_Sha256_RsaOaep</SecurityPolicyUri>
   </ServerSecurityPolicy>
   <ServerSecurityPolicy>
      <SecurityMode>Sign_2</SecurityMode>
      <SecurityPolicyUri>http://opcfoundation.org/UA/SecurityPolicy#Aes256_Sha256_RsaPss</SecurityPolicyUri>
   </ServerSecurityPolicy>
   <ServerSecurityPolicy>
      <SecurityMode>SignAndEncrypt_3</SecurityMode>
      <SecurityPolicyUri>http://opcfoundation.org/UA/SecurityPolicy#Aes256_Sha256_RsaPss</SecurityPolicyUri>
   </ServerSecurityPolicy>
<!-- deprecated security policies for reference only>
  <ServerSecurityPolicy>
   <SecurityMode>Sign_2</SecurityMode>
   <SecurityPolicyUri>http://opcfoundation.org/UA/SecurityPolicy#Basic256</SecurityPolicyUri>
  </ServerSecurityPolicy>
  <ServerSecurityPolicy>
   <SecurityMode>SignAndEncrypt_3</SecurityMode>
   <SecurityPolicyUri>http://opcfoundation.org/UA/SecurityPolicy#Basic256</SecurityPolicyUri>
  </ServerSecurityPolicy>
  <ServerSecurityPolicy>
   <SecurityMode>Sign_2</SecurityMode>
   <SecurityPolicyUri>http://opcfoundation.org/UA/SecurityPolicy#Basic128Rsa15</SecurityPolicyUri>
  </ServerSecurityPolicy>
  <ServerSecurityPolicy>
   <SecurityMode>SignAndEncrypt_3</SecurityMode>
   <SecurityPolicyUri>http://opcfoundation.org/UA/SecurityPolicy#Basic128Rsa15</SecurityPolicyUri>
  </ServerSecurityPolicy>
-->
</SecurityPolicies>
To deactivate a transmission method, the corresponding `<ServerSecurityPolicy>` section must be completely commented out by adding the section to the character strings
<!-- and --> is embedded.
Example, where the unsecured transmission was deactivated
Authorisation of the client
There are basically three options for authorizing clients that can access the OPC UA server:
Anonym: Jeder Client im Netzwerk kann auf den OPC UA Server zugreifen, der Zugriffsschutz muss extern erfolgen
Username Password: Each client must authenticate itself with a username and password.EVERYONE created in the project who is not deactivated currently has access to the OPC UA server.
Certificate: The client must have a trustworthy user certificate that is made known to the OPC UA server.For this, the certificate must be installed as a trusted user in the certificate store of the computer!
By default, all three authorization methods are activated; the client can select an authorisation that suits him:
<!-- The SDK expects the server to support the same set of user tokens for every endpoint. -->
<UserTokenPolicies>
  <!-- Allows anonymous users -->
  <ua:UserTokenPolicy>
     <ua:TokenType>Anonymous_0</ua:TokenType>
     <ua:SecurityPolicyUri>http://opcfoundation.org/UA/SecurityPolicy#None</ua:SecurityPolicyUri>
  </ua:UserTokenPolicy>

  <!-- Allows username/password -->
  <ua:UserTokenPolicy>
     <ua:TokenType>UserName_1</ua:TokenType>
     <!-- passwords must be encrypted - this specifies what algorithm to use -->
     <ua:SecurityPolicyUri>http://opcfoundation.org/UA/SecurityPolicy#Basic256Sha256</ua:SecurityPolicyUri>
  </ua:UserTokenPolicy>

  <!-- Allows user certificates -->
  <ua:UserTokenPolicy>
     <ua:TokenType>Certificate_2</ua:TokenType>
     <!-- certificate possession must be proven with a digital signature - this specifies what algorithm to use -->
     <ua:SecurityPolicyUri>http://opcfoundation.org/UA/SecurityPolicy#Basic256Sha256</ua:SecurityPolicyUri>
  </ua:UserTokenPolicy>
</UserTokenPolicies>
To deactivate an authentication method, the corresponding complete section <d3p1:UserTokenPolicy> must be commented out, in which the section in the character strings
<!-- and --> is embedded.
Example where the anonymous authentication method was deactivated:
<!-- The SDK expects the server to support the same set of user tokens for every endpoint. -->
<UserTokenPolicies>
<!--
  <!-- Allows anonymous users -->
   <ua:UserTokenPolicy>
      <ua:TokenType>Anonymous_0</ua:TokenType>
      <ua:SecurityPolicyUri>http://opcfoundation.org/UA/SecurityPolicy#None</ua:SecurityPolicyUri>
   </ua:UserTokenPolicy>
-->
   <!-- Allows username/password -->
   <ua:UserTokenPolicy>
      <ua:TokenType>UserName_1</ua:TokenType>
      <!-- passwords must be encrypted - this specifies what algorithm to use -->
      <ua:SecurityPolicyUri>http://opcfoundation.org/UA/SecurityPolicy#Basic256Sha256</ua:SecurityPolicyUri>
   </ua:UserTokenPolicy>

   <!-- Allows user certificates -->
   <ua:UserTokenPolicy>
      <ua:TokenType>Certificate_2</ua:TokenType>
      <!-- certificate possession must be proven with a digital signature - this specifies what algorithm to use -->
      <ua:SecurityPolicyUri>http://opcfoundation.org/UA/SecurityPolicy#Basic256Sha256</ua:SecurityPolicyUri>
   </ua:UserTokenPolicy>
</UserTokenPolicies>
Install a Trusted User Certificate
To use a certificate as user authentication, this must be installed as a trusted user certificate in the certificate store of the computer on which the OPC UA server is running.
With a double click on the certificate, you get the certificate information, and you can use the button “Install Certificate” to install the certificate via a wizard:


WCF port numbers of the servers
The servers belonging to PROCON-WEB (SCADA variant) use the following ports as standard for communication within the Windows application:
SystemServer general informations |
Tag- Server |
Alert- Server |
Data- Server |
Skript- Server |
Web- Server |
Help- Server |
User- Server |
Report- Server |
OPCUA- Server |
|
|---|---|---|---|---|---|---|---|---|---|---|
Control- Session |
16620 |
16621 |
16622 |
16623 |
16624 |
16625 |
16626 |
16627 |
16628 |
16629 |
Data- Session |
16720 |
16721 |
16722 |
16723 |
16724 |
16725 |
16726 |
16727 |
16728 |
16729 |
Admin Session |
16820 |
|||||||||
Data- Session2 |
16925 |
|||||||||
Data- Session Secure |
17725 |
|||||||||
Web Socket |
16825 |
|||||||||
Web Socket Secure |
17825 |
|||||||||
OPCUA HTTP |
16829 |
|||||||||
OPCUA TCP |
16929 |
|||||||||
UPD Scan Request |
16800 |
|||||||||
UPD Scan Request |
16805 |
|||||||||
Project Transfer |
16810 |
Runtime database
In runtime, the global runtime databases are no longer managed in the SQL server, but project-specific runtime databases. These can be found in the “SQLDB” folder.The project-specific database name is: PWR_PROJECTNAME
Note
The name for the project “Messedemo_2023” is therefore “PWR_Messedemo_2023”.
The database is initially recreated with the project when runtime is started for the first time.To avoid data loss, the runtime does not delete any databases!Existing databases can be accessed via the system server console in the menu Configuration -> Runtime Databases listed and deleted.:::{important}To prevent projects with the same project name from accidentally accessing the wrong database, when a project is started, the Runtime uses the project ID (Guid) entered in the database to check whether it is the same project.:::If the project ID of runtime and database do not match, the runtime does not start, and the system server reports the error:

In this case, the database must either be deleted via the SystemServer console or manual intervention via the Microsoft SQL Server Management Studio is necessary.
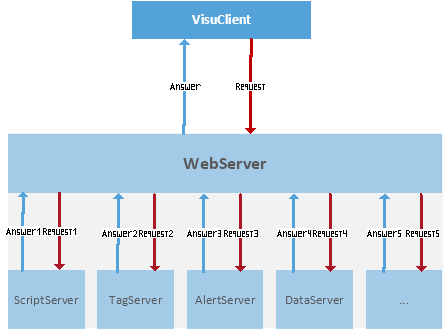
VisuClient
The designer can create an application for different end devices. These end devices are divided into different device classes such as tablets or smartphones. Three device classes are predefined by default. On the one hand, a default class is supplied, on the other hand, classes for tablets and smartphones. Further classes can be updated individually according to the desired device.
HTML pages are generated for each device that was taken into account in the configuration. Depending on the device, these pages are then called up appropriately and displayed in the browser. By assigning individual keywords, further device types can be recognised and given their own interfaces.

To call up a project in runtime, simply enter the name or IP of the server in the browser as the URL:
http://ip-des-servers/
Note
Example: <http://localhost/>
Several clients on one computer
Depending on the application, it may be necessary to start several clients on one computer.So that the Web server can differentiate between these clients, they must be started with an additional option in the URL. This option consists of “?client =” and the number of the client.
Note
Example: <http://192.168.10.20?client=1>
Encryption for communication with the client
This chapter describes the encryption of PROCON-WEB via https. The following sections describe how the system must be adapted to encrypt the data traffic and the transmission of the website.
Create certificate
A certificate is required to encrypt the connection between the server and WebRuntime. To avoid warning messages in the browser, the certificate must be trustworthy.
There are the following options:
Public certificate (subject to a fee), e.g., VeriSign etc.
-> Trusted on all hosts on the internet
Domain certificate (free)
-> Trusted on all hosts in the domain
Local certificate (free)
-> Trusted only on the same host
A domain certificate should be sufficient for most PROCON-WEB applications. The administrator of the domain must be contacted for this. A certification server is required (can be a Windows server) that answers certificate requests to declare them to be trustworthy for a domain.
The following describes the creation of a locally trustworthy certificate via the IIS:
Open IIS and double click on “Server Certificates“

Action “Create Self-Signed Certificate …“
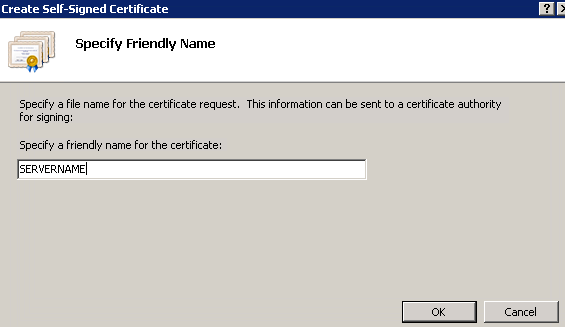
The certificate name should be the same as the computer name!
Powershell Script
Another way to create a local, self-signed certificate is to use the following Powershell script:
#STEP 1
#Create a root CA certificate used to sign the localhost certificate
#will be created in Localmachine\My and need to be placed in LocalMachine\CA
$rootcert = New-SelfSignedCertificate -CertStoreLocation Cert:\LocalMachine\My -DnsName "CACERTNAME" -TextExtension @("2.5.29.19={text}CA=true") -KeyUsage CertSign,CrlSign,DigitalSignature -NotAfter (Get-Date).AddYears(25)
[System.Security.SecureString]$rootcertPassword = ConvertTo-SecureString -String "PASSWORD" -Force -AsPlainText
[String]$rootCertPath = Join-Path -Path 'cert:\LocalMachine\My\' -ChildPath "$($rootcert.Thumbprint)"
Export-PfxCertificate -Cert $rootCertPath -FilePath 'RootCA.pfx' -Password $rootcertPassword
Export-Certificate -Cert $rootCertPath -FilePath 'RootCA.crt'

#STEP 2
# Certificate to be registered with PROCON-WEB Webserver
$testCert = New-SelfSignedCertificate -CertStoreLocation Cert:\LocalMachine\My -DnsName "LOCALHOST" -KeyExportPolicy Exportable -KeyLength 2048 -KeyUsage DigitalSignature,KeyEncipherment -Signer $rootCert  -NotAfter (Get-Date).AddYears(25)
[String]$testCertPath = Join-Path -Path 'cert:\LocalMachine\My\' -ChildPath "$($testCert.Thumbprint)"
Export-PfxCertificate -Cert $testCertPath -FilePath testcert.pfx -Password $rootcertPassword
Export-Certificate -Cert $testCertPath -FilePath testcert.crt
The script first creates a root CA (Certificate Authority) certificate on the basis of which the actual certificate is then created (# STEP 1), a valid certificate name (replacing CACERTNAME in the script) and a password (replacing PASSWORD in the script) should be chosen.
This certificate is stored in the certificate store (certlm) under “My Certificates” and must also be stored in “Trusted Root Certificates”

This certificate is stored in the certificate store (certlm) under “My Certificates” and must also be copied to “Trusted Root Certificates”:
Subsequently, the actual certificate is then created (#STEP 2). The DNS name (replacing LOCALHOST in the script) should be set to the host name. This certificate is also created under “My Certificates” in the certificate store (certlm).In order for the browser to be able to trust the certificate later, it must also be copied under Trusted Root Certification Authorities. If access is to be made from other computers, this certificate must also be installed on the respective computer in the certificate store so that the browser trusts this certificate
Link the certificate with PROCON-WEB
As soon as a certificate is available, it must be linked to PROCON-WEB. There are two steps to be taken here:
Link the certificate to the website
Link the certificate to the website

Connect the binding for https with the certificate

Important
ATTENTION: A certificate can only be linked to ONE website!
Link the certificate to the PROCON-WEB web server
Open the certificate you want from the list of certificates and copy the “thumbprint”

Open the command prompt as administrator and execute the following netsh command with the appropriate “thumbprint” (certhash)
http delete sslcert ipport=0.0.0.0:1700`
http add sslcert ipport=0.0.0.0:17725 certhash=3e49906c01a774c888231e5092077d3d855a6861 appid={4d76ee9e-7ef2-4530-b0d6-b725878671d8}
The first command deletes a certificate that may have already been assigned and the second command links the certificate to the PROCON-WEB web server application (AppID: {4d76ee9e-7ef2-4530-b0d6-b725878671d8})
By specifying 0.0.0.0 for ipport, every network card used on the computer is bound, in this case to port 17700, optionally the commands can also be executed for the https standard port 443 if this port of PROCON-WEB is also to be used.
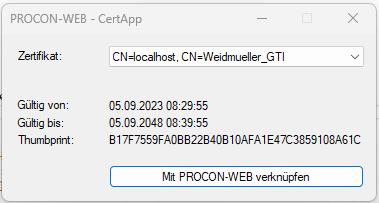
Link the certificate with the GTI.CertApp
Instead of the command line, the GTI. CertApp.exe. The tool is started as an administrator and executes the command lines for the user, all you have to do is select the appropriate certificate from the combo box and press the button “Link to PROCON-WEB”:
Call from the browser
Depending on the trustworthiness of the certificate, the website can now be accessed via https without a warning message. To avoid a warning message in the browser, the domain of the URL must be correct in addition to a trustworthy certificate.


Important
If a website is accessed with a certificate outside the trust area (e.g. local certificate from another computer in the domain), a warning message appears.
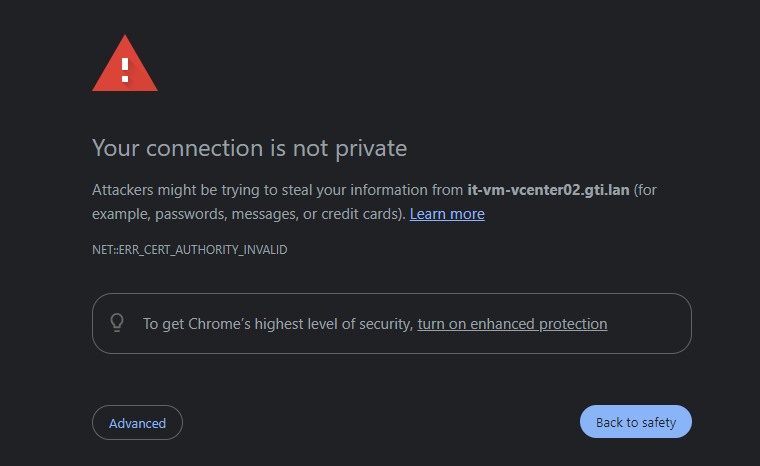
After confirmation, communication with the IIS is allowed, but communication with the PROCON-WEB web server is not. Workaround: Enter the relevant URL directly into the address line of the browser.

Then navigate back again and use PROCON-WEB.